Key Takeaways
- Basic refrigerator repairs can be done at home with a bit of knowledge and patience, involving components like door gaskets, thermostats and defrost timers.
- Before performing any work on a refrigerator or freezer, it’s crucial to unplug the appliance and, if applicable, safely discharge the capacitor to avoid electrical shock.
- While many refrigerator problems can be addressed by a DIYer, issues involving the coolant system, motor or compressor are best left to professional service persons.
A refrigerator is one of the few appliances in your home that runs continuously, day or night, keeping your food cold. If you consider how hard a refrigerator has to work, it is actually quite amazing that they break down so infrequently. On the rare occasion your refrigerator does stop working, you may face a high repair bill and the expense of replacing all your lost food. Have no fear! This article is here to tell you everything you need to know about repairing your refrigerator and freezer yourself. You might be surprised to learn that repairs are actually quite easy, requiring only a little knowledge about the appliance and a little patience. Let's get started with some basic information.
Refrigerators and freezers consist of two basic components: a condenser coil and an evaporator coil. A liquid coolant is circulated through these coils by a compressor and a motor. The refrigerant liquid is cooled in the condenser; it then flows to the evaporator. At the evaporator, the air in the unit is cooled by contact with the liquid-filled coil. The condenser of a refrigerator or freezer is the coil on the outside of the unit; the evaporator is the coil on the inside. The coolant is circulated through the system by a compressor.
Advertisement
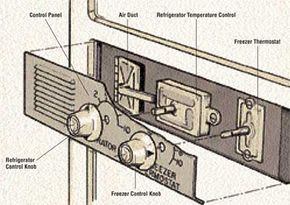
Most refrigerators and freezers are frost-free. In this type of unit, a heater is automatically turned on by a timer in order to melt the frost inside the unit. Frost is melted by the heater at several different spots in the unit, starting with the coldest and most frosted areas. When the frost is completely melted, the thermostat automatically switches to a cooling cycle in order to maintain the standard freezing temperature. Because this process is automatic, frost does not build up inside the box.
The unit's compressor system, which forces the coolant through the coil system, is driven by a capacitor-type motor. Other basic parts of the cooling/defrosting system include switches, thermostats, heaters, condensers, and fans. A do-it-yourselfer can test and replace many of these refrigerator components. However, there are exceptions, as explained later, that are best left to a professional repair person.
Caution: Before doing any work on a refrigerator or freezer, make sure it's unplugged. After unplugging the unit, check to see if the motor/compressor has a capacitor; this component is located in a housing on the top of the motor. Capacitors store electricity, even when the power to the unit is turned off. Before you do any work on a capacitor-type refrigerator or freezer, you must discharge the capacitor, or you could receive a severe shock.
Advertisement