How to Repair a Coffee Maker
There's nothing more invigorating in the morning than the smell of fresh coffee -- nor anything more frustrating than the sight of a coffee maker that isn't functioning as directed.
Fortunately, many repairs to coffee makers are simple to perform and require only basic tools. So, before you toss that coffee maker or defect to a coffee shop, consider how coffee makers work and what to do when they don't.
Advertisement
How Coffee Makers Work
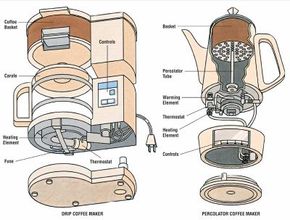
There are two types of coffee makers in common use: those that drip hot water once through the coffee grounds, and those that percolate, or recycle, the water through the grounds many times.
Most drip coffee makers are activated by switches and timers in the control panel, heating water and pumping it up to drop through the coffee basket. The resulting hot coffee falls into a carafe. An element under the carafe keeps the coffee warm.
Percolator coffee makers heat a small amount of water in the base of the unit, forming steam that pushes the hot water up a tube in the center of the percolator. At the top, water falls into the coffee basket and soaks up all that great coffee flavor from the grounds. The resulting hot coffee then drips through holes in the basket base and into the main compartment to be recycled. A thermostat determines when the coffee has brewed sufficiently, then turns the percolating system off. A heating element continues to maintain the coffee at the selected temperature.
How to Repair a Coffee Maker
Common repairs to coffee makers include servicing the on/off switch, thermostat, heating element, and warming element.
Servicing an On/Off Switch: A coffee maker's switch is a simple device that controls current to the heating unit and pump. Fortunately, this key controller is easy to test and to replace. Here's how:
Step 1: Make sure the coffee maker is unplugged.
Step 2: Remove the base or shell to access the back of the switch.
Step 3: Place test probes across the terminals and activate the switch. The circuit should be closed and show continuity as indicated by the switch positions.
The same test of continuity can be used to test other controllers, such as timers. All operate as switches, conducting electricity in some settings and not in others.
Servicing a Drip Coffee Maker's Thermostat: A thermostat in a drip coffee maker controls electricity to operate the heating element. It can cause problems if it doesn't work correctly. To test the thermostat in a drip coffee maker:
Step 1: Unplug the unit, empty excess water from the reservoir, turn the unit over, and remove the base. (Special head screwdrivers -- available at larger hardware stores -- may be required.)
Step 2: Use a continuity tester or multitester to check the thermostat, placing a probe at each end.
Step 3: If defective, remove and replace the thermostat with one of the same rating.
Step 4: Also check the continuity of the fuse and replace it if the circuit is open.
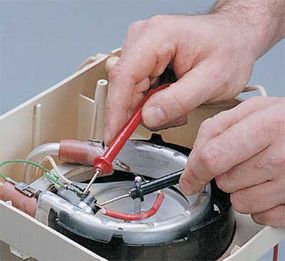
Servicing a Percolator Coffee Maker's Thermostat: The thermostat in a percolator coffee maker serves the same function, but looks different from one in a drip system. To test a percolator coffee maker's thermostat:
Step 1: Unplug the coffee maker, make sure the coffee and filter are removed before turning it over, then remove the base to expose the heating element and thermostat.
Step 2: Test the thermostat's continuity.
Step 3: If the thermostat is an open circuit, replace it. If replacing the thermostat requires unriveting or desoldering it, consider taking it to an appliance-repair shop or replacing the entire coffee maker.
Servicing Heating Elements: A coffee maker's heating element is a critical component. No one wants cold coffee. The heating element in either a drip or percolator coffee maker is accessed through the base of the appliance. To test and replace a heating element:
Step 1: Make sure all liquids and grounds are emptied from the appliance before turning it over to remove the base.
Step 2: Once accessed, the heating element can be tested using a continuity tester or a multitester as you would any conductor. Disconnect the unit from the circuit, then place a probe at each terminal and verify that the element can
conduct electricity.
Step 3: If no electricity is being conducted, replace the
heating element unit or assembly. With masking tape, mark the location of all wires and components you loosen so you will be able to reconnect them with ease.
Servicing Warming Elements: Once the coffee is brewed, the warming element in the base of the coffee maker keeps it warm. The warming element on some coffee makers remains on all day long, so it may be the first component to fail. In addition, water or brewed coffee may spill and leak into the warming element, shorting it out. Here's how to test and replace a warming element:
Step 1: Remove the coffee maker's base, identify the warming element, and disconnect it from the terminals.
Step 2: Check for continuity using a continuity tester or multitester.
Step 3: Replace the warming element, if necessary.
Let's mix it up a little by learning how to repair another small home appliance -- food mixers -- on the next page.