How to Repair a Food Mixer
Food mixers can be found in nearly every kitchen. They blend ingredients to make cookies, cakes, muffins, breads, desserts, and other foods. Because of their versatility, they have become a favorite gift item for people setting up a new household.
How Food Mixers Work
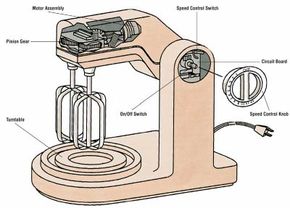
Food mixers are motorized small appliances. That is, rather than heating something, they move something. In this case, they move or mix food ingredients. Obviously, the motor is a primary component of the food mixer. So are the gears. Gears translate the motor's rotation to the opposing rotation of the beaters. A speed controller varies the electrical current delivered to the motor, thus allowing the speed of the beaters to be controlled.
Advertisement
There are two types of food mixers: portable (or hand) mixers and stationary (or stand) mixers. Portable mixers are lightweight, with small motors for easier mixing and blending jobs. Stand mixers use larger motors and components to manage bigger jobs, such as kneading dough or mixing large batches of ingredients.
How to Repair a Food Mixer
Easy repairs to food mixers include servicing a switch, repairing speed controls, and servicing gears.
Servicing a Switch: Switches are simple components that can easily stop the operation of a small appliance. If your mixer doesn't operate and you've checked the plug and cord, test the switch next.
To test and replace a switch:
Step 1: Carefully remove the housing around the switch to expose the back side of the switch.
Step 2: Check the terminals on the switch to ensure that the wires from the appliance are fully attached to the switch.
Step 3: Mark the terminal wires for position and disconnect them.
Step 4: Use a continuity tester or multitester to determine if the switch is faulty. If it is, replace it and reconnect the terminal wires.
Servicing Speed Controls: Food mixer speed is controlled by varying the current to the motor. Smaller hand mixers use a speed switch that includes a number of electrical contacts, each increasing current to the motor. Larger units use a variable resistor to control current. Continuity testers or multitesters are useful for checking the operation of either type of speed control. In some cases, contacts can be cleaned to improve function. However, in many cases, problems caused by speed controls can only be solved by replacing the controller.
Servicing the Gears: Food mixers work so well because they rotate the beaters in opposing directions to blend the ingredients. This opposing rotation is produced by the gears. In most food mixers, a worm gear attached to the motor shaft turns two or more pinion gears. The pinion gears, in turn, rotate the beaters. As gears are a physical component rather than an electrical one, servicing them is different. To inspect and lubricate gears:
Step 1: Make sure the appliance is unplugged.
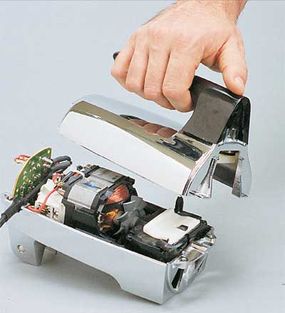
Step 2: Remove the upper housing to expose the gears. In most cases, gears that are causing problems can be checked for damage and then lubricated.
Step 3: Inspect and lubricate the worm gear as well as the pinion gears, making sure that excess lubricant does not touch the motor or any electrical components.

Step 4: Remove any loose shavings or pieces in the housing before reassembling.
Replacing a Fuse: If your food mixer's motor doesn't operate, the motor's fuse may be blown. To test and replace a fuse:
Step 1: Remove the upper housing to gain access to the motor.
Step 2: Find the fuse and disconnect it from the motor.
Step 3: Place a continuity tester or multitester probe at each end to check for continuity. If there is none, the fuse is blown and must be replaced with one of the same amperage rating.
Step 4: Because the fuse's purpose is to save the motor from electrical damage, check the speed controller and other electrical components in the appliance to determine the cause of the blown fuse. Otherwise, the new fuse will blow as soon as the motor is turned on.
Replacing the Motor: If a small appliance is properly designed, the motor should be one of the last components to fail. It is also one of the last components to check. Unless you have the proper tools, you should replace the motor rather than attempt to repair it. Or you can take the motor to a professional service person for repair. To test and replace a motor:
Step 1: Test the motor for continuity as you would any other electrical component.
Step 2: If it fails the test, mark and remove wires attached to it and disconnect the motor from the housing.
Step 3: Make sure the new motor is an exact replacement in size and rating to ensure that it fits the housing and the task.
A blender is another motorized small appliance. See the next section for what to do when your blender stops blending.