How to Repair a Blender
A food blender is a popular and useful kitchen appliance. Foods and liquids placed in it are blended or chopped based on the speed set by the operator. Today's food blender can chop ice, make peanut butter, grate cheese, and perform many other useful functions.
How Food Blenders Work
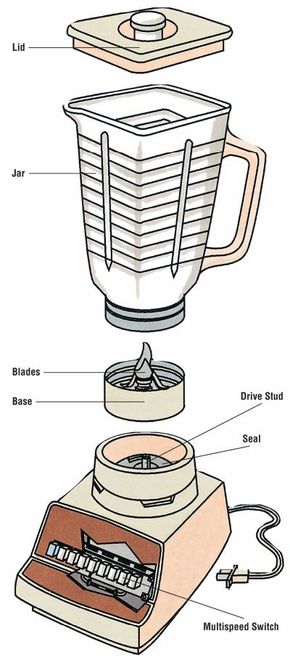
The kitchen food blender is a motorized small appliance. A blade inside a jar is connected to a motor shaft. By varying current to the motor, the blade's speed is controlled.
Advertisement
Preventive maintenance can reduce the repairs needed to keep a food blender running for many years. The two most important steps an operator can take are not to overload the blender and to keep the seals tight.
The multispeed switch in the blender sends current to the motor based on which control buttons are selected or how far the rheostat is turned. More current means a higher motor speed. Placing hard foods in the blender jar and trying to chop them with a low motor speed can cause the motor to burn out.
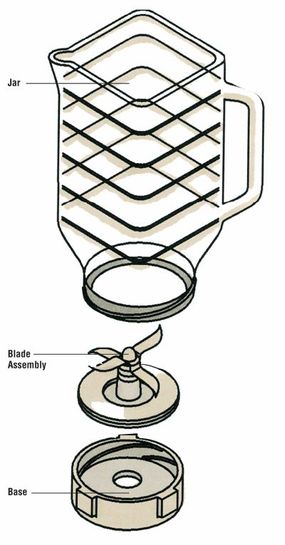
Because the jar holds liquids, yet must be disassembled for cleaning, it has seals to keep liquids from escaping. In addition, the blender housing has a seal around the coupling to make sure liquids don't leak into the vulnerable motor. Keeping these seals tight and ensuring that liquids don't overflow the jar can help keep a blender operating smoothly.
How to Repair a Food Blender
Food blender repairs include servicing a multispeed switch, replacing a fuse, servicing a motor, tightening a drive stud, and servicing a blade assembly.
Servicing the Multispeed Switch: It's easy to see why the multispeed switch is a critical component to the operation of your food blender. Because of its high use and complexity, it is a frequent culprit when things go wrong. To service the multispeed switch:
Step 1: Remove the blender base.
Step 2: The multispeed switch will be attached to the base with clips or screws accessed from underneath the base's faceplate or from inside the base. Visually inspect the switch before removing it; in many cases, the problem is a loose terminal. Otherwise, a blackened terminal or wire may identify where the problem has occurred.
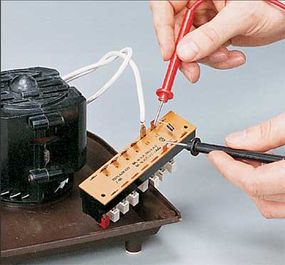
Step 3: Check the multispeed switch with a continuity tester or multitester.

Step 4: Because of its exposed location on the front of the blender, the switch is susceptible to damage from liquids. Use a can of compressed air or an electrical contact cleaner to clean the switch. If necessary, replace it.
Replacing the Fuse: Fortunately, most blenders include an in-line fuse that protects the motor from overload. If excessive current is sent to the motor, the fuse will blow. To determine if the fuse is working:
Step 1: Remove the blender base and locate the fuse in the wire from the multispeed switch to the motor.
Step 2: Disconnect the wire and use a continuity tester or multitester to check the fuse. If the circuit is open, the fuse is blown.
Step 3: Replace the faulty in-line fuse with one of identical rating.
Servicing the Motor: The motor will typically withstand many years of use (though not much abuse). Unfortunately, if the motor needs to be replaced, it may be less expensive to buy a new blender.
Motor operation is easy to test. Because there is a circuit running from the appliance cord, through the multispeed controls, to the motor, and back to the cord, an ohmmeter (part of your multitester) can test the circuit. To test a blender's motor:
Step 1: Place a probe on each cord prong.
Step 2: Select a speed-control button or turn the speed controller slightly, then read the resistance on the meter.
Step 3: Next, rotate the drive stud clockwise one turn. If the resistance reading (in ohms) changes, the motor needs service. Take it to an appliance-repair service or replace the appliance, depending on cost.
Tightening the Drive Stud: If the motor operates well, but the blade in the blender jar doesn't turn as it should, the problem may be the drive stud. The most frequent cause is a loose drive stud. To tighten the drive stud:
Step 1: Remove the base and turn the blender over. The other end of the drive shaft will protrude from the bottom side of the motor.
Step 2: Grip the drive shaft with a wrench or pliers, then turn the blender on its side to attach a wrench to the drive stud.
Step 3: Hold the drive shaft steady as you turn the drive stud clockwise.
The other cause of drive stud problems is the rounding of its corners, requiring a new drive stud. To replace a worn drive stud, reverse the instructions for tightening a drive stud, install the new part, and tighten it.
Service the Blade Assembly: The blender's blade assembly is simple in function. It is rotated by the drive stud, which blends or chops food within the jar.

The most common problem is caused by the jar leaking liquids. The solution is to tighten the base. If this doesn't solve the problem, inspect and, if necessary, replace the gasket.
If the drive stud is turning but the blade assembly isn't, inspect the assembly socket into which the drive stud fits. It may be worn and require replacement. This is a common problem on blenders with metal drive studs and plastic blade-assembly sockets.
It's time to open up and talk about how to repair electric can openers. See the next page for suggestions.
