How to Repair a Vacuum Cleaner
Vacuum cleaners typically last 8 to 12 years, depending on their quality, frequency of use, and general maintenance. By maintaining and repairing your vacuum cleaner as needed you can extend its service life and reduce its actual cost.
There are two common types of vacuum cleaners: upright and canister. The upright vacuum cleaner has the motor and beater bar in the same unit. A canister vacuum cleaner has the motor and storage bag in the canister and the beater bar in a separate power head, with the two units connected by a hose.
Advertisement
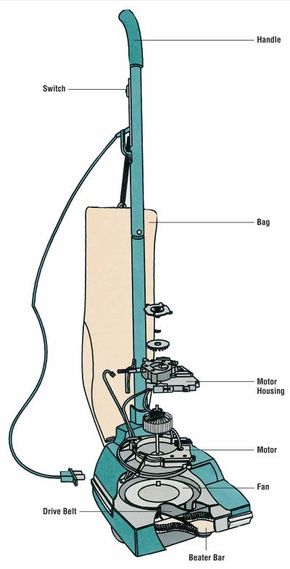
How Upright Vacuum Cleaners Work
An upright vacuum cleaner uses a motor and fan to pull dirt from a surface and deposit it in a bag. Dirt is loosened and swept into the vacuum with a rotating brush called the beater bar. The upright vacuum cleaner is guided by the operator using the handle on which the bag and controls are mounted. Operation is simple. Maintenance and repairs are easy to perform.
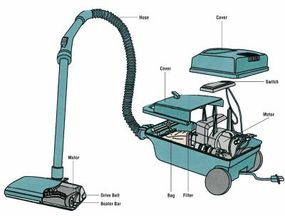
How Canister Vacuum Cleaners Work
A canister vacuum cleaner places the majority of its weight (vacuum motor, filters, bag, and cord winder) in a separate unit to make the power head lighter.
With a long hose, the canister can be placed in the middle of the room and the power head moved more easily. This design allows larger and more powerful motors to be used.
As with the upright, the canister vacuum cleaner loosens dirt with the beater bar, located in the power head and driven by a smaller motor. Dirt is pulled through the hose by the main motor in the canister. Wheels on the canister make it easily portable. Because the fan in a canister vacuum is more isolated than the fan in an upright vacuum, it is generally less susceptible to damage.
How to Repair an Upright Vacuum Cleaner
The following tips offer easy instructions for servicing an upright vacuum cleaner's on/off switch, beater bar, drive belt, dirt fan, and motor. You'll also learn how to repair an on/off switch, a power-head wire connection, a beater bar, a motor, and a cord reel for a canister vacuum.
Servicing an On/Off Switch: Because of its repeated use, a vacuum cleaner's on/off switch can malfunction. Fortunately, on most models the switch is easy to access and test. Some are fastened in place with rivets, but most use screws. To test and replace the switch:
Step 1: Make sure the vacuum is unplugged, then remove the cover plate to expose the back side of the switch. The switch may be on the handle or on the housing.
Step 2: Check the wires to make sure they are completely attached to the switch.
Step 3: Use a continuity tester or multitester to make sure that there is an open circuit when the switch is off and a closed circuit when it is on.
Step 4: If there is a problem with the circuit, or if the switch doesn't test correctly, remove and replace the switch with one designed to be a replacement.
Servicing a Beater Bar: The beater bar in an upright vacuum cleaner is the first contact your upright vacuum has with dirt. It's also one of the first components to need servicing.
The beater bar is a round roller with an offset row of brush fibers. The brushes can wear down, the roller can be damaged, the end cap can come off and be lost, or the drive belt can come loose. To remove and replace the beater bar:
Step 1: To inspect the beater bar, turn the vacuum upside down. The beater bar will be at the front edge of the housing.
Step 2: Remove the clips at each end, remove the drive belt, and lift the beater bar from the housing.
Step 3: To disassemble the beater bar, remove the end cap and flange; pull the brush from the casing.
Step 4: If worn, replace the brush. If broken, replace the cap, flange, or case. If necessary, replace the entire beater bar.
Servicing a Drive Belt: The drive belt in an upright vacuum cleaner passes power from the motor to the beater bar. The drive belt should be checked once a month to ensure that it is in good condition. Some beater bars have an adjustment that allows the drive belt to be tightened or loosened. To replace the drive belt:
Step 1: Remove one end of the beater bar (see "Servicing a Beater Bar") from the vacuum housing.
Step 2: Loosen the drive belt from the motor pulley and remove it from around the beater bar.
Step 3: Slip the replacement drive belt over the beater bar and around the motor pulley.
Step 4: Reinstall the beater bar and adjust the drive belt as necessary.
Servicing a Dirt Fan: The dirt fan in an upright vacuum cleaner is located underneath the motor. It pulls dirt swept back by the beater bar up into the vacuum bag. In most cases, the dirt fan doesn't need replacement, only periodic maintenance. Here's what you need to do:
Step 1: Remove the motor cover and dismount the motor from the vacuum frame. The fan will be on the underside of the motor.
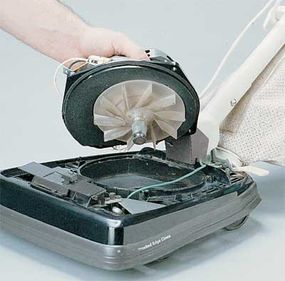
Step 2: Clean the fan's blades and base with a moist cloth. Inspect the blades for damage caused by vacuuming solid objects.
Step 3: Unscrew or unbolt the dirt fan from the motor shaft to inspect and clean the back side.
Step 4: Check whether the motor shaft needs lubrication.
Step 5: If the dirt fan needs replacement, make sure the new part is an identical replacement. Take the old unit to an appliance-parts store to verify the replacement.
Servicing a Motor: Most upright vacuum cleaners are designed for reasonably long life. However, some will last longer than others. Much depends on the quality of the motor. If a vacuum's motor stops working unexpectedly, check the power cord, the fan (for jams), and the on/off switch. It's also possible that you have a defective motor. Here's how to find out:
Step 1: If you suspect that the motor is defective, first test the motor's brushes with a continuity tester or multitester.
Step 2: Turn the motor shaft or beater bar by hand. The motor should maintain continuity.
Step 3: If not, replace the brushes or take the vacuum to an appliance-repair shop to have it done. If the motor is unrepairable, consider replacing the entire upright vacuum, as the cost of a new motor is a major investment.
How to Repair a Canister Vacuum Cleaner
A canister vacuum cleaner has its own set of repair procedures. Here they are:
Servicing an On/Off Switch: Like the switches on most small appliances, the on/off switch on a canister vacuum cleaner gets a lot of use. Considering the ease of repair and its low replacement cost, this switch is one of the first components to check if a vacuum doesn't turn on or off correctly. To test and replace the switch:
Step 1: Open or remove the canister housing to access the back side of the switch.
Step 2: Use a continuity tester or multitester to ensure that there is an open circuit when the switch is in the OFF position and a closed circuit when the switch is in the ON position.
Step 3: Also check the wiring and terminals to ensure that they are connected properly.
Step 4: If the switch doesn't test correctly, remove it and replace it. Some switches are fastened to the housing with screws, others with clips or friction snaps. A few are riveted in place.
Servicing a Power-Head Wire Connection: An advantage of the canister vacuum is that the part that is pushed and pulled across the floor is lighter than with a single-unit upright vacuum. A disadvantage is that power must be delivered first to the canister, then to the separate power head.
The wire connection between the two units is often a source of problems, even in better-quality canister vacuum cleaners. The reason is that there are four sections to the connecting wire: from canister to hose, from one end of the hose to the other, from one end of the power-head tube to the other, and within the power head itself. The end of each section of wire has a connector. If the connection is not made sufficiently, the power head doesn't operate or operates intermittently.
In most cases, servicing the power-head wire connection simply requires that each connector be checked and tightened as needed. If a specific connector frequently makes a poor connection, you can clean the male and female connections with a small piece of emery paper and a can of compressed air.
Broken wires or worn insulators can sometimes be reconnected and wrapped with electrical tape. However, the wire may be located inside the hose, requiring that the hose be replaced as well.
Servicing a Beater Bar: The beater bar on a canister vacuum cleaner is serviced in almost the same manner as one on an upright unit. Here's how:
Step 1: Remove the clips at each end of the beater bar, and pull it and the drive belt from the power-head case. In many cases, all you have to do is clean the brush and the two ends. Remove any excess pet hair or carpet fibers that get wound into them.
Step 2: If needed, remove the beater bar end cap and flange to remove the brush from the shaft and clean or replace it.
Step 3: Also check the drive belt and replace it if it is worn or damaged.
Step 4: When reinstalling the beater bar, make sure there is sufficient tension on the drive belt to rotate the bar by pulling on the belt. If the belt is loose, adjust it following the instructions in the owner's manual.
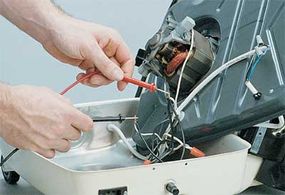
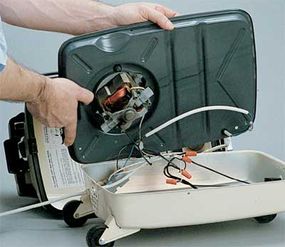
Servicing a Motor: The motor for a canister vacuum cleaner is easy to access on most models. To test and replace the motor's brushes:
Step 1: Open the canister's top cover and remove the motor cover to expose the motor itself.
Step 2: Place the probes of a continuity tester or multitester on the two wires that lead to the motor from the on/off switch.
Step 3: Rotate the motor shaft a few revolutions by hand. The motor should test as a closed circuit with some resistance. If an ohmmeter indicates no resistance or infinite resistance, the motor is probably damaged.
Step 4: Check the motor's brushes in the same manner, if they are accessible. Replace the brushes if needed.
For other motor repairs, take the appliance to an appliance-repair service or motor-repair shop. If the motor needs replacing, evaluate the overall condition of the vacuum and consider replacing the entire appliance.
Servicing a Cord Reel: The cord reel on a canister vacuum cleaner is a gadget that simply makes storage of the cord easier. It doesn't clean anything. The cord reel unit is usually located at the rear of the canister.
An internal spring offers sufficient tension to retract the cord onto the reel. The cord reel winds the cord in a circle, so the internal end of the cord must also move in a circle. At the same time, it must be electrically connected to the motor.
To make this work, the cord is attached to a rotating contact called a commutator block. It is a circular conductor of electricity that passes current from the internal end of the cord to a stationary block. If the blocks become dirty or corroded, they will not pass current to the motor. To remove and clean or replace the cord reel:
Step 1: Open the top cover of the canister. Another sealing cover will protect the cord reel -- and probably the motor as well -- from the vacuum chamber.
Step 2: Depending on whether you're cleaning or replacing the cord reel, you may need to remove it from the housing. To do so, find the clips or fasteners holding it into place and undo them. If necessary, cut the two wires leading from the cord reel to the motor. In some cases, you may be able to make adjustments and repairs without cutting the motor wires.
Step 3: Clean the cord reel of dirt, then clean the commutator and stationary block with some isopropyl alcohol on a soft rag. If pitted, the blocks should be lightly sanded and wiped clean.
Step 4: Adjust the spring as needed and reinstall the unit in reverse order, replacing any cut wires.
Don't blow it -- read the tips on the next page to help you fix a malfunctioning hair dryer.