How to Paint a Room

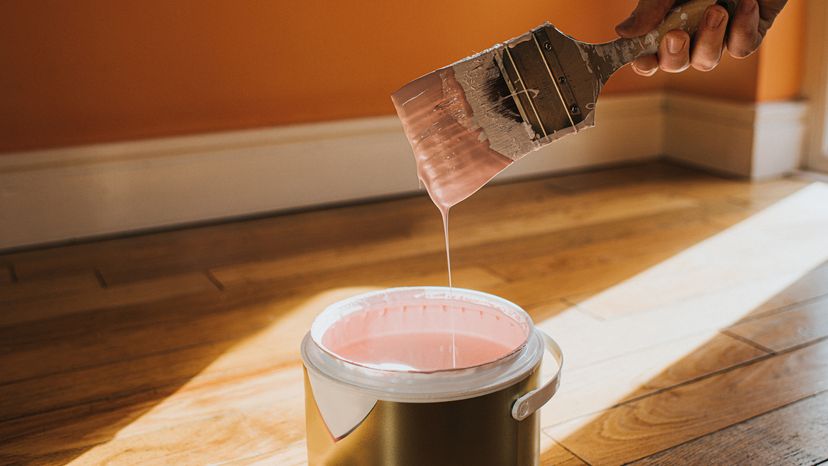
Hand holds a thick paint brush dripping in the paint
Grasp sash and trim brushes as you would a pencil. Hold a wall brush with your entire hand. Catherine Falls Commercial / Getty Images

Painting a room can be a task that takes a couple of hours, a half day, or more. It all depends on what and how much you decide to paint. You can freshen up a room by giving a door or cabinet a new coat of paint in just a few hours. Or you can break it into smaller jobs and spread them out over a week or more. Whatever the size of the job you decide to tackle, the painting techniques remain the same.

In this article, we'll take you all the way through the process of painting a room. From prepping to cleaning up, we have the job -- and your room -- covered. We'll start at square one, with how you should use your painting equipment.

Advertisement

Brushes

When you embark on an interior painting job, you'll soon discover how easy it is to use brushes and rollers competently. Even so, there are a few techniques that will help postpone fatigue and provide a neater job.

The grip you use depends on the brush you've chosen. Trim and sash brushes with pencil handles are grasped much as you would a pencil, with the thumb and the first two fingers of the hand. This technique gives you excellent control for intricate painting. With beaver-tail handles on larger brushes, you'll need a stronger grip because the brushes are wider and heavier. Hold the handle with the entire hand, letting the handle span the width of your palm as you would hold a tennis racket. This technique works best when you're painting large, flat surfaces.

The goal of loading a brush is to get as much paint on the wall as possible without dribbling it all over the floor and yourself in the process. It will take you only a few minutes to be able to gauge accurately how much paint your brush will hold along the way. Meanwhile, start the job by dampening the bristles of the brush (with water for latex or the appropriate thinner for other types of paint) to condition them and make them more efficient. Remove excess moisture by gently striking the metal band around the handle's base against the edge of your palm and into a sink or bucket.
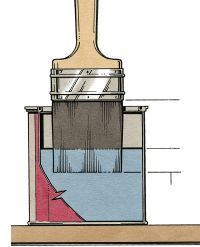
©2006 Publications International, Ltd. Never dip a brush more than about one-third the length of the bristles into the paint. If you do, the brush will become next to impossible to clean.

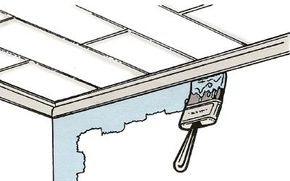
With the first dip, move the brush around a bit in the paint to open the bristles and let the brush fill completely. It will be easier to pick up a full load if you jab the brush gently into the paint with each dip. With most latex paints, you can simply dip the brush and let the excess drip off for a few seconds before moving the brush to the wall. With thinner coatings, however, you may have to gently slap the brush against the inside of the paint can or lightly drag it across the inside edge of the lip to remove excess paint.To neatly paint up to a line where two edges or colors meet, called "cutting in," use a trim brush with beveled bristles (the end of the brush resembles a chisel). Paint five or six strokes perpendicular to the edge of the ceiling or the wall. Next, smooth over these strokes with a single, long stroke, painting out from the corner first, then vertically. Where the wall and ceiling come together, use downward strokes on the wall first followed by smooth horizontal strokes.

On the ceiling itself, cut in strokes toward the center of the room, away from the wall. Then paint a smooth horizontal stroke on the ceiling that follows the direction of the wall. Even if you're using the same color of paint on adjoining surfaces, follow this method of cutting in with 2-inch-wide borders rather than just plopping a loaded brush directly into a corner. This will prevent drips, sags, and runs.
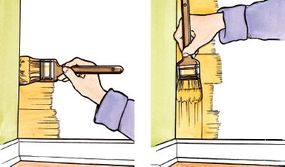
 

©2006 Publications International, Ltd.To cut in at a corner, paint out from the corner for five or six strokes, then smooth over them with a single, long, smooth stroke.

 Another cutting-in approach, beading, can practically eliminate the need to use masking tape to protect one painted area from another. Use a beveled trim brush with nice long bristles. Hold the brush so that your thumb is on one side of the metal ferrule and your fingers on the other. Press the brush lightly against the surface, then, as you move the brush, add just enough pressure to make the bristles bend away from the direction of your brushstroke. Keep the brush about 1/16 inch away from the other colored surface. The bent bristles and the pressure will release a fine bead of paint that will spread into the gap.

With both methods of cutting in, but especially when you're dealing with two colors, it's better to have a brush that's too dry than one that's too wet. This is detail work. To do it effectively, go slowly and cut in 4 or 5 inches at a time. It will seem tedious at first, but your speed and accuracy will improve with practice, and even one ordinary-size room will give you lots of practice.

Rollers

Working with a roller is even less exacting than working with a brush. Even a novice painter can get the feel of it in just a few minutes.

As with brushes, moisten the roller first with water for latex paint or the appropriate thinner for other types of paint. Roll out the excess moisture on a piece of scrap lumber or kraft paper or even on a paper grocery bag. Don't use newspaper because the roller may pick up the ink. Fill the well of the roller pan about half full, and set the roller into the middle of the well. Lift the roller and roll it down the slope of the pan, stopping just short of the well. Do this two or three times to allow the paint to work into the roller. Then, dip the roller into the well once more, and roll it on the slope until the pile is well saturated. You'll know immediately when you've overloaded the roller. It will drip en route to the wall and have a tendency to slide and smear instead of roll across the surface.
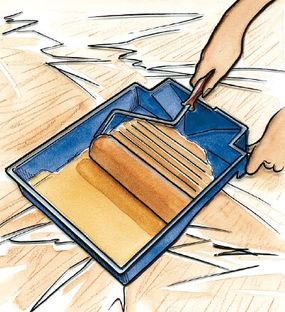
©2006 Publications International, Ltd. To load a roller, fill the well of the pan about half full and set the roller into the well. Then lift the roller and roll it down the slope of the pan two or three times to work paint into the roller.

The most effective method of painting with a roller is to paint 2-or 3-square-foot areas at a time. Roll the paint on in a zigzag pattern without lifting the roller from the wall, as if you're painting a large M, W, or backward N. Then, still without lifting the roller, fill in the blanks of the letters with more horizontal or vertical zigzag strokes. Finish the area with light strokes that start in the unpainted area and roll into the paint. At the end of the stroke, raise the roller slowly so it does not leave a mark. Go to the next unpainted area, and repeat the zigzag technique, ending it just below or next to the first painted patch. Finally, smooth the new application, and blend it into the previously finished area.
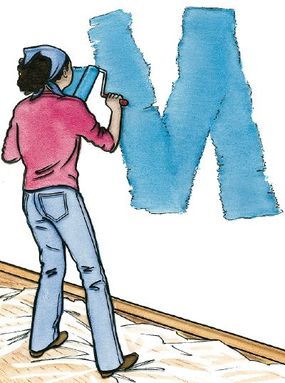
©2006 Publications International, Ltd. With a roller, begin by making an M, a backward N, or a W pattern about 3 feet square. Always start with an upstroke so paint won't run down the wall. Next, fill in the pattern with crosswise strokes. You should be able to paint each 3-square-foot area with one dip of the roller.

Professional painters also suggest starting with a roller stroke that moves away from you. On walls, that means the first stroke should be up. If you roll down on the first stroke, the paint may puddle under the roller and run down the wall. In addition, be careful not to run the roller so rapidly across the wall that centrifugal force causes it to spray.

If you have a large indoor painting job, an airless sprayer is the best tool to use. We'll take a look at airless sprayers and how to use them safely in the next section.


How to Use an Airless Sprayer

For larger painting jobs, an airless sprayer is the most efficient way to apply paint. An airless sprayer uses an electrically run hydraulic pump to move paint from a bucket or container, through a tube, into a high-pressure hose, to a spray gun, and, finally, to the surface. Once you get the knack of it, an airless sprayer is easy to use, but if you rent one, make sure you get a set of written instructions.

The instructions will tell you how to flush the system with solvent (usually water or mineral spirits, depending on the paint you'll be using) and how to pump the paint through the hose to the spray gun. For cleanup, the procedure is reversed: Pump the leftover paint out and flush with solvent.

Advertisement

You'll only need the spray rig for a day or two, but plan to spend at least another day beforehand to thoroughly mask off everything you don't want to paint. Tape drop cloths to every floor surface. Drape windows, the fireplace, and doors. Remove all hardware or cover it with masking tape. Mask switches and outlets. Paint from a sprayer travels on the tiniest of air currents and settles a fine mist of overspray on just about every surface in a room.

Plan to keep at least one window in each room open and set up an exhaust fan to draw paint vapor out of the room. Be sure, too, to wear a painters' mask, a hat, and old clothes with long sleeves to protect your arms.

Airless sprayers are equipped with several filters to keep paint particles and foreign matter from clogging the spray tip, but it's a good idea to filter the paint yourself through a nylon stocking or paint filter before you pump the paint through the hose.


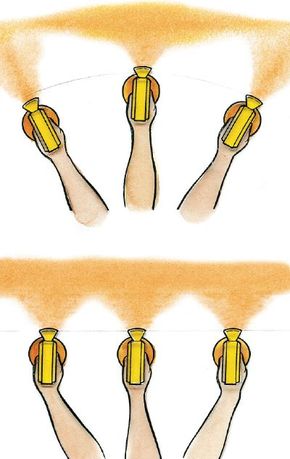
Using an airless sprayer effectively takes some getting used to, so plan to practice on some scrap plywood or an inconspicuous part of the room or the house. The object is to cover the surface with a uniform coating of paint. Hold the spray gun a constant 6 to 12 inches from the surface and maintain this distance with each pass of the gun. Keep the gun precisely parallel to the wall. Don't sweep it back and forth or you'll end up with a wide arc of paint on the wall; the paint will be concentrated in the middle of the arc and almost transparent at each end.

Paint about a 3-foot horizontal strip at one time, then release the trigger and drop down to paint another strip of the same length, overlapping the first strip by one-third to one-half. Once you've covered a 3-foot-wide area from the top of the wall to the bottom, go back to the top and start another 3-foot section adjacent to the first, overlapping the edge of the first painted area by several inches as you work your way down the wall again.

Examine the painted areas to make sure the entire surface is receiving a uniform coat of paint. Too much will run or drip; too little will let the old paint show through. If you notice these flaws, it means you are not keeping the spray gun a uniform distance from the wall at all times or that you are tilting it. An upward tilt will deliver excess paint to the bottom of the painted strip. A downward tilt will concentrate paint at the top of the strip.

To prevent paint buildup at the end of each strip, release the trigger on the gun a fraction of a second before the spray gun stops moving at the end of your stroke. When beginning a new strip, start moving the gun a fraction of a second before compressing the trigger. Always keep the gun moving when it's spraying.

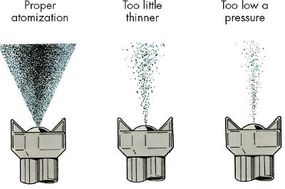
Be sure, too, that you've properly thinned the paint and adjusted the pressure control according to the manufacturer's instructions. If there is too much or too little thinner or too high or too low a pressure, the spray of paint won't atomize properly.


Too much or too little thinner, too high or too low a pressure, and the paint won't atomize properly. Follow the manufacturer's instructions for thinning and adjusting pressure.
©2006 Publications International, Ltd.

Using an Airless Sprayer Safely

Airless sprayers are fast and efficient because they supply pressures of up to 3,000 pounds per square inch. This force moves the paint at 100 to 200 miles an hour through the spray tip. All that power can be dangerous. Consequently, treat an airless sprayer with lots of respect, follow the manufacturer's instructions to the letter. Use the following precautions to prevent accident or injury:

  • Keep the spray gun's safety lock on when you're not painting.
  • Make sure the spray gun has a trigger guard and a safety shield around its tip.
  • If the spray tip becomes clogged, do not try to clear it by pressing your finger on it while the paint is being sprayed. Keep your fingers away from the tip when the sprayer is operating.
  • Never point the gun at anyone else or allow anyone to point it at you.
  • Always turn the sprayer off and disconnect it from its electrical source before you clean out the gun or the sprayer's filters. Even then, if you have to clean the tip, squeeze the trigger to release any built-up pressure in the hose.
  • Only work in a well-ventilated area, wear a painters' mask to avoid inhaling fumes, and don't smoke or work around open flames. If you're working outside, don't leave containers of solvents sitting in the hot sun; put them in the garage or another shady spot.
  • Never leave the sprayer within reach of children or pets.

Now that you know how to properly use your equipment, it's time to learn how to actually paint a room. The first step in that process is prepping, which is detailed in the next section.

How to Prep for Painting a Room

© 2006
Publications International, Ltd.

Painting can be a task that takes a couple of hours, a half day, or more. It all depends on what and how much you decide to paint. You can freshen up a room by giving a door or cabinet a new coat of paint in just a few hours. Or you can break it into smaller jobs and spread them out over a week or more. Whatever the size of the job you decide to tackle, the painting techniques remain the same.

If you're painting over a new primed wall, you can safely skip these prepping step. But if you're painting over a previously painted surface, look for rough, peeling, or chipped areas. The best way to find flaws is to remove all the furniture from the room. If this isn't possible, cluster the furniture in one area, and cover it and the floors with drop cloths. Take down the draperies and the drapery hardware. Loosen the light fixtures; let them hang and wrap them with plastic bags. Remove the wall plates from electrical outlets and switches (if you intend to paint them the same color as the wall, do so while they're off the wall). If you find flaws, now is the time to fix them. You don't need to take a weekend or a week to tackle interior fixes. Instead, you can break it down into smaller jobs -- quick fixes that take just an hour or two each.

Advertisement

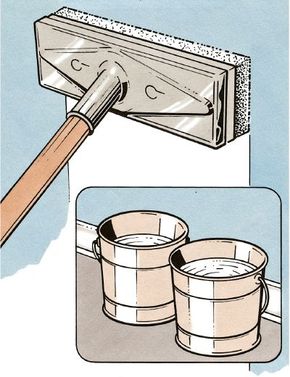
After fixing any flaws, wash down the surfaces to be painted with warm water and a good household detergent or wall-cleaning soap to remove soot, grease, cigarette smoke, and airborne dirt. Using a sponge just slightly less than dripping wet, go over a vertical strip of wall about 2 feet wide. Squeeze the dirty water out of the sponge into a separate pail or down the drain. Go over the wall with the squeezed-out sponge to pick up as much of the remaining dirt as possible. Squeeze out the sponge again, and rinse it in clean water. Then, sponge the same area once more to remove the last of the dirt and detergent residue. This routine sounds tedious, but it actually goes fast, and you'll end up with a wall that is clean and provides a good surface for a new coat of paint.

Don't attempt to paint over a surface that already has a glossy finish, even if it is clean. Glossy surfaces don't provide enough adhesion. And even if the paint goes on, it may not stay on. To cut the gloss on an entire wall, wash it down with a strong solution of trisodium phosphate (TSP), available at hardware or paint stores. Mix the TSP powder into hot water until no more will dissolve. Swab it on the wall, and sponge it dry. Rinse with clear water, then sponge dry again. If TSP is not available (in many communities it has been banned because of its tendency to pollute water sources), you can use a commercial deglosser, a solution that you swab on glossy surfaces before painting.

You can use deglossing solutions on woodwork, too, or you can give woodwork a light sanding with medium-or fine-grade sandpaper. Wipe off or vacuum the resulting powder before you paint. On baseboards, remove accumulations of floor wax or acrylic floor finish with a wax remover or finish remover.

Scraping

The older your house, the greater the chance there's an area that needs scraping. A previous paint job may have begun to peel or crack in some places. Windowsills and sash frames may have chipped, or the old paint may have "alliga-tored" into a maze of cracks. If you find these conditions, scrape them gently to remove the loose particles, then sand them smooth to blend with the area around them. If you get down to bare wood on woodwork, prime the spots before you apply the final coat of paint. If it's impossible to blend the scraped areas with the nonscraped areas on walls, go over them with a light coat of drywall joint compound. When walls are dry, sand them smooth, prime, and paint.

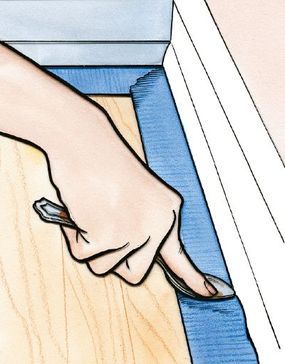
©2006 Publications International, Ltd. To keep paint from seeping under painter's tape, use the bowl of a spoon to press the tape tightly to the surface.  

Masking

Where two new paint colors come together on a single surface, it's practically impossible to keep a straight line between them while painting freehand with either a brush or a roller. To get a straight line, use a carpenters' level and a pencil to draw a faint line on the wall. Then, align masking tape with the line across the wall. Peel the tape off the roll a little at a time, and press it to the wall with your thumb. Don't pull the tape too tightly as you go, or it may stretch and retract once it's in place. To keep the paint from seeping under the masking tape, use the bowl of a spoon to press the tape tightly to the surface.

Don't leave the tape on until the paint is dry. If you do, it may pull the paint away from the surface. With latex paint, you only need to wait a half hour or so before peeling off the tape. With alkyds, two or three hours is enough. The paint can's label will tell you how long it takes for the paint to set completely.

Masking tape is useful for protecting trim around doors, windows, built-ins, baseboards, or bookshelves. When you're brushing or rolling new paint on the wall, you won't have to slow down or worry about sideswiping the trim.

You now are ready to paint. We'll address that task in the next section by telling you how to coat walls, ceilings, and woodwork.

How to Paint Walls, Ceilings, and Tight Spots

©2006 Publications International, Ltd. Use a brush to paint along the edge of the ceiling next to moldings and to paint next to corners. This technique is called "cutting in."

Since the walls and ceilings are the largest surfaces in a room, you'll devote a lot of energy to painting them. In this section, we'll tell you the best techniques for painting walls and ceilings, as well as the tight spots in between.

Walls

Advertisement

Paint an entire wall before taking a break so the painted portions won't lose their wet edges. Then stand back, scan the wall, and cover any missed spots or smears. Whether you paint in sections from top to bottom or from side to side across the room is up to you. But if you're using an extension handle on your roller, you may find it more convenient to start at one high corner and go all the way across the room with a series of completed zigzag patterns. This way you won't have to constantly change the handle on your roller as you would if you painted in sections from the ceiling down to the floor. If you're right-handed, start in the room's left-hand corner; if you're left-handed, start in the room's right-hand corner.

Ceilings

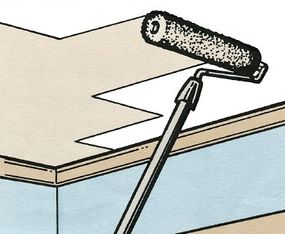
When rolling paint on a ceiling, maintain a wet edge at all times to avoid creating lines and ridges. If you're using fast-drying paint, you may have to work faster than you anticipated and without taking a break. Both speed and ease can be achieved by using an extension handle so you can paint from the floor instead of from a stepladder that has to be moved around the room. Many roller handles are made to accept a screw-in extension that you can buy at the paint store, but you may want to see if the threaded end of your broom or mop handle will work.

©2006 Publications International, Ltd. When using a roller, work in strips across, always working over the wet edge of previously painted strips.

Tight Spots

You probably won't have enough room to use the zigzag technique described earlier over and under windows and above doors and doorways. Instead, just roll the paint on horizontally. For areas that are narrower than the standard 7- or 9-inch roller, use a 4-inch roller or a paintbrush. (The little roller is best because it will give you the same surface finish as the rest of the wall.) Brushes apply paint less evenly and tend to leave trails.

Now that we've covered the walls and ceilings, it's time to move onto the other parts of a room -- namely the trim, baseboards, wainscoting, windows, and doors.

How to Paint Trim, Baseboards, Wainscoting, Windows, and Doors

©2006 Publications International, Ltd Paint double-hung windows in the sequence shown, moving the top and bottom sashes for access to all surfaces.

Even when the walls and ceilings -- the largest painting surfaces in a room -- are coated, the job isn't nearly done. Painting the trim, baseboards, wainscoting, windows, and doors can take as much time, if not more, than the walls and ceilings. Here's how you should approach these intricate tasks:

Trim, Baseboards, and Wainscoting

Advertisement

If you're using only one color and one finish on all surfaces, you may want to paint the trim as you come to it in the process of painting the walls. Of course, you'll have to keep alternating between brush and roller if you use this technique, but this shouldn't be difficult in rooms that have only a couple of windows and a single door. If you decide to paint the trim first, mask it off with masking tape or painter's tape when you paint the ceiling and walls.

To paint the top of a baseboard, paint down from the top for five or six short strokes, then smooth over them with a single, long, smooth stroke. Then, using a painting shield or a thin piece of cardboard as a movable masker, cut in along the floor. After that, you can fill the unpainted space between with long brush strokes. Paint only 2 or 3 feet of baseboard at a time. Examine the surface for drips, spatters, and overlapped edges, and clean them up immediately. Do not wait until the entire baseboard is painted or the paint flaws will have already set.

Painting wainscoting or paneling requires a similar approach. Cut in along the top and bottom edges where the wainscoting meets the wall and the floor, just as you did with the baseboard. Next, paint the indented panels and the molding around them. Paint tends to collect in the corners of these panels, so your brush strokes should be toward the center of the panel. On the raised surfaces around and between panels, work from the top down, and use up-and-down strokes on the verticals, back-and-forth strokes on the horizontals.

Windows and Doors

Flush doors -- those with smooth, flat surfaces -- are easy to paint with either a brush or a roller, but doors with inset panels can be tricky. No matter what type of door you're dealing with, paint the entire door without stopping. Otherwise the lap marks may show. Before you start, remove the doorknobs, the plates behind them, and the latch plate on the edge of the door.

On ornate doors, start by painting the inset panels at the top of the door. As with wainscoting, paint all the panels and the molding around them. Then work your way down from the top to the bottom, painting the top rail, middle rail, and bottom rail (the horizontals) with back-and-forth strokes. Next, paint the vertical stiles (the sides) with up-and-down strokes. If you're painting both sides of the door, repeat this procedure. If you're painting only one side, paint the top edge of the door with a light coat. Over time, paint can build up on the top edge and cause the door to stick. Finally , paint the door's hinge edge and latch edge.

The job of painting windows will go faster if you purchase a 2-or 2-1/2-inch sash trim brush, angled slightly across the bottom to make it easier to get into 90 corners and tight spaces.

To paint wood-frame windows, first raise the bottom sash more than halfway up and lower the top sash until its bottom rail is several inches below the bottom sash. Paint the bottom rail of the top sash and up the stiles as far as you can go. Paint all the surfaces of the bottom sash except the top edge. Reverse the position of the sashes: top sash up to within an inch of the window frame, bottom sash down to within an inch of the windowsill. Then, paint the formerly obstructed surfaces of the top sash and the top edges of both sashes.

Don't paint the wood jambs in which the sashes move up and down yet. Instead, paint the window frame, working from top to bottom, including the sill. When the paint on the sashes is dry to the touch, move them both down as far as they will go. Paint the exposed jambs. Let the paint dry, raise both sashes all the way, and paint the lower jambs. To keep the sashes from sticking in the jambs, put on only as much paint as is necessary to cover the old coat. Wait for the paint to dry, then lubricate the channels with paraffin or a silicone spray.

Only two more parts of the room need to be painted: the cabinets and floor. We'll tackle that task in the following section.

How to Paint Cabinets and Floors

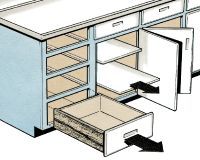
©2006 Publications International, Ltd. With cabinets, paint in this sequence, starting inside and working out. Paint drawers last.

Both cabinets and floors are relatively easy to paint if you know what to do. In this section, we'll show you some tricks that will help you paint these surfaces like a professional.

Cabinets

Painting cabinets and cupboards will be easier if you remove all obstructions first, including shelves, drawers, handles, pulls, knobs, and latches. If the hinges on the doors have pins you can remove easily, take off the doors until the cabinet and cupboard interiors and surfaces have been painted.

Advertisement

The most difficult part of painting cabinets is reaching the barely accessible interior surfaces. Consider shortening the handles on your trim brushes to make things easier. Paint the inside back walls; inside top; side walls; and bottoms, tops, and edges of shelves.

Then paint all the exterior surfaces, working from the top down. If the doors are still in place, swing them open and paint the inside surfaces. Then close them partway and paint the outside. Finally, stand the drawers up on newspapers and paint only their fronts. Do not paint the exterior sides or bottoms of the drawers.

Floors

Once reserved for porches, paint is turning up on wood floors with increasing frequency, particularly in vacation homes. You can do a small floor in just a couple of hours once everything is prepared.

The techniques for painting floors are the same as for painting any other large flat surface. Be sure to remove all traces of wax, and sand the floor lightly to roughen its surface, improving its paint-holding ability. You can use ordinary porch and deck paint, but the color selection may be limited. You can also use a good-quality oilbase enamel. In either case, follow up with two to four coats of clear polyurethane to protect the painted finish.

First, remove all the furniture from the area, and cut in the paint around the baseboards with a brush. Then you can use either a wide wall brush or a medium-pile roller for the rest of the floor. If you use an extension handle on a roller, you will be able to do the job standing up. Paint your way out of the room. On most wood floors, plan on applying at least two coats of paint, then two, three, or four coats of polyurethane. Let each coat dry to absolute hardness before reentering the room, and wear rubber-soled shoes until after the very last coat to avoid marring or scarring the surface.

Painting masonry floors is easier, faster, less expensive, and more common than painting wood floors. Moisture is a major cause of masonry painting problems. Most masonry is porous, and water that comes through it pushes at the paint, causing small particles to come off. In addition, the alkalinity in masonry affects the adhesiveness of some paints and attacks the pigments in others. Paint designed for masonry surfaces can handle rough treatment.

There are a number of latex-base masonry paints that offer the advantages of easy application and easy cleanup. They can be used in damp conditions without adhesion problems. Cement-base paints are frequently used on previously unpainted concrete where very low-pressure moisture is a problem. Epoxy paints are often applied where a hard finish is needed to resist moisture and chemicals. Just make sure the paint you use is compatible with any existing paint and with the type of masonry you'll be covering. A paint dealer can help you select the appropriate coating.

Before you get down to painting, repair and patch all cracks and holes and allow the patch compounds to cure fully. Then, wearing rubber gloves and goggles, use a 10 percent muriatic acid solution to remove efflorescence, the whitish powder that appears in spots on concrete. Mop up the solution, let the area dry, rinse it thoroughly, and let it dry again. Wash the entire floor with a strong detergent or a concrete degreaser. Then, once the floor is dry and just before painting, vacuum it to get rid of any leftover dirt.

On most masonry floors you can paint with a long-napped roller fitted with an extension handle so you can paint standing up, but you may need a brush for very rough areas. Depending on the surface conditions and the kind of paint you use, you may have to apply a second coat. If so, read the label on the paint can to find out how long you should wait between coats.

Some people like to finish painting a room by adding decorative flourishes. The next section, then, will focus on painting stencils, textures, and stripes.

How to Do Decorative Painting

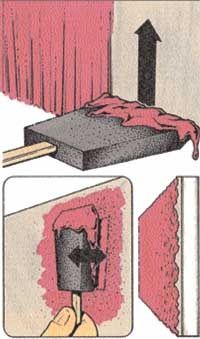
To texture paint with a foam brush, slather it on, then go over the surface with the flat of the brush, patting the paint.
©2006 Publications International, Ltd.

Sometimes a room doesn't feel finished without decorative touches. In this section, we'll show you three common decorative painting techniques: stencils, textures, and stripes.

Stencils

Stenciling is one of the oldest and easiest decorative painting techniques. Use it to create borders of various patterns on walls, ceilings, floors, and around windows and doors. Stencils look like the reverse of a coloring book page, with spaces where the pattern would ordinarily be. About the size of a sheet of typewriter paper, reusable stencils are made of thin plastic or heavy paper. They're available at art supply stores or retail paint outlets.

Advertisement

You can make your own stencils, too. Use thin cardboard -- shirt cardboard is fine. Sketch a design, transfer it to tracing paper, and cut it out with scissors or a craft knife. Lay the pattern on a piece of cardboard slightly larger than the pattern itself, trace around it, then cut it out.

To transfer your design to the wall, tape up the stencil at all four corners. Use a special stenciling brush -- usually round in shape, but flat across the bristles -- to apply latex or alkyd paint to the cutout. Pour paint into an old saucer or pie tin. Dab the brush lightly into the paint, then dab it lightly on kraft paper to remove excess paint. You should be working with an almost dry brush. Don't stroke the paint on the stencil. If you do, you'll force the paint under its edges. Instead, use a light up-and-down dabbing motion. Let the paint dry to the touch, peel the stencil slowly away from the wall, and move on to the next area.

If you want to create a border using the same pattern over and over again, it makes sense to buy or make extra stencils so you can continue to work on other areas as the paint dries on the first ones. If your stencil requires two or more colors, paint with only one color at a time and let the first dry before adding the second.

Plastic ready-made stencils are washable and reusable. Those made of heavy paper or cardboard, however, will only last so long before the paint saturates the fibers and weakens the stencil. When that happens, buy or make new ones so that the stencil stays flat against the wall as you paint.

Textures

What can you do if you have a wall with flaws so serious that ordinary paint won't cover them up? Or what if you want a surface with a more tactile quality? Or maybe you want to try for a weathered or stucco look. For any of these, texture painting is a good option.

Paints specifically designed for texture work are as thick as pancake batter or wet plaster. Some are gritty and some are not. All are ideal for flawed surfaces and for creating a rustic look. You should still wash the surface, scrape off flaking paint, and patch major holes, but you don't need to make the surface perfectly smooth. Texture paints will camouflage most surface blemishes.

Texture paint without granules in it can be applied with special texturing rollers, a wide brush, a urethane foam brush, or even a trowel. Whatever tool you use, smear the paint onto the surface, about 1/16 inch thick. As with regular wall paint, work with sections approximately three feet square.

Create the surface design in one section at a time. A long-napped texturing roller will give you a uniform stippled effect all over. Similar but less regular stippling can be achieved with a foam brush. Apply the paint, then go over the surface with the flat of the brush, patting the paint to create little peaks and valleys.

You can use less conventional texturing tools once the paint is on the wall, such as crumpled wax paper or a big sponge. With a coarse brush you can create circles or swirls in the paint. Keep the thickness and the texture uniform from one section to another, overlapping their borders as you go along.

For applying grit-textured paint to ceilings, buy a special long-napped roller or use a synthetic-bristle brush. Instructions on the can explain how to apply the paint.

Stripes

You can paint stripes on walls or furniture using some easy techniques.

For medium-wide stripes of one to four or more inches, use a level to draw two parallel lines on the wall. Follow the lines with masking tape, pressing the tape down carefully with your thumb or the bowl of a spoon so that paint doesn't seep under its edges. Use a trim brush to paint between the masking tape lines. Wait until the paint is just barely dry to the touch, then slowly peel the tape away from the wall.

A series of thin, parallel stripes can be painted all at one time if you use special striping tape, the kind used to paint racing stripes on cars, available at automobile supply stores. The tape is one inch wide overall, but it has up to eight 1/16-inch peel-off strips down its length. Again, use a level to create a straight line. Follow the line with striping tape. Then peel as many of the removable strips off the roll as you like, automatically exposing what will soon be stripes.

Because you're dealing with more tape edges here than before, go back over the tape again, carefully pressing down all the edges to keep the paint from seeping under them. Finally, working with a dry brush, paint over the tape. (A 1/2-inch trim brush is best for delicate work.) Let the paint dry to the touch, then slowly peel away the tape.

Your work is done, but it isn't really done. The final part of painting a room is cleaning up, which is outlined in the next section.

How to Clean Up From Painting

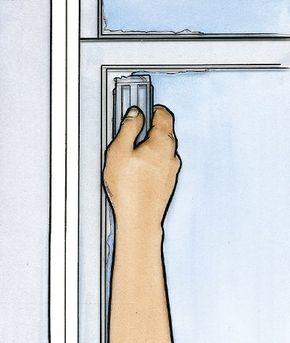
©2006 Publications International, Ltd. Use a razor blade scraper to remove dry paint from glass. Avoid breaking the seal between the paint and windowpane.

One of the most important aspects of a successful paint job is keeping things clean as you're working. It's also important to clean equipment as soon as you're finished and to wipe up any spatters or drips as soon as they occur. Here are some tips:

Minimizing Drips and Spatters

Even if you have already cut in around the room, avoid bumping the roller into the walls as you paint the ceiling or into the ceiling as you paint the walls, even if you're using the same color paint on both surfaces. The roller may deposit a visible ridge of paint each time it touches the ceiling or the wall.

Advertisement

No matter how slowly and steadily you move the roller across a surface, it will emit a fine spray of paint. Wear a scarf or cap (inexpensive painters' caps are available at paint stores), and make sure the floor and furniture are covered with drop cloths. Canvas drop cloths are best because they're durable, washable, and reusable. Plastic drop cloths, however, are far less expensive and, if you tape them down so they won't slide around, just as effective.

If you choose not to mask around windows, doors, and woodwork, minimize the risk of spatters by using a paint shield, either homemade or purchased from a paint dealer. The store-bought shields come in several sizes and materials (plastic or aluminum). Do-it-yourself shields can be made from thin cardboard or the slats of an old venetian blind. The paint shield works like a moving masker. Holding the shield in one hand, place it perpendicular to the surface being painted. Then, with the other hand, apply the paint. Paint shields are ideal for painting window frames because they can be used to keep paint off the glass, eliminating the need to scrape off dried paint later.

Because some spatters and spills are inevitable, keep a moist sponge and a pail of water handy when you're using latex paints. If you're using a solvent-thinned paint, keep some thinner and a supply of rags nearby to wipe up spatters and drips before they dry into bumps.

Cleaning Windowpanes, Spatters, and Drips

The best time to clean up paint drips and spatters is when they're still wet and will wipe away easily. If you do miss them, you can clean them up later with some extra effort.

If you used masking tape around windows, peel it off right after painting. Otherwise it may pull off some of the paint. If you painted with a painting shield or freehand, there will most likely be a few errant drops or smudges on the glass. A razor blade scraper, available at paint or hardware stores, will scrape the paint off the glass easily. Avoid breaking the seal between the new paint and the windowpane when you're cleaning up ragged edges around the sash.

Cleaning up drips and spatters on most other surfaces is easier and less time consuming. For latex paint, a soft cloth combined with household detergent and warm water should do the trick. Don't scrub a freshly painted finish, though, even if it is dry to the touch. Many paints don't cure for 30 days or more. For solvent-thinned paints, use a soft cloth and turpentine or mineral spirits to soften and remove dried-on paint droplets. Then, go over the area again with warm water and detergent.

To get paint drips off hardwood, ceramic tile, or resilient flooring, wrap a cloth around a putty knife and gently scrape them up. Then wash the areas with warm, soapy water . Don't use solvent if you can avoid it, as it can damage the finish on the floor.

Cleaning Painting Equipment

Cleaning painting equipment includes not only brushes and rollers but also reusable drop cloths, paint cans, containers, and roller pans. Don't delay cleaning your equipment one minute longer than necessary. Fresh paint comes out of brushes, rollers, and pans easily; let paint dry for a while and you'll have to put a lot more time and effort into getting it out.

Inexpensive roller covers don't respond well even to thorough cleaning. Some paint residue will remain in the nap of the roller cover. When the roller is exposed to fresh paint later, the dried-in paint can soften and cause streaks in the new finish. If you use inexpensive roller covers, buy a new one for each job and save yourself the time and effort of trying to clean them. If you invest in a professional quality roller cover, it will clean thoroughly and can be used repeatedly.

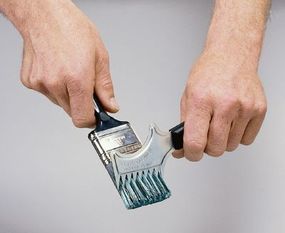
If you used latex paint, drag the brushes across the lip of the paint can to remove most of the paint. Then rinse the brushes and rollers under warm tap water and wash with dishwashing detergent. A paintbrush comb can help remove paint residue from the bristles. To get out the excess water, gently squeeze the bristles or take the brush outside and give it a few vigorous flicks. Squeeze the water out of the roller covers. Use paper towels to soak up any remaining water in both brushes and rollers.

©2006 Publications International, Ltd. When the brush is clean, shake out the excess solvent or water, and comb out the bristles.

With solvent-thinned paints, use the appropriate solvent as identified on the paint can's label. Agitate brushes and rollers in a container of the solvent. Repeat this process to get out all the paint. To clean brushes, pour the solvent into an old coffee can. For rollers, use an inexpensive aluminum foil loaf pan or a clean roller pan. Solvents are toxic and flammable, so don't smoke or work near a water heater or furnace, and make sure there's plenty of ventilation. Use paper towels to blot out the excess solvent from brushes and rollers, then wash everything in warm, soapy water. Hang up brushes until they're dry; set roller covers on end.

Wipe out, wash, and dry roller pans and paint containers. Wipe off the lips of paint cans and hammer down the lids to preserve leftover paint. Store paint and solvent cans away from extreme heat or cold and out of the reach of children. If you have less than a quart of paint left, store it in a tightly capped glass jar and save it for touch-ups. Brushes and rollers that have been cleaned and dried should be wrapped up before they're stored away. Brushes can go back in the plastic or paper packages they came in, or you can wrap them in aluminum foil. Rollers can be wrapped in kraft paper, foil, or perforated plastic sandwich bags.

To clean reusable drop cloths of heavy-duty plastic or canvas, wipe off major paint splotches with soap and water and paper towels. Don't use solvent on drop cloths, as it may cause them to dissolve. Let them dry thoroughly, fold them up, and store them with your other equipment for the next project.

As you've seen in this article, painting a room is a step-by-step process. But if you carefully follow those stops -- from prepping to cleaning -- your room will look like new.

©Publications International, Ltd.