A Guide to Decorating Wooden Furniture

Woman Painting Furniture with Pink Enamel Paint
Enamel is a great finishing option to paint furniture with to smooth out any flaws. Joos Mind / Getty Images

You can decorate newly finished furniture, refurbish an old piece without stripping it, or add distinction to an inexpensive unfinished piece by adding a special-effect touch. You have many options to choose from.

You can apply an enamel finish to hide many surface flaws. Antique glazing or flyspecking will create an aged or worn wood look. Wax gilding adds a gold color to a furniture's shine. Stencils, paint stripes and decals are simple and economical ways to add decoration to almost any finish. Use your imagination and the step-by-step instructions mentioned in this article to create any special effect you prefer.

Advertisement

Before you begin any special-effect technique, make sure your furniture surface is clean and smooth. And make sure the materials you want to use are compatible with the finish already on the piece. This is especially important with lacquer finishes. One common choice for decorating furniture is applying an enamel finish.

Enameling

Unlike clear finishes, enamel can be used over an old finish on wooden furniture. It is tough, attractive, and easy to take care of. It covers a lot of flaws -- poor-quality or uninteresting wood, badly stained surfaces, and pieces made with very different types of wood can all be rescued with a coat of bright enamel. Used over bare wood or over an old finish, enamel can create a striking accent piece.

Types of Enamel

Where furniture is concerned, enamel should never be confused with paint. Paint consists of pigments in an application vehicle or medium. Good enamel consists of pigments in a varnish, lacquer, or oil base. While enamel is as tough as varnish, paint produces a soft finish, and is not recommended for use on furniture. Oil-based enamel is generally superior to the latex type.

Enamel is available in high-gloss, semigloss, and flat or matte forms. If you're enameling a piece of furniture as an accent for a room, you may want a shiny finish, but most fine enameled furniture has a satin finish, not high-gloss. Buy enamel in stock colors, or have it mixed at the paint store.

Special Requirements

Finished surfaces to be enameled must be sealed with thinned shellac. Before enamel is applied, all surfaces should be undercoated. Shiny enamel emphasizes flaws, so surfaces to be covered with this type must be very smooth. Enamel cannot be used over wax.

Unless a piece of furniture has intricate carvings already clogged by the old finish, stripping or removing the old finish is not required before enamel is applied. To prepare a finished piece of furniture for enameling, sand it to remove any obvious flaws and chip marks. The surface must be smooth, but it isn't necessary to remove the old finish completely. Clean the sanded wood thoroughly with a tack cloth, and apply a sealer coat of thinned shellac. Let it dry completely and sand the piece lightly with grade 7/0 sandpaper. Remove the sanding debris with a tack cloth. To prepare an unfinished piece of furniture, sand and seal the wood with any finish application, and clean it with a tack cloth.

Application Techniques

Wooden furniture to be finished with enamel must be properly sanded, coated with a filler finish to even out the open pores, and coated with a sealer finish to create a smooth surface. (For guidelines on how to sand and seal furniture, click here.) Finished surfaces must be sanded and sealed only. Before applying enamel, clean the piece of furniture thoroughly with a tack cloth.

Before applying the enamel, you must undercoat the piece of furniture; commercial enamel undercoater is available. This undercoater is usually white; use it white or have it tinted to match the enamel. The undercoat should never be darker than the enamel.

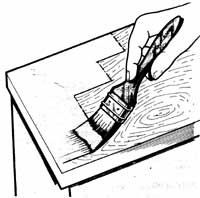
Apply the undercoat with a clean, good-quality brush; make sure the undercoat is thoroughly mixed. Brush the undercoat smoothly and evenly along the grain of the wood, flowing it on to cover the surface completely. Carefully smooth the surface to even out any thick spots. Brush marks will almost disappear as the undercoat dries.

Let the undercoat dry for at least three days, or as directed by the manufacturer; then lightly sand the undercoated surfaces with grade 7/0 sandpaper. Remove all sanding debris with a tack cloth.

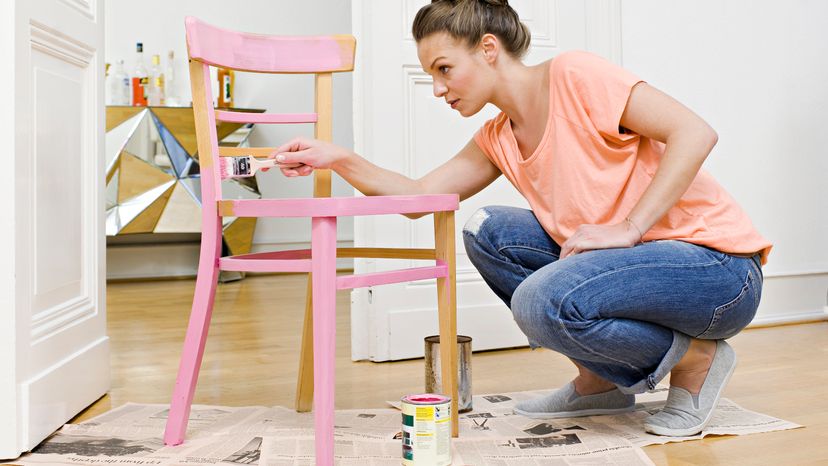
When the undercoat is complete, apply the enamel. Use a clean, good-quality brush, of the type specified by the enamel manufacturer; mix the enamel thoroughly but gently. Apply the enamel with long, smooth, even strokes, laying it on along the grain or length of the wood in strips the width of the brush. Use enough enamel to flow smoothly onto the surface, but not so much that you leave thick spots.

After laying on an even coat of enamel in strips, apply more enamel across the grain or width of the wood to level and even the surface. The enamel should be as even as possible, with no thick or thin spots, but as with varnish, a thin coat is better than a thick one. Thick coats of enamel dry extremely slowly, and tend to stay soft for a long time.

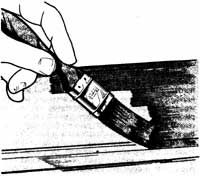
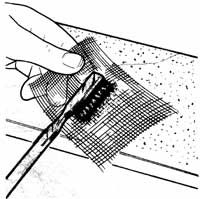
To finish each surface, tip off the enamel along the grain or length of the wood, using an almost dry brush. Holding the brush at a slight angle to the surface, very lightly stroke the surface of the enamel to remove brush marks and even the surface. Smooth the entire enameled surface, working in strips along the grain or length of the wood. As you work, pick off dust and lint with a lint picker. Brush marks will disappear as the enamel dries.

On vertical surfaces, enamel is likely to sag or run. Work with a fairly dry brush, applying enamel from dry to wet surfaces. As you finish each surface, carefully inspect it for runs and sags. With the brush in a tipped position, and moving the brush as you come onto the surface with the bristles, tip the finish. Keep the stroke in motion as you come through the sag or run and as the tip of the brush leaves the surface. By keeping the brush in motion before, during, and following the tipping, you will avoid brush marks. Watch the enamel carefully as it dries; sags and runs are especially liable to occur after the enamel has set for 10 to 15 minutes. Tip off sags and runs immediately when you spot them.

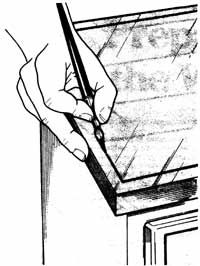
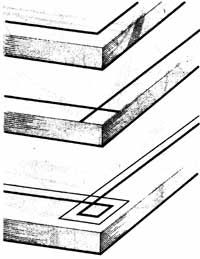
Enamel must be applied carefully to prevent thick spots. At outside corners, work from the flat surface toward the corner; lift the brush as it nears the corner and before it flips down over the edge. This prevents a buildup of enamel along the edge. At inside corners, work an inch or two away from the corner; then brush the enamel into the corner, tip it off, and leave it alone. This method prevents buildup on many flat-surface brushings. Spots that tend to hold enamel like tiny potholes should be coated just once with enamel and tipped just once with the brush. Repeated tipping will leave a bulge.

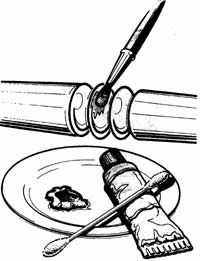
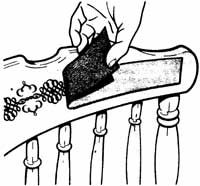
Brush lengthwise along rungs, spindles, and other turnings. On carved moldings, apply the finish to the carvings first with a fairly dry brush; then finish the flat surfaces with the tip of the brush. Finally, with a very dry brush, go over the carvings and then the flats, leveling the finish and removing any fat edges, sags, or runs. On raised panel doors, finish the panels first and then move onto the flat framing. The finish will build up at the miters in the frame where they meet the panel; remove the excess with a very dry brush, working from the corner out.

Drying and Recoating

Let the enamel dry for several days, or as directed by the manufacturer. Then lightly sand the surface with grade 7/0 sandpaper and a padded sanding block, and clean the piece of furniture thoroughly with a tack cloth. Apply a second coat of enamel, as above, and let it dry completely.

Enamel can be finished in several ways. For a tough, shiny surface, apply a third coat of enamel, as above; sand the second coat lightly before applying more enamel. Or let the piece of furniture dry for at least a month, and then apply a coat of paste wax and buff it to a shine.

Enamel is a common base used for antique glazing furniture. Check out the next section for guidelines on when and how to add an aged or colored look to your piece.

How to Antique Glaze Furniture

©
Antiquing consists of a glaze applied over a base finish; the first step is applying an enamel base coat to the wood.

Antiquing is the technique of glazing a base finish to simulate age or create an interesting color effect. Enamel is the most common base for antiquing, but varnished, shellacked, and lacquered surfaces can also be glazed. Antiquing is not recommended for real antiques, but it can work wonders with a thrift-store find or a cheap unfinished piece.

Materials

Advertisement

Antiquing kits, sold in paint and hardware stores, include both base enamel and a coordinated or contrasting glaze. Many colors and combinations are available. Any sound flat or gloss enamel, varnish, shellac, or lacquer finish can be treated with glaze. Look for transparent antiquing glaze, in muted tones of umber and burnt sienna or in white, gold, black, or colors. The greater the contrast between base and glaze, and the brighter the glaze color, the more obvious it will be that the piece of furniture is antiqued. If you're working over an existing finish, make sure the glaze is compatible.

Application Techniques

The base coat: A piece of furniture to be antique-finished must be clean and in good repair. Remove all hardware. If you're antiquing an unfinished piece of furniture or covering an old finish, sand and seal the wood. On finished pieces to be covered completely, clean the wood thoroughly and then treat it with sanding deglosser to dull the surface; if there are still any shiny spots, buff them with No. 0000 steel wool. Sand out any chips in the old finish so that the surface is smooth.

On pieces to be glazed over an existing finish, clean the wood thoroughly with a detergent solution and dry it well;

then wipe it with denatured alcohol. Let the prepared wood

dry for 24 hours.

If you're working on an unfinished piece or covering an old finish, apply a base finish coat of flat or gloss enamel. Let the enamel dry completely. If necessary, apply a second base coat; sand the surface lightly, clean it, and apply the enamel. Let the final coat of enamel dry completely, at least two days.

The glaze:When the base coat is completely dry, or the existing base finish is prepared, apply the antiquing glaze. Use a contrasting color for an obvious antiqued look, a muted umber or burnt sienna to simulate age. Apply the glaze with a clean brush.

©
When the enamel base is dry, brush the glaze on over it, one surface at a time. For glaze retention on highlights, cover highlight areas first, then flat surfaces.

Antiquing glaze sets quickly, and the surfaces you glaze first will retain more color than the ones you glaze later. Working on one surface at a time, apply glaze to moldings, carvings, and decorated areas, and then to flat areas. On large surfaces, the glaze can be applied in several stages,

if necessary.

Let the glaze dry until it starts to dull, as directed by the manufacturer. Then carefully wipe the glaze off with a soft cloth, flat surfaces first, so that the base coat retains color only at areas to be highlighted. Work from the center of each surface out to the edges, wiping carefully along the grain of the wood. Remove the glaze completely from high spots; leave some of it in low spots, in corners, in

carvings or decorations, and along edges and moldings.

The surfaces wiped last will retain the most glaze; leave

the parts you want to highlight until last.

Let the glazed surface dry completely, as directed by the manufacturer.

Textured Glazes: For a bolder look, you can get different design effects by texturing the glaze with different materials, and leaving more glaze on. Before using these texturing methods on a piece of furniture, experiment on a piece of scrap wood given an enamel base coat.

©
Let the glaze dry until it starts to dull; then wipe it off. Work from the center out, leaving glaze in low spots, in carvings, and along the edges.

Texturing the glaze can be done with almost anything -- cheesecloth, crumpled newspaper, plastic wrap, a sponge,

or whatever you have on hand. Remove a little glaze or almost all of it, whichever you prefer. For a wood-grain texture, use a cheesecloth pad; wipe the glaze off in long, even strokes, and then dab it with a scrap piece of carpeting or a stiff-bristled brush. Crumpled newspaper or plastic wrap produces a marble effect; a dry sponge makes a random stipple. Use a burlap bag or a towel for a scratched look.

For a leather texture, let the glaze get almost dry;

then pad it with a piece of fiberglass insulation.

Protecting the Surface

Antiqued finishes can be left uncoated, but for a more

durable surface, seal the piece of furniture with semigloss or high-gloss varnish. Make sure the varnish is compatible with the antiqued finish. Apply the varnish directly over the antiquing.

If you are looking for another way to create a worn-out look, check out the next section for guidelines on when and how to flyspeck your furniture piece.

How to Flyspeck Furniture

©
To flyspeck a surface, carefully spatter thinned paint or shellac with a toothbrush, through a piece of wire screening.

Flyspecking is the random spattering of furniture with tiny drops of paint. The effect is of aged and worn wood. Some very expensive furniture is flyspecked, but this technique can be especially effective in finishing inexpensive pieces. Flyspecking isn't really deceptive, but it can be attractive if it is done with the right materials and technique.

Materials

Any thin flat black paint can be used for flyspecking. For colored specks, use thinned shellac tinted with aniline dye. Orange or brown is effective on medium-brown wood. Thin the paint or shellac so that it spatters in fine droplets; make sure it's compatible with the finish.

Advertisement

Application Techniques

A piece of furniture to be flyspecked must be clean. If you're finishing the piece, add flyspecking after sealing but before the finish is applied. Before working on a piece of furniture, practice the specking technique on a piece of cardboard or scrap wood.

The easiest way to apply the specks is by spattering the thinned paint or shellac through a piece of wire screening. Dip a toothbrush into the paint or shellac and flick the bristles with your thumb. Work just far enough from the surface to produce a fine, even spatter. Experiment to find the best brushing angle; practice until you can cover the test surface evenly, and then apply the specks to the piece of furniture.

Flyspecking can be used over an entire surface or to accentuate edges and corners. Apply the specks in any density desired, working evenly over the surface. Use only tiny spatters of paint or shellac; to speck an area more heavily, use repeated spatters. Let the flyspecked piece dry completely.

Protecting the Surface

Flyspecked surfaces should be sealed with a coat of varnish. Apply the varnish directly over the flyspecking.

If the worn-wood look isn't your preference, consider adding a gold tint for some pizazz. Learn about when and how to wax gild furniture in the next section.

How to Wax Gilt Furniture

© Apply wax gilt sparingly, smoothing it back and forth to bring out the sheen. When the gilt has set, buff it lightly.

Applying a gold finish or gilding is another option to restore your wooden furniture. This process can be added to ornate carvings or carved mirror and picture frames on furniture to create a special look.

The traditional gilding method is gold-leafing, done with thin sheets of gold foil. Gold leaf is beautiful and durable, but it's also very expensive. Bronzing, a more recent gilding technique, is done with powdered gold, either mixed into a vehicle or applied directly. It may fade with time, however. Bronze powder is made in gold, silver, bronze, copper, and colors; it is often used for stencils on furniture.

Advertisement

The easiest way to apply gold is wax gilding. Wax gilt is a paste, made in gold, silver, bronze, copper, and colors and sold at craft and art supply stores. It's inexpensive and looks very much like gold leaf. For moldings or small-area highlighting, wax gilt is the best choice. Use it over gold leaf paint for the best results.

Application Techniques

A surface to be gilded must be clean. Remove all wax and dirt. If you're working on a picture frame, clean the surface very gently with a damp cloth, and let it dry thoroughly.

For the deepest gold effect, paint the area to be gilded with liquid gold leaf paint, using a 1/2-inch brush. Let the paint dry completely, about 30 minutes, and then apply the wax gilt.

To apply the gilt, dip an artists' brush or a piece of soft cloth into turpentine and then into the gilt; if the gilt is in a tube, squeeze a little out so it's easier to work with.

Wax gilt is thick; apply it sparingly, smoothing it on. Press gently as you work, smoothing or brushing back and forth, to bring out the sheen of the gold.

When the entire surface is covered, let the gilt set for about an hour; then carefully buff the surface, in one direction only, with a soft cloth. The buffing distributes and highlights the gilt. No surface protection or further finishing is necessary.

Looking for a simpler, more economical way to decorate your furniture piece? Check out the guidelines for stenciling furniture wood in the next section.

How to Stencil Furniture

© Spray paint onto the stencil in short, even bursts. To prevent spattering, mask the piece of furniture with paper.

Stenciling is a quick and easy way of adding style to wooden furniture. The key is choosing the stenciling method that fits your piece best. Whether you want art deco or Pennsylvania Dutch, a drawing or a child's name, stencils are an almost foolproof way of decorating your furniture.

Stencils can be applied over any finish. They are easiest to work with when used over varnish that's still slightly tacky. When the surface to be decorated is completely dry, the stencil must be very carefully attached so that the edges of the design don't blur. Use paint for informal designs, bronze powder -- gold, silver, bronze, copper, or colors -- for a more formal effect.

Advertisement

Materials

Use stencil paper or architects' linen, available at art supply stores, to make a custom stencil. If your design has more than one color, make a separate stencil for each color. For large or complex designs, make several small stencils instead of one large one. Trace your design carefully onto the stencil paper or architects' linen, and cut it out with a sharp craft knife. Make sure all corners and curves are sharp and accurate.

An easier option is to purchase a stencil. Craft stores sell an array of pre-made stencils in a variety of styles.

Application Techniques

Painted Stencils: Brushing paint over a stencil is tricky, and requires a special brush. For the best results, use high-gloss or semigloss spray paint or enamel. Make sure the stencil paint is compatible with the finish.

Surfaces to be stenciled must be clean; remove all wax and dirt. If you're decorating a newly varnished piece of furniture, work while the varnish is still slightly tacky. Carefully press the stencil into place on the tacky surface, smoothing it down flat on the wood. Make sure all cut edges adhere to the varnish, but be careful not to touch the varnish or you'll leave fingerprints.

On dry surfaces, attach the stencil carefully with masking tape. If the finish is new, make sure it's completely set; otherwise the tape may damage it. Mask the entire piece of furniture with newspaper.

Spray paint onto the stencil in short, even applications; cover the stencil surface completely, but don't let the paint get thick enough to sag or drip. Let the paint dry almost completely; then remove the stencil. Repeat the process for each color of the design; make sure each color is completely dry before applying the next color.

Bronze Power Stencils: Surfaces to be stenciled must be clean; remove all wax and dirt. Bronze powder must be applied over varnish. If you're working on a newly varnished piece of furniture, apply the stencil while the varnish is still slightly tacky. If you're working on an old or completely dry finish, apply a thin coat of varnish over the surface to be stenciled, and let it dry until it's just tacky -- about 30 minutes to two hours. Make sure the varnish is compatible with the existing finish.

Carefully press the stencil into place on the varnished surface, smoothing it down flat. Make sure all cut edges adhere to the varnish, but be careful not to touch the varnish or you'll leave fingerprints. Masking the piece of furniture is not necessary.

Apply the bronze powder with a piece of velvet or soft flannel over your index finger, or make a small pad out of the fabric. Working with only a little powder, dip the velvet into the bronze powder and smudge it into the exposed areas of the stencil. Bronze powder can be applied evenly, but you can give your designs depth by shading it and rounding your strokes. Work from the edges in to bronze each area of the stencil.

Repeat the process for each color of the design. If you must overlap stencils to apply the colors, let the varnish dry completely between colors. Remove excess bronze powder with warm water and a soft brush; blot the wood dry and let it air-dry for about an hour. Apply another thin coat of varnish to the unfinished area, let it get tacky, and repeat the stenciling process. When the design is complete, let it dry and then remove excess bronze powder as above.

Protecting the Surface

To prevent damage to paint or bronze powder, stenciled surfaces should be sealed with varnish. Apply the varnish directly over the stencils.

If you are looking for a simplier but elegant way to decorate furniture, consider the guidelines for painting stripes mentioned in the next section.

How to Paint Stripes on Furniture

© To make a freehand stripe, draw your hand along the edge of the surface to hold the brush steady along the top.

Adding stripes is another quick and easy way to style and decorate wooden furniture. Painting edge stripes on enameled or antiqued furniture can add distinction to flat surfaces -- use one thin border stripe or paint multiple stripes or geometric borders.

Tabletops, chair seats, and similar areas are good candidates for striping, but any flat surface can be decorated with stripes. Use high-gloss or semigloss enamel, slightly thinned; make sure it's compatible with the existing finish.

Advertisement

Application Techniques

Freehand Striping: Freehand stripes take a steady hand and a good brush, but they aren't difficult on a fairly small piece. The surface to be striped must be clean; remove all wax and dirt. Use a good-quality artists' brush, with a small diameter and a good point. Practice striping on a piece of cardboard before you work on a piece of furniture.

Stripes close to the edge of a surface can be applied without a straightedge or other guide. Hold the brush with your thumb and first two fingers and rest your other two fingers on the edge of the surface; keeping the brush steady on the surface, draw your hand along the edge. This method is effective for edge stripes on curved or straight surfaces. For stripes too far from a straight edge for this technique, use a yardstick as a guide to draw your hand along; have an assistant hold the stick in place as you paint.

Apply enamel carefully, loading the brush enough to make a complete stripe but not enough to blob or drip. Keep your pressure steady as you draw the brush along the edge of the surface; practice on cardboard to get a feel for the technique. If the brush doesn't hold its point or spreads out too far, try turning it slightly as you draw it along. This will re-form the brush as you work.

For double stripes or designs with more than one color, let each stripe dry completely before you paint the next one. Work from the inside stripe out to avoid smudging.

© Edge stripes can add distinction to flat surfaces; use a single or multiple stripe, crossed lines, or a simple geometric.

Taped Striping: On long edges, or for wide stripes, use painter's tape to define the stripes. The surface must be clean, with all wax and dirt removed. Carefully press the tape along the surface; make sure it's straight, and at a consistent distance from the edge. Seal the edges of the tape carefully to keep the paint from seeping under it; press each tape edge firmly all along its length with your thumbnail or the tip of a putty knife.

Apply the enamel with a good-quality artists' brush, roughly the same width as the masked stripe. Use enough paint to cover the surface completely, but smooth it out well; don't let the stripe get thick or uneven. Let the paint dry completely. Then remove the tape, pulling it gently away from the surface. Do not leave the tape on the surface for more than 12 hours, or it may damage the finish.

For double stripes or designs with more than one color, let each stripe dry completely before you tape the next one. Apply tape very carefully where stripes cross, to keep it from damaging the earlier stripes. Work from the inside of the surface toward the edges.

Protecting the Surface

To prevent damage to the stripes, the surface should be sealed with varnish. Apply a coat of varnish directly over the stripes.

If you are working with inexpensive furniture, decals are another option for sprucing up your piece. Check out when and how to use decals in the next section.

How to Apply Decals to Furniture

© Soak the decal in warm water until the paper backing loosens; then smooth it into place and peel off the backing.

Decals or decoupage can add a down-home, cheerful touch to informal wooden furniture. They shouldn't be used on expensive furniture, but they look right at home on some early American reproductions. And, Pennsylvania Dutch decals or other country-look designs can be very attractive on kitchen furniture or in a child's room. Home center and hardware stores often carry decals, but you'll probably find a better selection at a craft or art supply store.

Application Techniques

A surface to be decorated with decals must be clean; remove all wax and dirt. Decals consist of a painted or printed image on a varnished or lacquered paper base. To apply a decal, soak it in warm water until the paper loosens; then carefully smooth the decal onto the surface to be decorated. Peel off the backing paper. Follow any specific instructions provided by the manufacturer.

Advertisement

If you don't like the effect of a decal, or if it isn't positioned correctly, peel it off while it's still wet, dip it into warm water again, and reapply it. To remove dry decals, buy special decal-removing strips. Soak the remover strip in warm water, as directed by the manufacturer, and place it over the decal to be removed. Let it set for about 30 minutes, or as directed, and then peel it off; the decal will come with it.

Protecting the Surface

To prevent damage to the decals, the surface should be sealed with varnish. Apply the varnish directly over the decals.

You have many options to consider when decorating furniture. Whether you want to add a worn-out look, gold tint, stencils or painted stripes, the key is making sure your materials are compatible and knowing how to use them correctly.

©Publications International, Ltd.