How to Replace a Wall Switch in 10 Steps

Sometimes a light fixture that's in perfect operating condition doesn't work because the wall switch to the receptacle is faulty. There are several primary symptoms of switch failure:

  • flipping the switch no longer turns the light on or off
  • flipping the switch makes the light flicker, but the light will not stay on or off
  • the switch may work occasionally, but you have to jiggle it back and forth several times to keep the light on

If you spot any of these symptoms of switch failure, install a replacement wall switch as soon as possible. Here's how:

Advertisement

1. Cut Power

Deenergize electrical circuit that controls switch.

Advertisement

2. Remove The Switch Plate Cover

Remove switch cover plate. If cover plate doesn't come off easily, it is probably being held in place by several layers of paint. Use razor blade or utility knife to cut paint closely around edge of plate to free it.

Advertisement

3. Inspect the Old Switch

Inspect old switch to determine type of replacement model you need. (Replace cover until you return with new switch.) You must use the same type, but, in most cases, you can install a better grade of switch than the one you had before.

Advertisement

4. Prep the New Switch

Prepare new switch for installation. Some kinds of wall switches have no terminal screws for conductor attachments. Instead, switch has small holes that are only slightly larger than bare copper conductors. Remove about 1/2 inch of insulation from ends of wires, then push bare ends into holes. Locking tabs make electrical connection and grip wires so they can't pull out. If necessary, release wires from old switch by inserting narrow-blade screwdriver in slots next to wire-grip holes.

Advertisement

5. Remove Screws

Remove mounting screws on switch cover plate and take off plate. With cover plate removed, you'll see two screws holding switch in switch box. If necessary, remove screws, and carefully pull switch out of box as far as attached wires allow. If there are two screws with wires attached, switch is a simple ON/OFF (single-pole) type. If there are three screws with wires attached, you're working with a more complicated type called a three-way switch. Replacement switch must be the same type as old one, either single-pole or three-way. Three-way switches allow you to turn light on and off from two different locations, such as at top and bottom of stairway. Look carefully at three terminal screws; you'll see that two are one color while the third is a different color. Do not disconnect any wires until you compare old switch with replacement switch so you know which wire goes to which terminal screw.

Advertisement

6. Loosen Old Terminal Screws

Loosen one of the old terminal screws, remove wire, and attach wire to corresponding terminal screw on new switch. Repeat with remaining wires. Take care to connect wires so all bare wire is safely under screw heads; clip off any excess uninsulated wire. Procedure is the same whether you're working with simple ON/OFF switch or three-way switch, but you must be more careful with the latter. Verify wiring by comparing it with manufacturer's diagram on packaging of new switch.

Advertisement

7. Insert Wires

If you're installing modern wire-grip type of wall switch, cut off end of each wire to leave only 1/2 inch of bare wire. Push one bare end wire into each wire-grip hole, and check that wires have caught properly by tugging gently on them. Caution: If wires or insulation going into electrical box are brittle or frayed, that part of circuit should be professionally rewired.

Advertisement

8. Replace the Switch

Replace switch in wall electrical box. Push switch into box carefully, and make sure wires fit neatly into box behind switch. There are small tabs extending from switch's mounting bracket; these tabs should lie flat against wall outside electrical box. They hold switch flush with wall no matter how electrical box is angled inside.

Advertisement

9. Put the Switch Back in Place

Put switch back into place, using two mounting screws provided with new switch. Oval holes in mounting bracket allow you to fasten switch so it's straight up and down even when screw holes in electrical box are tilted.

Advertisement

10. Attach Cover Plate

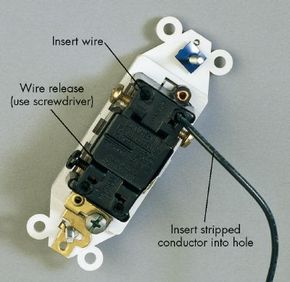
Attach cover plate with screws you took out earlier, and replace circuit fuse or trip circuit breaker back on.

All switches work on the same general principles, and you can usually choose a switch with features you like best. The single-pole toggle switch is still the most popular. When the toggle switch is mounted properly, the words ON and OFF are upright on the toggle lever, and the light goes on when you flip the switch up. A variation of the traditional toggle switch is the lever-action switch, which lies almost flush with the wall. It turns the fixture on when someone pushes the top of the switch in. The push-button switch has a single button that turns the light on when pressed and off when pressed again. Some switches are available with the extra feature of a built-in neon lamp that glows when the switch is off, making it easy to locate the switch in the dark. Dimmer switches, with a dial to control the brightness, turn the light off when the dial is turned all the way down or pushed in. Some dimmer switches are like toggle types. Sliding the toggle upward increases the light's intensity; sliding it all the way down turns off the light. You can install these switches as replacements for nearly any type of switch.

Need to rewire a lamp? Check out How to Rewire a Lamp to find out how.

Lots More Information

Related HowStuffWorks Articles

Advertisement

Loading...