How to Build a Patio

Day 2 Patio
© 2013 Discovery Communications

A patio is one of the most valuable and satisfying home improvements you can make, but building it is a big -- and expensive -- job. For a simple solution to both problems, here's a sensible alternative: a concrete patio you can pour yourself section by section. Here's what you'll need.

Tools: measuring rule, stakes, sledgehammer, shovel, wheelbarrow, rake, hammer, power saw or handsaw, carpenters' square, level, garden hose, portable cement mixer (3-cubic-foot capacity), 6-foot 2 × 4 for striking off, wood float, steel trowel, push broom, weights.

Advertisement

Materials: string, gravel; 2 × 4 and 1 × 3 pressure-treated ground-contact lumber, or 2 × 4 and 1 × 3 cedar or redwood stock; 2-inch-wide masking tape; 8-penny galvanized common nails; premixed gravel-mix concrete mix, or Portland cement, sand, and coarse aggregate; plastic sheet film.

Time: varies with size; at least 2 days for a 9-foot-square area.

The first step in building your patio is to carefully choose its location. Find out what type of location is best -- and learn other preparation tips -- on the next page.

For information on accessories for your patio, try the following links:

Advertisement

Preparing to Build a Patio

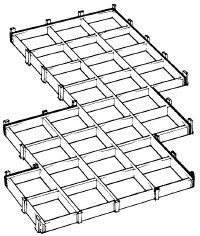
To frame the patio, build a grid of 3-foot squares, firmly nailed and staked at all joints and corners.

Choose the patio site carefully. Plan the patio for an area that's level and well drained, and slopes slightly away from the house. Take sun, shade, and wind into consideration.

The patio is constructed as a grid of 3-foot-square concrete units, framed by wood. Make a sketch of the yard area and plan the patio in 3-foot-square units; it can be as few or as many units as you like. When you've decided on a design, outline the patio area on the construction site with stakes and string, to give you an idea of how it looks and to mark the site. Measure accurately; be careful to keep the corners of your staking square.

Advertisement

When you've finalized the size and shape of the patio, excavate the entire marked-off area to a depth of about 7 inches -- 3 inches for a gravel base and 4 inches for the concrete itself. Keep the sides of the patio excavation vertical, and keep the bottom as level as possible. Then fill the entire dug-out patio area with a 3-inch-thick layer of gravel, and rake the gravel level.

To frame the patio, build a grid of 2 × 4 pressure-treated ground-contact lumber on the excavated site. You must use treated wood or the frame will rot in the finished patio; of, if you prefer, build the grid of 2 × 4 cedar or redwood stock.

Build the outside frame for the patio first, butting the 2 × 4's together at the corners; then place dividers to form the 3 × 3-foot grid, first one way and then the other. Make sure all top edges are flush; they'll be a part of the finished patio. Nail the 2 × 4's together with 8-penny galvanized common nails; check the joints with a carpenters' square as you work to be sure all joints are strong. Use at least two nails through the 2 × 4 face at each joint.

To hold the frame in place, drive 12-inch stakes all around the frame; set a stake at each corner and at each grid joint all around the frame. Cut the stakes from 1 × 3 pressure-treated ground-contact lumber, or from 1 × 3 cedar or redwood. Drive each stake carefully to hold the frame at a vertical; pound the end of the stake below the top edge of the 2 × 4 frame.

When the frame is completely assembled, check its pitch. The patio should slope evenly away from the house, about 1/4 inch for every 12 feet. Adjust the pitch as necessary, raking the gravel in the excavated area to the required slope. Fill low spots under unsupported frame members, and remove gravel as necessary to level high spots; rake to level the entire patio area to a smooth, evenly sloping pitch.

After you've framed the patio, the next step is to pour the concrete. We'll cover this on the next page.

For information on accessories for your new patio, try the following links:

Advertisement

Pouring Concrete for a Patio

When the patio area is firmly framed in, you're ready to pour the concrete. Because the patio will probably -- unless you live in a very warm area -- be exposed to freezing and thawing, you must use machine-mixed concrete; hand-mixed concrete is not as strong. The easiest way to work is to rent a portable cement mixer with a 3-cubic-foot capacity -- one mixer load will mix just enough concrete to fill one grid unit of the patio, 4 inches thick. Depending on the size of the patio, you can schedule the pouring to suit yourself and to make best use of the mixer; pour one 3-foot-square section at a time, as few or as many as you like.

To mix the concrete, it's easiest to use sacks of premixed gravel-mix concrete -- 41/2 sacks of concrete mix make up one mixer load, or one 3-foot-square unit of the patio. If you have the storage space, and the patio is a big one, it's cheaper to mix your own concrete; use a mixture of one sack of Portland cement, 21/2 cubic feet of sand, and 3 1/2 cubic feet of coarse aggregate to each 5 gallons of water. Get operating instructions for the portable cement mixer from the rental agent. You'll also need a wood float to smooth the surface of the concrete.

Advertisement

Work section by section to pour the patio. About 1 hour before you mix the cement, soak the gravel base with the fine spray of a garden hose, to keep the concrete from drying too quickly. Protect the top edges of the wood frame around each unit with 2-inch-wide masking tape.

Load the cement mixer and add water as directed, using about half of the ingredients for one mixer load. Start the mixer, add the remaining ingredients, and mix the concrete for the full time specified by the rental agent -- at least 3 minutes. Then, working quickly, empty the prepared concrete out of the drum -- if possible, directly into the prepared frame; otherwise, into a wheelbarrow.

Spread the concrete into the corners of the unit with a shovel, jabbing the shovel through the concrete to eliminate air holes. Smooth the top surface of the unit as evenly as you can; it should be slightly overfilled, and about 4 inches thick.

With a helper, level the surface of the newly poured concrete. Use a 6-foot piece of 2 × 4 to strike off the unit; with each person on one side of the square, set the 2 × 4 on edge across the frame and pull it in a zigzag across the wet concrete. This sawing-across process removes excess concrete and levels the surface of the unit.

As soon as the concrete is leveled, smooth the surface with a wood float. Push and pull the float across the wet concrete to smooth the surface thoroughly and to bring a sheen of water to the top.

When the surface of the unit is smooth and evenly water-sheened, stop working and let the concrete stand. Wait until the water sheen disappears from the surface -- as little as 10 to 20 minutes in hot, windy weather, as long as 4 to 5 hours in cool weather.

As soon as the sheen disappears, trowel the concrete smooth with a steel trowel; press firmly, and work evenly over the entire surface. For a nonslip finish on the concrete, lightly pull a damp push broom across the troweled surface.

After finishing the surface of the unit, cover it with plastic sheet film and weight the plastic down. Let the concrete cure for at least 1 week. During the curing period, wet the concrete once or twice a day with the fine spray of a garden hose; replace the plastic after soaking the concrete.

Depending on how you schedule the pouring, pour individual units of the patio to allow for easy access. For a large patio, you may find it easier to work in alternate squares. Let each unit cure completely before walking on it; wait 1 week more before putting furniture on the new concrete. Remove the protective masking tape after the curing period.

Your new patio is now ready for entertaining a crowd, or just relaxing by yourself. And you can take pride in the fact that you built it yourself.

For information on accessories for your new patio, try the following links:

Advertisement

Advertisement

Loading...