How to Repair Concrete Steps
Old houses -- and even middle-aged ones -- often have concrete front or back steps that have felt the wrath of the elements over the years and are crumbling along the edges. It takes time to recast the damaged steps, but it isn't difficult.
Tools:
- safety goggles
- cold chisel
- sledgehammer
- whiskbroom
- garden hose
- hammer
- sturdy wheelbarrow
- shovel
- stiff paintbrush
- trowel
- wood concrete float
Materials:
- boards as long and wide as the steps to be mended
- bricks
- boards for sides of form
- short pieces of 2 × 4
- 4-penny common nails
- ready-mix sand concrete mix
- liquid concrete bonding agent
- plastic dropcloth
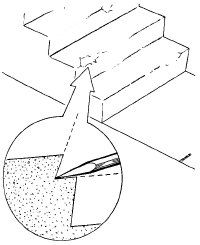
Time: about 1 day; if several steps must be recast, plan on spending more time. In addition, you'll need to spend a few minutes several times each day during the curing period.To begin the project, prepare the edge of each damaged step by chiseling out the crumbling concrete. Wearing safety goggles, use a cold chisel and sledgehammer to deepen and widen the open edge down to solid concrete. Angle the chisel to cut straight back into the riser of the step and to cut sharply back and down into the tread, forming an acute open V along the edge of the step. Clean out the undercut edge with a whisk broom and flush it thoroughly with a garden hose.
Advertisement
Build a form around the step to be recast. Use a board as long and as wide as the front edge of the step is wide and high; set the board across the riser and stack several bricks against it at each end to hold it firmly in place. If possible, the top edge of the form should be level with the sound surface of the step.
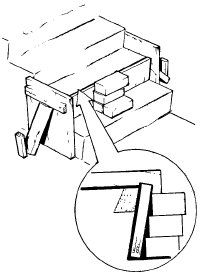
To close in the ends of the steps, set a board across each side of the chiseled-out step, flush against the concrete and level with the step surface at the top edge. Nail a piece of 2 × 4 across each board along the top of the step and wedge another piece of 2 × 4 under this brace to hold the forms solidly in place.
Prepare ready-mix sand concrete mix according to the directions on the package; pour the dry mix into a sturdy wheelbarrow, add water, and mix it thoroughly with a shovel. When the concrete mix is ready to use, mist the chiseled-out step with the garden hose to dampen the concrete. Working quickly, apply liquid concrete bonding agent to the undercut edge with a stiff paintbrush according to the manufacturer's instructions. Spread the bonding agent evenly into the undercut edge, being careful to cover the entire inside surface. Clean the paintbrush immediately with water.
Fill the boarded-in step's edge cavity with concrete, using a trowel or the shovel to spread it along the edge. Slice through the new concrete with the sharp end of the trowel to remove any air spaces, and pack the concrete firmly into the undercut edge. Level the surface roughly with the trowel to meet the surface of the old concrete.
Smooth the newly poured concrete with a wood float, being careful to hold the float level on the old surface and the new edge. Let the newly poured edge harden for about 45 minutes and then smooth the surface again with the wood float to match the texture of the old concrete. If you want a smoother finish on the recast step, wait until the film of water left on the concrete after the last float-smoothing has been absorbed, then smooth the edge of the step carefully with a clean trowel.
Let the concrete set until the film of surface water left by the final smoothing has been absorbed. Cover the steps with a plastic dropcloth, weighted above and below the mended steps and at the sides. Let the patched edges cure for a week before walking on them. Several times each day during the curing period, lift off the plastic and spray the recast steps lightly with the fine spray of water from a garden hose, then replace the plastic. To keep the new edges from being damaged, leave the forms in place until the concrete has completely cured.
On the next page you'll learn how to repair cracks, both large and small, that appear in brick or concrete block walls.
For further tips and instructions on how to fix things around the house:
- Home-Repair Safety Tips: Doing the job yourself doesn't save you money if you end up in the emergency room. Read these tips to make sure you work smart when doing home repairs.
- Home-Repair Tool Basics: Does your tool box have what it takes? Learn what tools you're likely to be looking for when making repairs around the house.