How to Repair a Washing Machine

By: Fix-It Club & Lance Looper  | 
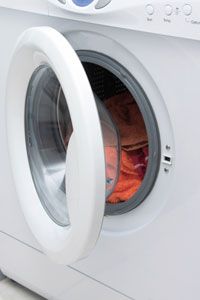
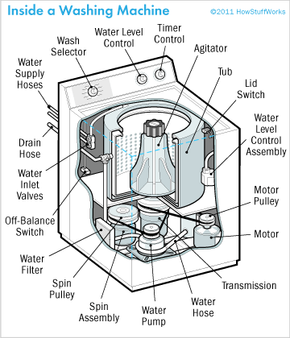
Ever wonder what the guts of a washing machine look like? A washer has a tub and an agitator; various cycles control the water temperature.
HowStuffWorks

Key Takeaways

  • Washing machine repairs can often be simple, starting with checking whether the appliance is plugged in and ensuring it receives power and water supply.
  • Regular maintenance, including cleaning the machine with baking soda or white vinegar, can prevent many issues.
  • For more complex problems, disassembling the washer may be necessary. Always consult the owner's manual and ensure the machine is unplugged before attempting repairs.

It's laundry day. You know this because the shirt you're wearing is eight years old and doesn't match your pants in any light. And there's a chance, just a chance, that you're wearing one black sock and one Navy blue sock. So you schlep a heaping hamper to the laundry room and carefully (or not so carefully) separate colors from whites. Then, you cram as many as will fit into the washing machine, throw in some detergent and hit the START button.

And nothing happens.

Advertisement

Suddenly, the piece of machinery you could always count on is on the fritz. Washing machines are the workhorses of the household appliance stable -- in fact, there's even a TED Talk about how they're the most important invention of the Industrial Revolution (source: Rosling]. And when they go down, they're the toughest to get by without. Who wants to drag their laundry down the street to the laundromat and fight other people for the privilege of shoving quarters into a strange machine that you suspect may not take the gentle cycle very seriously?

So, you have a choice to make: Call a repairman or see if you can tackle the problem yourself. Because washing machines do so many things, they may be harder to diagnose than they are to repair. For a household appliance, it's a pretty complicated gizmo - with special timing cycles that operate valves, motors that turn water on, spin the tub, drain water, and control the water temperature.

Note: Many newer washers include electronic diagnostics that can be interpreted from the owner's manual.

Caution: Before you do any work on a washer, make sure it's unplugged. Disconnect the grounding wire and the water hoses.

But diagnosis is possible, even for the do-it-yourselfer. It just takes a little patience and a basic understanding of washing machine mechanics. In this article, we will explain how to troubleshoot your washing machine and describe some quick repairs for common malfunctions.

Advertisement
Keep it Simple: Sometimes the Easiest Answer is the Right One

If these simple operating checks don't fix the problem, it's time to get up close and personal with your machine.
Jupiterimages/Thinkstock

As we mentioned, washing machines are complex, but there are some simple steps you can take to diagnose common washer problems.

Is the washer receiving power? The first line of defense for any electrical repair is the sincere hope that it's as simple as a loose plug, damaged cord or malfunctioning wall outlet. If all of these check out, it could be a blown fuse or circuit breaker. Either of these can still be a pretty simple fix. But if the machine is receiving power and still not operating, then it's probably time to get to know your washing machine on a deeper level.

Advertisement

After checking for power, the next thing to look at is the water supply. Knobs may get turned inadvertently or hoses could become kinked, so a quick inspection of these parts may yield an answer. Make sure that both water faucets are turned on and that all hoses are properly extended, without kinks. If the washer has a water-saver button, make sure the button is depressed.

If it's not a power or water source issue, the next logical problem may be that the washing machine is not working properly because it needs to be cleaned. In the next section, we'll discuss how to keep dirty clothes from creating a dirty washer.

Advertisement

Washing Machines Need Cleaning, Too

A clean washer is a happy washer.
iStockphoto/Thinkstock

We interrupt this scintillating mechanical exploration of washing machine mechanics to bring up a very important matter: why your laundry might stink even after a fresh wash. It may be that your washer is dirty. Here's how to clean a washing machine:

Regularly clean the top and door of the washer to prevent the buildup of dirt and detergent. When you wash very linty materials, pull lint from the tub after removing the laundry. Built up lint can keep water and detergent from properly circulating and soap deposits themselves may cause laundry to smell bad. To solve this problem, fill the tub with water and add 1/2 cup of baking soda or 3 cups of white vinegar; then run the machine through the complete wash cycle sans laundry [source: DIY Life]. If the deposits are really bad, wash the inside of the tub with a solution of household ammonia and mild detergent. Rinse thoroughly and wipe the tub with liquid bleach. A word of caution: Rinse the tub thoroughly before wiping it out with bleach. The combination of ammonia and bleach forms a potentially dangerous gas called chloramine. This compound can cause health issues ranging from mild skin irritation to digestive and kidney problems [source: CCAC]

Advertisement

Finally, run the machine through a complete wash cycle before you put any more laundry in. Hopefully, you were able to address your issue with these simple steps.

But if your problem persists, don't despair. In the next section, we'll discuss disassembling the washer for more thorough repairs.

Advertisement

A Look Under the Hood: Disassembling the Washer

Washing machines: Some disassembly required.
iStockphoto/Thinkstock

For most repairs and maintenance, the washer cabinet usually requires disassembly. The washer cabinet is where the magic happens, and houses all of the electrical components of the washer. Location varies by manufacturer, but typically this can be found on the top of the machine behind the control panel. This can be relatively simple based on the make and model, but be sure to consult the owner's manual to find out how to disassemble your particular machine properly. Caution: Make sure the power cord and water hoses are disconnected before you disassemble the cabinet or tip it over for service.

Here are three steps for basic washer disassembly:

Advertisement

Step 1: Removing the control panel, typically located on top of the machine, usually requires loosening and/or removing a set of retaining screws. These may be located under a piece of molding or trim that needs to be removed in order to see them. Knobs on the control panel are usually friction-fit and will pull off, while others are held by small setscrews, which do not have heads like a typical slotted screw, at the base of the knob. Loosen the setscrews with a screwdriver or Allen wrench and pull the knobs straight off the shafts.

Step 2: To remove the service panel, you also need to remove the retaining screws. First, make sure the machine and the hoses are drained of water. Tip the washer over on its front or side to gain access through the bottom of the machine, which is generally open and doesn't have a service panel.

Step 3: To remove the top of the cabinet, insert a stiff-bladed putty knife into the joint between the top and side panels and give the knife a rap with your fist. This should release the spring clips so that the top can be removed.

Part of what makes washers so hard to repair is that they have so many control devices (components that control other functions, such as switches and timers). Now things start to get a bit more complicated, but don't give up yet. In the next section we will walk you through servicing these slightly more sophisticated parts.

Advertisement

Which Switch to Fix?

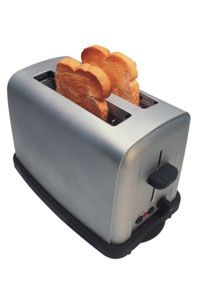
Sorry, toaster: You aren't as complex as your old buddy the washing machine.
Comstock/Thinkstock

Washing machines run through elaborate cycles with multiple settings, which makes them different from your typical household appliance, a toaster for instance, that may perform just one or two functions. Here's how to repair some of the common switches and timers.

Lid Switch

Advertisement

The lid switch on a washer often serves as a safety switch, and if it's not working, or if the switch opening in the lid is clogged with detergent, the machine will not run. To check and repair the lid switch:

Step 1: Unplug the machine. You can clean out the lid switch port using a wooden manicure stick or even a chopstick.

Step 2: If cleaning doesn't help, remove the top of the cabinet to access the switch itself. With the switch exposed, check to make sure the screws have not become loose. Loose screws can cause the switch to move when the lid is closed or as the machine goes through its cycles. Check the terminals of the switch to make sure they're tight.

Temperature Selector Switch

This control panel switch regulates the temperature of the water in the tub. It also plays a role in controlling the fill cycle. If you suspect this switch is faulty, remove it and take it to a professional service person for testing because this takes special equipment.

If there's a problem with both water temperature and tub filling cycles, both the temperature switch and the timer may be faulty. Procedures for testing the timer can be found on the following page.

Water Level Control Switch

This is another control panel switch, usually located next to the temperature switch. There should be a small hose connected to this switch, and sometimes, this hose becomes loose and falls off the connection. When this happens, the water in the tub usually overflows. To solve this problem, cut about 1/2 inch off the end of the hose and use a push fit to reconnect it to the switch. A push fit is a simple metal fitting that fastens into place by a row of small teeth that grip the tubing. The switch itself can also malfunction, resulting in tub overflow and other water-level trouble in the tub. If you suspect this switch is faulty, remove it by backing out the screws holding it in place and take it to a professional service person for testing.

If you've gotten this far and your washer is still broken, don't give up now. We're only getting started, and your laundry isn't going anywhere. Keep reading because in the next section we'll discuss why it may just be bad timing.

Advertisement

Timer Troubles

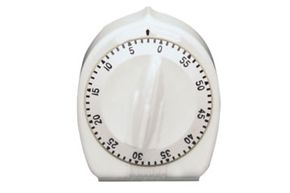
A washing machine timer looks a little different from this kitchen timer, but the principle is the same: Timing is crucial.
Comstock/Thinkstock

The timer controls most of the operations of the washer: water level, tub filling and emptying, length of cycles and cycle-setting sequences. For this reason, any repairs to the timer should be made by a professional service person. However, there are a couple of checks you can make yourself when you suspect the timer is faulty.

Step 1: Unplug the washer. To access the timer, remove the control knobs and the panel that covers the controls. This is usually the same control panel we discussed earlier, but may also be accessed be through a panel at the back of the unit. Carefully examine the wires that connect the timer to the other parts of the washer. If the wires are loose or disconnected, try pushing them into position; they usually fit into their terminals like plugs. Use long-nosed pliers to push them into position in order to avoid breaking the wire connections -- never pull a wire by hand.

Step 1: Unplug the washer. To access the timer, remove the control knobs and the panel that covers the controls. This is usually the same control panel we discussed earlier, but may also be accessed be through a panel at the back of the unit. Carefully examine the wires that connect the timer to the other parts of the washer. If the wires are loose or disconnected, try pushing them into position; they usually fit into their terminals like plugs. Use long-nosed pliers to push them into position in order to avoid breaking the wire connections -- never pull a wire by hand.

Advertisement

Step 2: To test the timer, use a volt/ohm meter (VOM) set to the RX1 scale. The RX1 scale is the lowest and should be the default setting of the meter. Disconnect the power leads to the timer and clip one probe of the VOM to each lead. The VOM should read zero if the timer is working. Since the timer is a multipurpose switch, turn it through its cycle and test each pair of terminals in turn. The meter should read zero at all of these points. If one or more readings are above zero, the timer is faulty and should be replaced.

Step 3: To replace the timer, unscrew and disconnect the old one. Install a new timer made specifically for the washing machine. Disconnect the old wires one at a time, connecting each corresponding new wire as you work to make sure the connections are properly made. After all the wires are connected, check the connections again for correctness and screw the timer assembly into place.

Now we're having some serious fun! Actually, you're probably thinking about which is more painful, reading about laundry or actually doing it. Take heart -- we're approaching the spin cycle and you'll be done soon.

Advertisement

Rub-a-Dub-Dub: Servicing the Tub and Valves

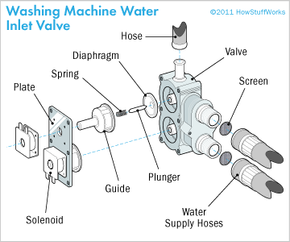
If an inlet valve is faulty, check the water connection and the valve screens. Try gently tapping the solenoids; if this doesn't work, replace the inlet valve assembly.
HowStuffWorks

If your washer is overflowing or is excessively noisy, the tips on this page may be able to help you solve your problem.

If the washer won't fill or fills very slowly, if it overfills, or if the water is the wrong temperature, the water inlet valves could be faulty. These components are easy to locate and very easy to replace, at little cost. When you suspect an inlet valve is broken, first check to make sure the water faucets are fully turned on and properly connected to the hot and cold inlets of the valves. Then check the screens in the valves; if they're clogged, clean or replace them. If water doesn't enter the tub, set the temperature control to the HOT setting. If there is no water, set the control to the WARM setting. If all that comes out is cold water, the hot-water inlet valve is not working. Reverse the procedure to test the cold-water valve, setting the control first on COLD and then on WARM. If the tub overfills, unplug the washer. If water still flows into the tub, the valve is stuck open. In any of these cases, the valves should probably be replaced.

Advertisement

Here's how to check the valve assembly:

Step 1: Remove the back service panel and disconnect the hot-water and cold-water hoses to the valves.

Step 2: Remove the hoses connected to the valves inside the cabinet. Also disconnect the wires from the terminals. Back out the screws holding the valves to the machine. The inlet valves have solenoids (a coil of wire that carries a current) inside the housing.

Step 3: Tap the solenoids with a screwdriver handle. If this doesn't work, replace the entire inlet valve assembly. Install it in the reverse order of the way you disconnected the old one.

If laundry is torn during the wash cycle, feel around the tub. If you find a rough spot, you may be able to smooth it with an emery board or light sandpaper. If this doesn't work -- or if you have to cut to bare metal to remove the roughness -- the tub should be replaced. In this case, it's probably much wiser to replace the entire washer.

You've probably noticed, but now we're getting into the really sticky problems. By now, the weekend warriors have abandoned all hope and are strolling through the aisles of Home Depot. But not you. In the next section, we'll test your mettle with more miscellaneous mechanical gobbledygook.

Advertisement

Agitate This: Servicing the Agitator

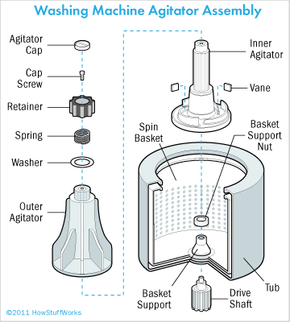
Replace a damaged agitator with a new one of the same type. Unscrew the cap on top of the agitator and pull straight up; the agitator should lift off.
HowStuffWorks

The agitator -- the finned part that fits on the tub shaft -- can also tear laundry if the fins are cracked or broken. You may be able to solve the problem temporarily by pinching off the splinters with pliers and lightly filing the plastic smooth, but this is just a stopgap measure; the agitator should be replaced. Replace a damaged agitator with a new one of the same type. To do this, unscrew the cap on top of the agitator. With the cap off, pull straight up on the agitator; it should lift off. If it doesn't move, rap its side with a hammer. If it still won't lift off, drive wedges under the bottom rim of the agitator to dislodge it. Then, set the new agitator into place and replace the agitator cap.

Damage to the snubber, a pad-like device sometimes located under the agitator cap, can cause the machine to vibrate excessively. The snubber may have a suspension spring in it. Lift off the agitator cap and examine the snubber. If the spring is broken, or if the pad is visibly worn, replace the entire snubber. Snubbers might also be found at the top of the tub, under the transmission, or as part of the water-pump housing. Look around until you see it.

Advertisement

If the machine doesn't have a snubber, listen for noise at the suspension unit between the tub and the machine cabinet. The suspension unit has fins or pads that may need replacement. In some cases, the entire unit may have to be replaced. Another noise point is the basket support nut, which holds the basin in place. You can imagine what kind of punishment that sucker takes. Tighten the nut or, if you can't tighten it, replace it.

Sudden tub stops can be caused by a broken motor belt, but they are usually due to poor tub loading. Check to see if wet laundry is wadded around the bottom of the tub shaft, or under the basket or agitator assembly. Remove the basket or agitator in order to remove the laundry easily.

Next, we'll take a look at water-related problems, starting with troubleshooting water leaks.

Advertisement

Troubleshooting Water Leaks

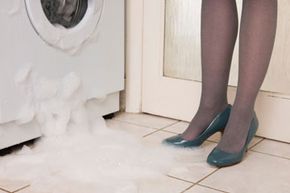
Leaking water can spell trouble (and not just for your shoes).
Jupiterimages/Getty Images/Pixland/Thinkstock

Water leaks in a washer are often difficult to trace. The problem could be a loose connection, a broken hose, a cracked component or a defective seal. It could also be a hole in the tub. If that's the culprit, it's usually best to replace the washer.

Tightening water connections can eliminate most leaks. Here's how to do it:

Advertisement

Step 1: Check the lid seal. If faulty, replace with a new gasket.

Step 2: Check the hoses at faucet connections. Tighten connections or replace hoses.

Step 3: Check the hoses at water valve connections. Tighten connections or replace hoses.

Step 4: Check the drain hoses. Tighten connections or replace hoses.

Step 5: Check the inlet nozzles. Tighten connections or replace nozzles.

Step 6: Check the splash guard. Tighten connections or replace.

Step 7: Check any plastic valve. Tighten connections or replace.

Step 8: Check the outlet hose to drain. Tighten connections or replace hose.

Step 9: Check the water pump, using the procedures that follow on the next page

Now that you've checked the most likely sources for a water leak, you can reasonably rule out that as the culprit. On the following pages, we will cover tips for servicing the water pump, the belts and pulleys, and the motor.

Advertisement

Pump Problems: Servicing the Water Pump

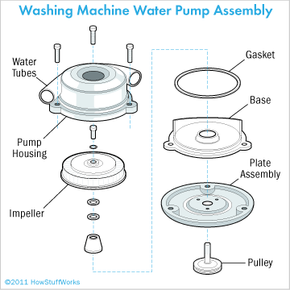
Take the pump apart and clean away all debris inside it. Clear away debris from the water tubes, too.
HowStuffWorks

Of all washing machine parts, the water pump probably takes the most punishment because it's constantly in use. When the pump fails, you can hear or see the trouble: a loud rumbling inside the machine, or a failure of the water to drain out of the tub. Here's what you can do to fix the problem:

Step 1: Check the drain hoses to make sure they're draining properly. Remove the water supply hoses from the back of the washer. With long-nosed pliers, extract the filter screens from the valve ports in the washer or from the hoses themselves. These screens keep debris from collecting in the hoses and can become clogged. Wash the screens thoroughly. Then, replace them and reattach the hoses. If the machine still rumbles or doesn't drain, examine the pump.

Advertisement

Step 2: To access the pump, first bail and sponge out any water in the machine's tub. Then tip the washer over on its front, using a heavy blanket or pad to protect the washer's finish. Remove the back service panel. The pump is usually located along the bottom of the machine, but with the unit tipped on its front, it's easier to remove the pump through the back than through the bottom of the washer.

Step 3: Locate the pump. It has two large hoses attached to it with spring or strap clips. If the clips are the spring type, pinch the ends of the clips together with pliers to release them, and slide the clips down the hoses. If the hoses are kinked or crimped at these connections, straighten them as best you can and reconnect them. Then, try the machine again to see if this kinking was causing the problem. If the machine still doesn't drain, you'll have to remove the water pump.

Step 4: To remove the pump, loosen the bolt that holds the drive belt taut and move the washer motor on the bracket to loosen the belt. Move the motor out of the way and unbolt the pump. As you loosen the last mounting bolt, support the pump with your hand. Then, lift the pump out of the washer.

Step 5: You should take the pump apart if you can because the trouble could be lint, dirt or pieces of cloth. Clean away all debris inside the pump and clear any debris out of the water tubes. Reassemble and hook up the pump again and test it. If cleaning the pump doesn't put it back into working order, or if the pump housing can't be removed, replace the pump with a new one of the same kind.

Step 6: To install the new pump, set it into position and connect the mounting bolts to the pump housing. Move the motor back into position. Tighten the drive belt (the rubber belt that connects two shafts of the motor) by prying it taut with a hammer handle or pry bar; it should give about 1/2 inch when you press on it at the center point between the two pulleys.

Step 7: Reconnect the hoses leading to the pump.

If the pump's not your problem, other mechanical issues may be afoot. If your belts and pulleys are to blame, find out how to fix them on the next page.

Advertisement

Belts and Pulleys and Motors, Oh My!

Hmm, maybe it's time to replace that old motor?
iStockphoto/Thinkstock

The drive belt (or belts) of a washing machine may become worn or damaged, causing noisy operation or stopping the washer entirely. Fortunately, a damaged drive belt is easy to replace. Remove the back panel of the washer to gain access to the belt and then follow these steps to remove it:

Step 1: Loosen the bolt on the motor bracket and move the motor to put slack in the belt. The motor bracket is a simple metal brace that holds the motor housing in place.

Step 2: Remove the old belt and stretch a new one into place on the pulleys.

Step 3: To put tension on the new belt, use a hammer handle or a short pry bar to push the motor into position while you tighten the bolt in the adjustable bracket. The belt should have about 1/2 inch deflection, or give, when you press on it at the center point, midway between the pulleys. If the belt is too loose, it will slip on the pulleys, causing the machine to malfunction. If the belt is too tight, it will wear very quickly and will probably become so hot that it will start to smoke or smell.

Loose pulleys can also cause problems. Most pulleys are fastened to shafts with setscrews around the hub of the pulley. Remember, setscrews do not have heads so you might have to look closely to see them. These screws must be tight, or else the pulley or belt will slip. The resulting malfunction may seem to be caused by a faulty motor, but it can be corrected by tightening the pulleys and adjusting the belt. For this reason, always check the belts and pulleys before working on the motor.

In most cases, motor malfunctions should be handled by a professional; do not try to fix the motor yourself. If the motor is a universal model, however, you can change worn carbon brushes when sparking occurs, as detailed in How to Repair Appliances. To save yourself the expense of a service call, remove the motor from the washer and take it to a professional service person, then reinstall the repaired or new motor yourself. To access the motor, remove the back panel of the washer. The motor is mounted on an adjustable bracket.

As you can see, washing machines are complicated appliances with lots of moving parts. However, washers typically last around 12 years, which is not too shabby [source: Appliance.net]. With the troubleshooting tips in this article, you should be able to squeeze a few more years out of your machine and get cranking out loads of clean laundry in no time.

Frequently Asked Questions

How often should I clean my washing machine to prevent malfunctions?
Regular cleaning is recommended at least once a month to prevent buildup that could lead to malfunctions.
What's the first step if my washing machine stops spinning?
Check the power source and ensure the machine is plugged in and the circuit breaker hasn't tripped.

Lots More Information

Related Articles

More Great Links

  • Appliance.net. "Appliance Maintenance Tips and Lifespan Estimates." March 27, 2008. http://www.appliance.net/2008/appliance-maintenance-tips-and-lifespan-estimates-467
  • Carter, Maureen. "Washing Machine Hygiene." DIY Life. July 25, 2007. http://www.diylife.com/2007/07/15/washing-machine-hygiene/
  • Citizens Concerned About Chloramine. "Chloramine Facts." Sept. 11, 2006. http://www.chloramine.org/chloraminefacts.htm#effectsofchloramine
  • Consumer Manual. "Repairing Leaks in Washing Machine." http://www.consumer-manual.com/english/home-supplies/hs004.htm
  • Kenmore. "Product Catalog."http://www.kenmore.com:80/shc/s/p_10154_12604_02627182000P
  • Repair Clinic. "Washing Machine Parts."http://www.repairclinic.com/Washing-Machine-Parts
  • Rosling, Hans. TED Talks "Hans Rosling and The Magic Washing Machine." March 2011http://www.ted.com/talks/hans_rosling_and_the_magic_washing_machine.html
  • Williams, Martyn. PC World. "Surf Among the Suds with Web-Enabled Washing Machines." Oct. 17, 2000http://www.pcworld.com/article/32128/surf_among_suds_with_webenabled_washing_machine.html

Advertisement

Loading...