How to Repair China, Porcelain, and Glass
Careful assembly and clamping are the key to mending delicate objects. With patience and the right glue, you can repair even the most fragile china, porcelain, and glass.
Tools:
Advertisement
- Small mixing dish and stick
- Clamping supports
- Masking tape
- Pan filled with sand
- Clothespins
- Modeling clay
- Rubber bands
- Scrap wood and nails, or paraffin
Materials:
- Clear epoxy glue
- Toothpicks
- Cotton swabs
- Acetone (nail polish remover)
Time: 5 minutes or more, depending on damage
Because you'll need time to fit broken pieces exactly together, quick-bonding glue should not be used for mending delicate pieces. Buy clear epoxy glue, sold in two parts, resin and hardener; mix only as much glue as you need. Epoxy dries completely waterproof.
Clamping
Before mixing the glue, prepare a clamp to hold the object together while the epoxy cures. Choose an appropriate method, as detailed below, to achieve a secure set. Don't apply glue to the broken pieces until the clamp is prepared.

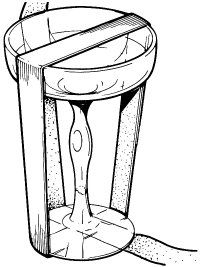
To hold a glued cup handle or the stem of a glass, gently wrap strips of masking tape around the cup or glass. Use at least two vertical strips to encircle a glass with a mended stem; keep the pressure on the strips even so the mended joint doesn't slip.

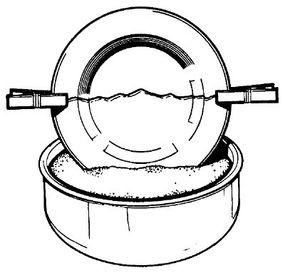
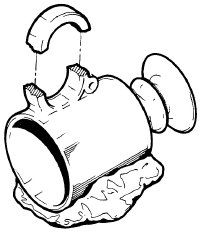
To hold a cracked or pieced plate or similar object, fill a pan with sand. Embed the uncracked portion of the plate in the sand, with the broken edges straight up so that the glued pieces will be held in place by gravity. If necessary, use clothespins to clamp large pieces in place. For a mended teapot, cup, or pitcher, nestle it into the sand as necessary to hold the glued pieces in place.
Modeling clay is an excellent clamping material. Mold lumps of clay to support mended cups, glasses, or other objects with the broken part up. The mended pieces will be held in place by their own weight. Or set a mended plate on edge in a drawer, and support its bottom edge with a base of modeling clay.
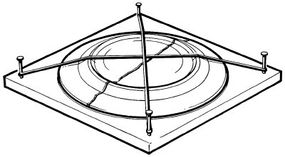
Stretch rubber bands around a mended glass or cup; they should be tight enough to hold the pieces securely but not tight enough to stress the pieces. Or, to hold a flat or shallow object, use a piece of scrap board for a base. Set the mended object onto the board; at appropriate spots around it, mark points on the board. Remove the object and drive nails partway into the board at the marked points. Replace the object and stretch rubber bands from nail to nail over it to hold it in place.

Gluing
To mend the broken object, clean the pieces thoroughly and let them dry completely. Before mixing the glue, fit the broken pieces carefully together so you'll be able to reassemble them correctly. Lay the pieces out in order on your work surface.
In a small mixing dish, mix only as much glue as you'll need to reassemble the object; stir together equal parts of resin and hardener, as directed by the manufacturer. With a toothpick, apply a very thin coat of glue to the raw edges of one broken piece; carefully join it to the main piece. Press the pieces gently but firmly together. Remove excess glue with a cotton swab moistened with acetone (nail polish remover).
Repeat to glue all broken pieces to the main piece, applying glue and removing the excess piece by piece. If the object is broken into many pieces, work from the inside pieces out to reassemble the object. Be sure you're confident of the assembly procedure before you start gluing.
Finally, clamp and support the mended object securely, as detailed above. Let the epoxy cure as directed by the manufacturer; curing usually takes about 1 week for maximum strength. Don't unclamp the object until the full curing period has passed.
Rebuilding
If a plate, saucer, or platter is badly shattered, and you have another one like it, use the unbroken object to make a mold. In the top of a double boiler, carefully heat paraffin until it's soft or barely melted. Lightly oil the bottom of the unbroken object and pack softened paraffin over it, or set the object bottom up in a small deep pan and pour melted paraffin over it to cover the bottom completely. Let the paraffin set completely and remove the unbroken object.
To reassemble the broken object, apply glue as above and fit the broken pieces together inside the mold. If possible, work from the center of the object out and up. The wax mold will hold the pieces at the proper angle as you reassemble them. If desired, reassemble the object in several stages. Let the epoxy cure completely before removing the mended object.
In the next section, you will learn how to make a brass, silver, and copper cleaner.
For more information on do-it-yourself kitchen improvement projects, try the following links:
- To create a whole new kitchen, see our article on How to Design a Kitchen.
- If you're shopping for ideas, you might find some good ones in A Guide to Kitchen Remodeling Materials.
- For suggestions on ways to enhance an existing kitchen, see our article on How to Build Kitchen Improvements.
