How to Repair Drawers
Over time, wooden drawers that are well-used will begin to show wear and tear. Boards can warp and lose their fit, guides slide poorly along worn runners, and the frame of your piece may become damaged. With prompt attention, most drawers can be fixed and returned to use, enabling them to glide open smoothly, holding everything from sweaters to silverware. Here are some of the most common problems with draws:
Loose Joints
Advertisement
Drawer frame construction is similar to chair construction. Dovetail joints (wedge-shaped openings or dovetails that hold matching pins cut in the joining piece) are used in old or expensive furniture. Butt joints (joining pieces simply butted together either face to face, edge to edge, or face to edge with no integral fastener) are glued and held with corrugated nails in newer furniture.
Dovetail joints seldom separate; if they do, force adhesive into the loose joint and tap the joint together with a hammer. Butt joints are another problem. To tighten a loose butt joint, try gluing the joint and tapping it together as tightly as you can. Clamp it firmly until the glue is dry. If this doesn't work, you may be able to nail the joint through the face of the drawer. Countersink the nail heads, and fill the holes with wood filler.
Binding
Problems with drawer frames are usually the cause of sticking and binding drawers. When a drawer sticks, it's jerked to get it open and slammed closed. This causes the joints in the frame to separate. First, make sure the joints are tight. Then lubricate the drawer guides and the top and bottom edges of the sides with stick lubricant, wax from a candle, paraffin, or silicone spray. Do not use a petroleum lubricant; oil will collect dirt and dust and cause more problems than the binding.
If lubrication doesn't solve the problem, carefully sand down the binding points. Remove only as much wood as necessary, and seal the raw wood with shellac to prevent future swelling. If sanding doesn't eliminate binding, examine the drawer's runners and guides.
Worn Guides and Runners
Drawers are built with wood or metal runners and move back and forth on guides or tracks. In old furniture, the runners are parallel pieces of wood fastened to the drawer bottom, and the guides are strips of wood across the frame. Sometimes the runners or guides are missing; sometimes they're split, warped, or badly worn. Rough guides or runners can cause the drawer to bind and can eventually damage the frame.
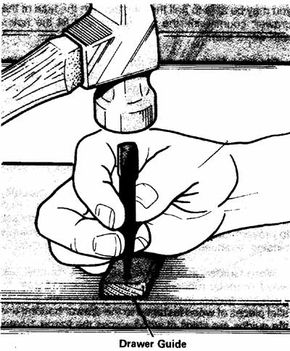
If the drawer guide is missing, install metal guides, available in several lengths and sold in hardware stores and home centers. Complete installation instructions are provided with the guides. If a wood drawer guide is rough, smooth it carefully with sandpaper or a rasp, or -- as a last resort -- a block plane. If the drawer still binds, remove the guide completely. Break a hacksaw blade in half and wrap one end of it with electricians' tape. Wearing gloves, cut the guide out with short strokes of the saw blade.
After removing the old guide, you may be able to install metal guides. For a neater job, cut and fit a new wooden guide that is the same size as the old one. Use hardwood to make the guide; softwood wears too quickly. Glue the new guide into position, and secure it with nails. Countersink the nail heads so they won't interfere with the drawer's operation.
When the runners are worn, the drawer moves unevenly because the wood is uneven. To replace a worn runner, plane and rabbet the worn edge to form an even, smoothly mortised strip along the drawer edge. Glue a thin strip of hardwood into each mortised runner edge, building it up to its original height. Secure the runners with small nails, and countersink the nails so that they won't interfere with the drawer's operation.
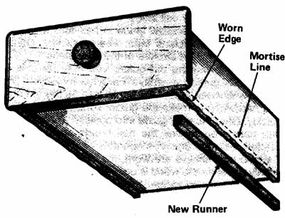
If the drawer frame has a wood kicker above the sides and the kicker is worn, smooth it and add a new hardwood strip to build it up again. Follow the same procedure used to replace worn runners.
Split Drawer Fronts
Split drawer fronts are usually the result of missing drawer guides. First install drawer guides. Second, repair the split with glue forced into the break. Wipe away any excess glue, and lightly clamp the edges with a strap clamp. Use only light pressure; too much pressure will buckle the wood at the split.
Split Drawer Bottoms
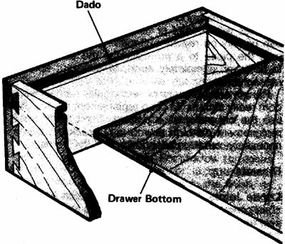
Drawer bottoms are not fastened into the drawer sides and ends; the bottom panel fits loosely into dadoes (slots cut into the face or end of a piece of wood) in the sides. This permits expansion and contraction of the wood and prevents the joints from cracking.
To replace a drawer bottom, remove one end of the drawer and slide the bottom panel out. Replace it with a new plywood or hardboard panel cut to fit. Some drawer bottoms are lightly tacked to a piece of molding nailed to the inside edges of the sides and back, and some drawer bottoms are set on triangular glue blocks. Remove these fasteners or braces before disassembling the drawer. If the piece of furniture is an antique, the drawers were probably hand-fashioned. These drawers should not be repaired with plywood or hardboard.
Warped Boards
Table leaves and other flat parts can warp unless they're properly sealed, and years of uneven humidity can leave them severely cupped. In most cases, unwarping them isn't too difficult.
To unwarp a board, work in summer. The traditional cure is exposure to wet grass and hot sun. Water a grassy area thoroughly, and set the board curved side up on the wet grass. As the dry side of the board absorbs moisture from the grass, the moist side -- the convex side -- is dried out by the sun, and the board unwarps. Unless the warp is caused by stress in the wood, the board should straighten out within a day.
When the board has straightened out, clamp it between two straight boards so that it will dry evenly. Before replacing it in the piece of furniture, seal the unfinished side with shellac to prevent it from warping again.
The foucs of the next section is caning, which is relatively easy to fix provided you're dealing with newer furniture.