Repairing wooden furniture is a process that can take many forms. There are numerous types of wooden furniture -- and accessories -- so the types of repairs are similarly varied.
The following article will provide details about making many of the most common repairs to wooden furniture, including those to chairs, doors, drawers, caning and mirror frames. Different techniques are needed for each type of fix. All wooden furniture has one thing in common, though: joints. Therefore, that's where we'll start.
Advertisement
A Guide to Furniture Joints
All furniture is put together in a series of joints, and structural problems often involve joint weakening or failure. Some joints are simple, some complicated; some types are stronger than others. The joints used in good wooden furniture are usually stronger than those in cheap pieces, but age and abuse can take their toll even when the original construction was good. To prevent more serious damage, all joints should be repaired as soon as possible when they loosen or separate.
Structural problems in wooden furniture can be defined in terms of three things: the material itself, the way it's put together, and the way it functions.
The material itself is the problem when a part is broken, warped, or missing. The way it's put together is involved when joints fail or parts aren't fitted properly. The way a piece of furniture functions depends on both material and construction, and functional problems can always be traced to one or both of these sources. Nothing can turn an all-around loser into a quality piece of furniture, but with a few basic repair techniques you can handle most structural furniture problems.
Advertisement
Reinforcing Loose Joints
When a joint fails, you have two problems to deal with: the immediate functional problem and the long-term effect of the failure on the rest of the frame. A loose joint that's not repaired today may not break tomorrow, but it will put stress on other joints. In a week's time, one wobbly leg may become two. To prevent simple structural problems from turning into more serious ones, loose or separated joints should be repaired immediately.
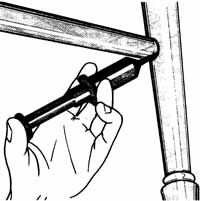
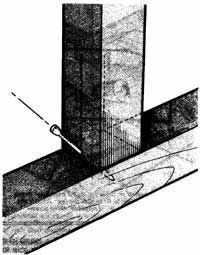
Gluing: The simplest solution is usually the best one, in repairs as well as in refinishing. When you discover a loose joint, first make sure the screws (if any) are tight; then try to repair it with an adhesive: plastic resin, epoxy, or resorcinol. Force the adhesive into the loose joint with a glue injector. If you can, wiggle the joint to distribute the adhesive. Clamp the joint for about two days, until the adhesive is completely cured. If possible, strengthen the glued joint with a glue block, as detailed below.
After gluing the loose joint, put the piece of furniture back into service. Check the joint again in a few weeks. If it has worked loose again, it can't be permanently repaired by regluing; you'll have to reinforce it, resecure it, or rebuild it completely.
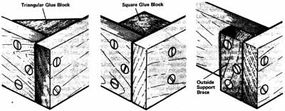
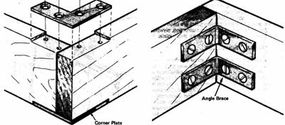
Glue blocks and steel braces: Glue blocks, the original furniture braces, are solid pieces of wood used to reinforce corner joints and provide additional support. Steel corner plates and angle braces perform the same function, but they can detract from the appearance of the piece of furniture, and they can also lower its value. For this reason, glue blocks are still an important part of furniture repairs. Valuable pieces of furniture, antiques, and good reproductions should always be repaired with glue blocks instead of steel braces when possible.
Glue blocks for corner braces can be either square or triangular. Square blocks are used chiefly as outside support braces or on long joints, such as the inside corners of drawers, where cutting a triangle would be impractical. In most cases, triangular glue blocks are preferable.
Glue blocks can be cut from any square stock, but hardwood is preferred. To make a glue block, cut a square piece of wood in half diagonally. The larger the piece of wood, the greater the gluing surface of the block. The length of the blocks will depend on the project; on average, 2 inches is adequate. To strengthen chair and table legs, cut triangular braces that are as large as necessary from 1-inch nominal boards. At the right-angle corner of the block, cut off a diagonal or make a notch to fit around the leg. For braces, 1 x 2 lumber works well.
To install a triangular glue block, spread adhesive on the two right-angle sides or edges. Set the block into the corner and twist it slightly to distribute the adhesive on the bonding surfaces. Small glue blocks can be strengthened by nails driven through the block into the furniture frame; drill pilot holes for the nails to make sure you don't split the wood. To strengthen chair and table braces, drive three screws through the block and into the frame, one screw straight into the corner and one straight into each side, at an angle to the inside block edge. Predrill the screw holes for the block in both the block and the frame.
Sometimes a corner joint is held by a steel bracket instead of a glue block. If the leg wobbles, first make sure the nut that holds the bracket is securely tightened. If this doesn't solve the problem and the bracket is set into notches in the frame, it may not be seated properly. Remove the nut and reseat the bracket; then replace the nut securely.
Some loose furniture joints are going to require a little more attention to make them structurally sound. Although resecuring or even rebuilding a joint may take additional time, you can accomplish either one with some advanced repair techniques.
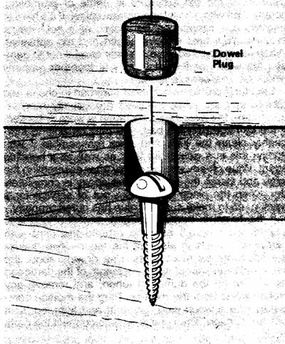
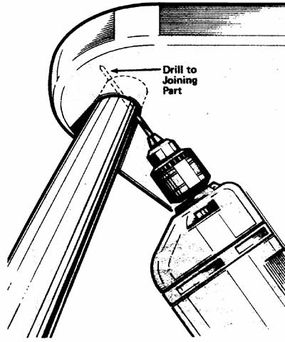
Screws and glue: If a loose joint would be difficult to take apart, you may be able to solve the problem with a long screw. First align the joint and drill a pilot hole for the screw. Then enlarge the top of the pilot hole so that a small piece of dowel can be installed over the screw head. Coat the screw with glue, and drive it into the joint so that it pulls the joint tightly together. Before you tighten the screw, try to force adhesive into the loose joint; this will help strengthen the joint. Then tighten the screw firmly.
To cover the screw head, cut a piece of dowel (wooden peg) to fit the enlarged hole. It should be slightly longer than the opening, so that the end of the dowel will protrude slightly above the surface of the frame. Insert the dowel plug with glue, making sure the end of the dowel is flush with the head of the screw, and let the glue dry completely; then carefully cut the end of the dowel flush with the surface, and sand it smooth. You'll probably have to refinish the frame so the dowel matches, and you may want to install false dowel plugs at the other joints in the frame so that they match. The dowel will give the frame a handmade pinned or pegged look.
The screw/plug trick can also be used to repair loose rungs and backs, but the pieces involved must be large enough to accept the screw and dowel. Small parts such as turnings and slats may split when a screw is driven into them.
For the strongest screw-reinforced joint, the screw should be driven into a piece of dowel instead of the frame itself. This isn't always possible. If you can, disassemble the joint, drill a hole at the screw point, and plug the hole with a dowel, gluing the dowel into place. Then reassemble the joint with a screw and glue, as above. If you want to hide the head of the screw, enlarge the hole for a dowel plug or countersink the screw slightly and fill the depression with wood filler.
Rebuilding a joint -- or a series of joints -- is not as tough as it might sound, although it does require a good deal of patience. You must work slowly to make sure all the parts are in the right places and all parts fit tightly. To disassemble the joint, pull it carefully apart. If it doesn't come apart easily, use a rubber or wooden mallet to tap the frame pieces apart, but be careful not to damage the wood.
Don't overlook the possibility that the joint was assembled with nails or screws as well as adhesive. In this case, you should remove the fasteners before you break the adhesive. If you can't remove them, break the adhesive bond and pry the joint apart very carefully. Don't force the joint apart. If the nails or screws are embedded too firmly, you'll split or splinter the wood. If prying would damage the wood, consider sawing the joint apart. Use a hacksaw with a thin blade that will go through metal and not leave a wide cut.
After the joint is disassembled, it must be thoroughly cleaned. If the old adhesive is brittle or crumbling, scrape it off with a knife or a narrow chisel. If it's hard to remove, use sandpaper, hot water, or a hot vinegar solution. You must remove all dirt and old adhesive. Whatever method you use, be very careful not to damage the wood or the joint won't fit together properly when you reassemble it.
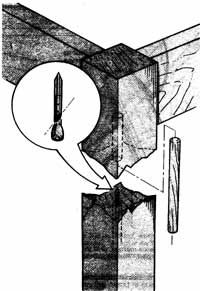
Structural problems are most common in chairs and tables, and the joints involved are usually mortise-and-tenon (a prong or tongue of wood secured in a hole in the adjoining piece). In most cases, the tenon (prong or tong of wood) is worn or broken. If the damage isn't too bad, you may be able to thoroughly clean the joint and then reassemble it with epoxy, which is a good joint filler as well as a bonding agent. Wipe off any excess epoxy after assembling the joint, and clamp the joint until the epoxy is completely dry.
Keep the piece of furniture out of service for a week or so to make sure the glue has cured properly. If the tenon is badly damaged or if the joint was sawed apart, you'll have to rebuild the joint with hardwood dowels in place of the tenon -- two dowels are adequate for most joints. Use dowels about the same width and about twice the length of the damaged tenon. Cut off the damaged tenon, and remove any broken wood from the mortise. Plug the mortise completely with a wood plug, glued in and trimmed flush with the surface. Then use dowels to connect the parts again.
To make the holes for the dowels -- in the tenon base and in the plugged mortise -- use a doweling jig, clamped to the edge of the wood and adjusted to center the dowel holes. Dowel center points can also be used, but they aren't as accurate as a jig. Drill the holes to a total depth of about 1/4 inch deeper than the length of the dowel to allow for glue buildup under the dowels.
Score the sides of the dowels with pliers and round the ends slightly with sandpaper or a file. This improves glue distribution and makes insertion easier and more accurate. Apply glue to the dowels, and insert them into the holes in one side of the joint. Then coat the edge of the wood with glue, and slip the other joint piece onto the dowels. Tap the joint together with a rubber or wooden mallet, wipe off any glue that oozes out of the joint, and clamp the joint firmly for about two days, until the glue is completely set.
In the next two sections, we'll show you how to repair chairs, starting with loose and broken parts.
All types of wooden furniture have their own individual structural problems. With common sense and a few particulars, you can keep all your wooden chairs in good repair. Here's how to replace loose or broken chair parts:
Loose Joints
Seat frames are held by mortise-and-tenon joints (a prong or tongue or wood secured in a hole in the joinining piece) or doweled joints (pegs of wood hold the pieces together) supported by triangular glue blocks notched to fit the legs. If you catch a loose joint in time, repair it with glue. If the joint is broken, you'll have to disassemble it and replace the dowels. The triangular glue blocks will probably be glued and screwed to the frame, and the dowel joint might even be supported with hidden nail or screw fasteners. Separate the joint carefully with an old screwdriver or a stiff-bladed putty knife, then replace the dowels. Make sure the joint is clean and dry before you reassemble it.
Advertisement
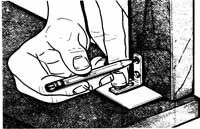
Sometimes you can use a mechanical fastener -- an angle brace or a chair leg brace -- to mend the frame. This, of course, really depends on the value of the furniture. Do not lower the value of an antique with a piece of metal. Metal reinforcements are useless unless the joint is tightly fitted together, but they can be used to make a firm joint even tighter. Fasten the braces with brass screws, and make sure the screws are long enough.
Fasten the metal angle to one side of the chair frame; predrill the screw holes. Insert a piece of thin cardboard under the opposite part of the angle, then drill the screw holes for that side. Drive in the screws fairly tightly, remove the cardboard, and finish tightening the screws. When the screws are final-tightened, the angle will pull the joint tightly together to bridge the gap left by the cardboard.
Loose Legs, Rungs, and Spindles
Loose legs, rungs, and spindles can sometimes become loose on wooden chairs that are used excessively. But those problems can often be repaired.
Loose rungs or spindles -- and, where no bracing is used, loose legs -- can sometimes be mended by forcing glue into the joints. But a part mended this way may work loose again. For a more permanent repair, carefully separate the part from the frame. If both ends are loose, remove the entire piece. For very stubborn joints, twist the part slightly to break the glue bond; if necessary, use self-locking pliers. Pad the part to prevent damage to the wood from the pliers.
Remove the old adhesive completely from the part and from its socket. Glue does not bond well to old glue. Be careful not to remove any wood from the end of the part or it won't fit right. After removing the old glue, test each end of the part in its socket. If the ends fit snugly, apply glue to the socket and reinsert the loose part. Clamp the reglued joint, and let it dry completely.
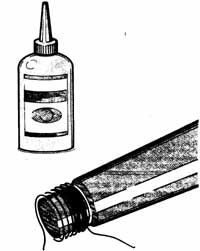
If the part is loose in its socket, you'll have to enlarge it to make a firm joint. If the tenon end is cracked, you'll have to reinforce it. Apply a thin coat of glue to the tenon, and wrap it tightly with silk thread. If necessary, apply more glue and cover the tenon with another layer of thread. Let the threaded tenon dry for a day, and then glue the reinforced end firmly into the socket. Insert it carefully so you don't disturb the thread. Clamp the joint, and let it dry completely.
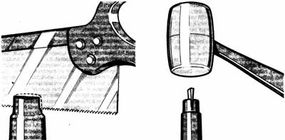
Very loose legs or rungs can be wedged to fit if the tenon is sound. Clamp the part in a vise or have a helper hold it, then saw very carefully into the center of the tenon end. The cut must be square and centered, roughly the depth of the part that fits into the socket -- about 3/4 inch. For small parts, use a hacksaw or a coping saw to make the cut; for thicker parts, use a backsaw or combination saw.
From a piece of soft wood -- pine quarter-round, if you have it -- cut a thin wedge to fit the width and depth of the saw cut in the tenon. The object here is to spread the saw cut slightly with the wedge, thus enlarging the tenon to fit the socket. When you're satisfied that the wedge is the right size, very carefully tap the wedge into the saw cut. When the tenon is slightly enlarged, stop pounding and trim off any excess wood from the wedge with a utility knife or pocketknife. Be careful not to pound the wedge too far; excessive wedging will split the tenon.
To test the wedge, insert the end of it into the saw cut and tap it down with a screwdriver handle. If you see the wood on both sides of the cut start to spread, the wedge is too wide. Finally, apply glue and reassemble the joint as above.
You may not be able to disassemble the piece of furniture for this wedging procedure. In this case, there are two more ways to do the job. If the joint is extremely loose and appearance is not important, remove as much adhesive as you can. Make several thin wedges from molding -- pine lattice is a good selection. Dip the ends of the wedges in adhesive and drive the wedges with a hammer around the loose part between the part and the socket. Then, with a utility knife, trim the ends of the wedges flush with the surrounding wood surface. Equalize the pressure from the wedges as you drive them in; unless you place them carefully, the wedges can throw the part out of alignment, further weakening the joint.
Where appearance is more important, drill a 1/16-inch hole through the side of the joint and the loose part. Then make a metal pin from a 10d common or finishing nail. Cut off the head of the nail with a hacksaw. Apply a drop or two of glue to the drilled hole, and drive in the nail. Countersink the pin with a nail set or another 10d nail, and fill the hole with wood filler.
On chairs with horizontal rails across the back, the rails are mortised into the side posts; on chairs with vertical spindles or slats, these parts are mortised into a curved or straight top rail. Rails, spindles, and slats can all be replaced easily, but replacement may be fairly expensive -- don't bother if the chair isn't worth the investment. To replace a broken or missing part, have a millwork or woodworking shop custom-make a new part.
First, disassemble the chair back. It will probably be joined at the legs, seat, and rail. Carefully pry the joints apart, removing any nails or screws. Disassemble only the joints involved in the repair. It usually isn't necessary to completely disassemble the piece to get at the part. If you aren't sure you'll be able to reassemble the chair, number the parts as you take them apart.
Take the broken part and a similar undamaged part to the millwork or woodworking shop for duplication. Carefully clean the old adhesive from the joints. Then reassemble the chair with the new part, gluing each joint. Clamp the chair with strap clamps until the adhesive dries, and then refinish the chair completely.
Outdoor chairs made with wooden slats can be repaired the same way, but the slats can usually be replaced with wide moldings or thin boards. To replace a broken slat, cut and shape a piece of wide molding or a board to fit the frame. If the slats are fastened with screws, drill screw holes in the new slat and attach it with the old screws or matching new ones. If they're fastened with rivets, drill the old rivets out and replace them with self-tapping or panhead sheet metal screws.
Broken Nonstructural Rungs and Spindles
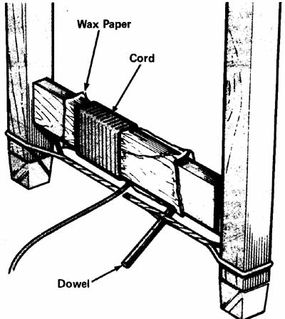
Splits and breaks in nonstructural rungs and spindles can be repaired with glue. Separate the broken ends of the part, and apply glue to each piece. If the part is only cracked, force glue into the crack with a glue injector. Join the pieces carefully, pressing them firmly together, and remove any excess glue. Wrap a piece of wax paper around the part, and then wrap the mended break firmly with a piece of cord to keep the part aligned properly. Clamp the chair firmly with a strap clamp or a rope, and let the glue dry completely.
Where strength is important, the broken part must be reinforced. The best reinforcement is a dowel (wooden peg) pinning the broken pieces together. Use 1/8-inch to 3/8-inch dowel, depending on how thick the broken part is; drill the dowel holes with a bit the same size.
Separate the broken ends of the part. In the center of one end and at a right angle to the break, drill a 1-inch-deep hole, the same diameter as the dowel. This hole marks the dowel location. Cut off the head of a 16d nail, and insert the nail in the hole, point out. The point of the nail should protrude only slightly above the broken surface. To mark the dowel location on the other piece of the broken part, match the pieces and press them firmly together. The point of the nail will leave a tiny hole in the matching piece. Then drill straight into the second piece, about 1 inch deep.
Measure the dowel holes, and cut a piece of dowel 1/4 inch shorter than their total depth to allow for glue buildup. Score the sides of the dowel with pliers and round the ends slightly with sandpaper or a file. This improves glue distribution and makes insertion easier. Apply glue to one end of the dowel, and insert it into the hole in one end. Then apply glue to the protruding dowel and to the face of the break, and push the other piece of the broken part onto the dowel. Match the parts perfectly, wipe off excess adhesive, and clamp the mended part as above.
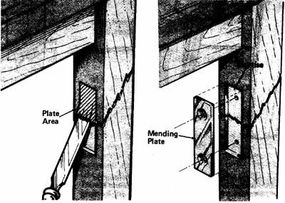
Where doweling isn't possible or where you want to provide extra strength, use a steel mending plate to reinforce the break. Mending plates can be used on any flat surface.
Glue the break as above, and let it dry completely. Then add a mending plate long enough to span the break and narrow enough to be inconspicuous. Use a plate with screw holes beveled to accept flathead screws.
Place the mending plate on the inside or least obvious face of the mended part. If appearance doesn't matter, secure the plate directly over the break, using flathead brass screws. For a less conspicuous repair, mortise the plate into the wood. Carefully trace the outline of the mending plate onto the wood with a scratch awl or a sharp nail. Score the wood along the outline with a series of straight-down chisel cuts as deep as you want the mortise -- about 1/4 inch for most plates. Allow space to cover the plate with wood filler. Cross-score the wood at right angles to the outline; then turn the chisel over, bevel side down, and remove the excess wood in the scored outline, working with the grain of the wood and removing only a little wood at a time.
When the bottom of the mortise is as smooth and level as you can make it, test the plate for fit and make any necessary adjustments. When the plate fits exactly, drill pilot holes for the screws and coat the mortise with a thin layer of glue. Dip the screws in glue, position the plate in the mortise, and drive the screws firmly in. Let the glue dry for several days, and then cover the mending plate evenly with wood filler or a veneer patch. Finish the filler to match the wood.
The seat is the part of a chair that suffers the most wear and tear, which means it also is the most likely candidate for repairs. We'll cover various seat repairs in the next section.
Many people would agree that the most important part of a chair is where you sit. A wooden chair seat that is split or needs to be replaced will be an obvious spot for you to perform repairs.
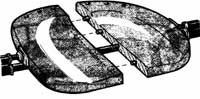
Split Seats
Advertisement
Split chair seats can be repaired with a series of 1/8-inch dowels (wooden pegs) along the break and reinforced with metal mending plates. The seat must be completely removed for doweling.
Drill holes for the dowels in each side of the broken seat, about 1 inch deep (or as deep as possible) and spaced about 4 to 6 inches apart. Use a doweling jig, clamped to the broken seat, to drill the dowel holes. Dowel center points can also be used, but they aren't as accurate. Cut and score each dowel as above, 1/4 inch less than the total length of the dowel holes.
Apply glue to one end of each dowel, and insert the dowels into the holes along one side of the broken seat; then apply glue to the protruding dowel ends and to the broken edge, and join the two parts. Tap the pieces of the seat together with a rubber or wooden mallet, and wipe off any excess glue. Lightly clamp the glued seat, and let it dry for at least two days. For extra strength, you can add metal mending plates to span the break, as above -- four plates should be adequate. Finally, reassemble the chair.
Inserting Chair Seats
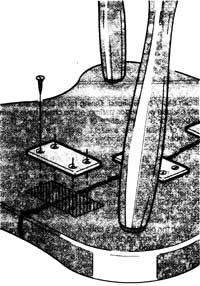
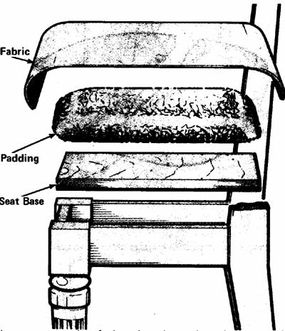
Chair seats set in or on frames are usually boards or plywood covered with padding and cloth. These seats seldom split, but when they do the simplest solution is to replace the seat with a new piece of plywood -- 3/8-inch thickness is best. If 3/8-inch plywood won't fit properly after the padding has been added, you may have to use 1/4-inch plywood, but anything less than this will not provide the needed support. Use the old chair seat as a template or pattern to cut out the new one.
Padded chair seats are usually held to the frame with screws driven through glue blocks. Look carefully for these screws; the cloth covering the padding may hide them. Remove all fasteners, and replace them the same way to hold the new chair seat.
If the upholstery on insert seats is worn or damaged, it can easily be replaced. Dining room chairs are usually padded with cotton batting. Some chairs have foam padding or a combination of foam and cotton. Both types of padding are available precut for chair seats. For most chairs, the padding should be about 3/4 inch to 1 inch thick.
To recover an insert chair seat, remove the seat from the chair. The seat is usually a piece of plywood, held to the chair frame by screws; the screws may be counterbored into the frame or may go up through the corner glue blocks. Remove the tacks or staples that hold the old upholstery fabric to the seat, and lift off the fabric. Refinish the chair, if necessary, before proceeding further.
Using the old fabric as a pattern, cut the new fabric to fit. If the old padding on the chair seat is in good shape, it can be reused; if it's damaged, replace it with new padding. You may be able to fluff and smooth old cotton padding; if it's badly flattened, add a layer of foam padding to build the seat cushion up to 3/4 to 1 inch.
Lay the new fabric flat, wrong side up, and center the padded seat on it upside down. Fold the edges of the fabric up over the seat, stretching it firmly onto the plywood; if desired, tape the fabric firmly down with masking tape. Starting at the center of one side, fold the fabric under and attach it to the seat with a staple gun using heavy-duty staples. If the new fabric is very heavy, flathead upholstery tacks may be more secure. Set staples or tacks 1 to 11/2 inches apart along the side of the seat.
When the first side is completely attached, restretch the fabric; then staple or tack the opposite side. Turn the seat over and smooth the padding. Be sure the fabric is straight, with no wrinkles. Then turn the seat over again, and fasten the other two sides. At the corners, fold the fabric in to miter it neatly; if necessary, staple or tack each layer separately. Finally, staple a scrap piece of the new fabric to the seat, in case repairs are necessary in the future. Replace the chair seat in the frame, and resecure it. Replace all the screws, and tighten them firmly.
As you've seen, chairs take a lot of abuse and, therefore, need a lot of repairs. The same goes for the legs and feet on heavy furniture. We'll show you how to make these fixes in the next section.
The legs and feet of furniture pieces -- especially heavy cabinets, dressers, and bookcases -- are subjected to both weight and lateral stress when they're moved. Pushing a heavily loaded piece of furniture can cause problems even if it doesn't cause immediate breakage, and these problems are very common in old pieces. Structural breaks should be repaired.
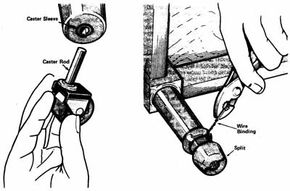
Loose Casters
A caster is secured by a metal rod driven into a hole drilled in the bottom of the leg. When the piece of furniture is moved, stress on the caster rod can damage the wood around it, enlarging the hole and loosening the caster. If the damage isn't too bad, the casters may just be loose. If the problem has been ignored too long, the casters may fall out when the piece is lifted or the ends of the legs may be split. Both problems can be solved.
Advertisement
To tighten loose casters, use metal or plastic caster sleeve inserts, which are available in several sizes. Remove the loose caster, and tap the insert into the hole in the leg. No adhesive is needed. The sleeve should fit snugly; if it doesn't, use larger inserts. Insert the caster into the sleeve. This should solve the problem.
If the leg is split, remove all the casters on the piece. Apply glue along the split, and press the glued edges firmly together; wipe off excess glue. To reinforce the break, bind the split with several wraps of fine black steel wire. On many pieces of furniture there is a ridge or a crevice at the caster point; if you wrap the wire around the leg at this point, the repair will not be obvious. If the leg doesn't have any carving or decoration at this point, you can notch the wood all the way around with a triangular file, and then wrap the wire in the notch. Treat all legs the same way so that they match.
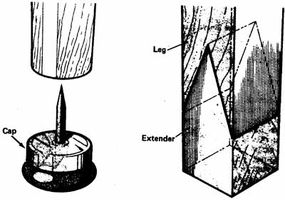
One Leg Shorter Than the Rest
When one leg on wooden furniture is shorter than the rest, you may be tempted to cut the other legs down to match the shorter one. Don't do it. Instead, build up the short leg to match the others. Cutting usually results in serious mismatching, besides shortening the piece and ruining its design.
If the leg is only a little too short, use a metal leg cap to build it up. These caps, made in several sizes, have from one to three prongs on a metal base. To install a cap, just hammer in the prongs. To make sure you don't split the wood, center the cap on the leg and lightly tap it to mark the prong positions. Then drill tiny holes to accept the prongs.
If a metal cap doesn't work, you may be able to add a wood extender to the leg. Cut the extender from the same wood as the piece of furniture, if possible; shape it to match. Fit the extender exactly, and then glue and nail it to the bottom of the short leg; countersink the nails. You'll probably have to refinish the entire piece to blend the extender with the rest of the wood.
If the gap is really wide, you can V-notch the leg and the extender and glue the parts together, forming an A-shaped brace. This is a very strong repair and will give the piece a real handmade look, so you don't have to match the wood exactly. Assemble the joint with glue and countersunk small nails. Drive the nails where they won't show, and fill the holes with wood filler. Even if the holes are visible, it won't look bad.
Doors on wooden furniture also frequently need to be repaired. In the next section, we'll tell you how to do it.
Doors on wooden furniture, opened and closed on a regular basis, are bound to incur some sort of damage. Left unattended, that damage can spread to the structure of the entire piece. Some repairs are simple, while others may require the replacement of an entire panel. We'll cover them all in this section.
Splits
Advertisement
Split doors, panels, cabinet backs, and other flat parts should be repaired with glue. Very thin door panels and cabinet backs cannot be repaired, and should be replaced. Where appearance is not important, as on the back of a door that's always left closed, metal mending plates can be used for reinforcement.
Sagging or Binding Doors
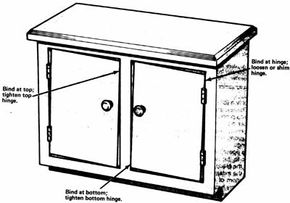
Sagging doors are usually caused by faulty hinge operation; make sure the hinges are working properly. Binding doors can be caused by faulty hinges or by excess humidity. Swelling from humidity or moisture vapor is most common in spring and summer and is most likely to affect wood that hasn't been properly sealed. In fall and winter, when the humidity is lower, the wood will shrink again.
Before you work on the wood, adjust the hinges. If the door binds at the top on the latch side, the top hinge is probably loose; tighten the screws. If the door binds at the bottom on the latch side, the bottom hinge probably needs tightening. If the door binds on the hinge side, the hinges may be too tight or may be mortised too deeply into the wood. In this case, remove the affected hinge or hinges and add a shim of thin cardboard under each one. Then replace the hinges.
If hinge adjustment doesn't work, you'll have to remove some wood at the binding points. Be very careful in removing any wood; use sandpaper rather than a plane. To prevent future swelling, seal the raw edge with shellac when the weather -- and the wood -- is dry.
Replacing Door Panels
Many cabinets have flat door panels, either veneered or covered with cloth, cane, metal, or glass. Split panels should be replaced. If the covering of one panel is damaged, all panels should be recovered, if necessary, to match.
Door and drawer panels are usually held in place by molding strips nailed around the edges, sometimes surface-mounted and sometimes set into a rabbet-type joint. (The rabbet is a reinforced butt joint, with one or both joining members notched to fit together; it is usually reinforced with screws or nails.) These molding strips may be hard to see, but by carefully prying around the panel you'll be able to see how they're attached.
To replace or recover a panel, remove the molding using a butt chisel, a knife blade, or the tip of a screwdriver. Be careful not to damage either the molding or the wood. After removing the molding on all four sides, lift the damaged panel out of the frame. Some raised door panels are fastened with screws from the back of the door frame; these screws must be removed before the panel can be taken out. Raised panel doors may be in one piece; in this case, the panel cannot be removed. To repair this type of door, remove the door from its hinges.
On very old furniture, door panels often require special repair techniques. If the panels are held by moldings, remove the moldings very carefully. Try not to bend or damage the nails that hold the moldings; it's best to reuse these nails when you replace the moldings. If the panel is held in the frame in grooves (dadoes), the best way to remove it is to soften the adhesive around the panel with heat or moisture -- a hot towel is a good tool. Most old furniture was put together with animal or fish glue, and this adhesive can usually be softened. If this doesn't work, take the piece to a professional; the door will have to be taken completely apart or even cut apart and reassembled.
Panels set in square or rectangular frames are seldom really square. To cut a replacement for any panel, use the old panel as a pattern. Don't try to force a replacement panel in or you may break the frame. If necessary, cut the panel down to fit the frame.
Next we'll move onto drawers, which generally get dinged up over time.
Over time, wooden drawers that are well-used will begin to show wear and tear. Boards can warp and lose their fit, guides slide poorly along worn runners, and the frame of your piece may become damaged. With prompt attention, most drawers can be fixed and returned to use, enabling them to glide open smoothly, holding everything from sweaters to silverware. Here are some of the most common problems with draws:
Loose Joints
Advertisement
Drawer frame construction is similar to chair construction. Dovetail joints (wedge-shaped openings or dovetails that hold matching pins cut in the joining piece) are used in old or expensive furniture. Butt joints (joining pieces simply butted together either face to face, edge to edge, or face to edge with no integral fastener) are glued and held with corrugated nails in newer furniture.
Dovetail joints seldom separate; if they do, force adhesive into the loose joint and tap the joint together with a hammer. Butt joints are another problem. To tighten a loose butt joint, try gluing the joint and tapping it together as tightly as you can. Clamp it firmly until the glue is dry. If this doesn't work, you may be able to nail the joint through the face of the drawer. Countersink the nail heads, and fill the holes with wood filler.
Binding
Problems with drawer frames are usually the cause of sticking and binding drawers. When a drawer sticks, it's jerked to get it open and slammed closed. This causes the joints in the frame to separate. First, make sure the joints are tight. Then lubricate the drawer guides and the top and bottom edges of the sides with stick lubricant, wax from a candle, paraffin, or silicone spray. Do not use a petroleum lubricant; oil will collect dirt and dust and cause more problems than the binding.
If lubrication doesn't solve the problem, carefully sand down the binding points. Remove only as much wood as necessary, and seal the raw wood with shellac to prevent future swelling. If sanding doesn't eliminate binding, examine the drawer's runners and guides.
Worn Guides and Runners
Drawers are built with wood or metal runners and move back and forth on guides or tracks. In old furniture, the runners are parallel pieces of wood fastened to the drawer bottom, and the guides are strips of wood across the frame. Sometimes the runners or guides are missing; sometimes they're split, warped, or badly worn. Rough guides or runners can cause the drawer to bind and can eventually damage the frame.
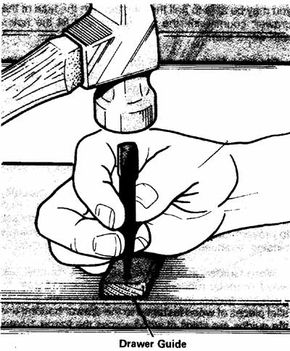
If the drawer guide is missing, install metal guides, available in several lengths and sold in hardware stores and home centers. Complete installation instructions are provided with the guides. If a wood drawer guide is rough, smooth it carefully with sandpaper or a rasp, or -- as a last resort -- a block plane. If the drawer still binds, remove the guide completely. Break a hacksaw blade in half and wrap one end of it with electricians' tape. Wearing gloves, cut the guide out with short strokes of the saw blade.
After removing the old guide, you may be able to install metal guides. For a neater job, cut and fit a new wooden guide that is the same size as the old one. Use hardwood to make the guide; softwood wears too quickly. Glue the new guide into position, and secure it with nails. Countersink the nail heads so they won't interfere with the drawer's operation.
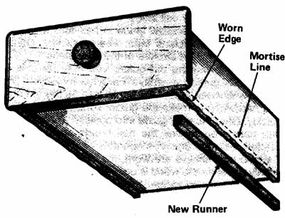
When the runners are worn, the drawer moves unevenly because the wood is uneven. To replace a worn runner, plane and rabbet the worn edge to form an even, smoothly mortised strip along the drawer edge. Glue a thin strip of hardwood into each mortised runner edge, building it up to its original height. Secure the runners with small nails, and countersink the nails so that they won't interfere with the drawer's operation.
If the drawer frame has a wood kicker above the sides and the kicker is worn, smooth it and add a new hardwood strip to build it up again. Follow the same procedure used to replace worn runners.
Split Drawer Fronts
Split drawer fronts are usually the result of missing drawer guides. First install drawer guides. Second, repair the split with glue forced into the break. Wipe away any excess glue, and lightly clamp the edges with a strap clamp. Use only light pressure; too much pressure will buckle the wood at the split.
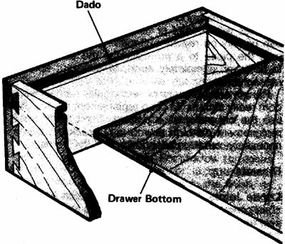
Split Drawer Bottoms
Drawer bottoms are not fastened into the drawer sides and ends; the bottom panel fits loosely into dadoes (slots cut into the face or end of a piece of wood) in the sides. This permits expansion and contraction of the wood and prevents the joints from cracking.
To replace a drawer bottom, remove one end of the drawer and slide the bottom panel out. Replace it with a new plywood or hardboard panel cut to fit. Some drawer bottoms are lightly tacked to a piece of molding nailed to the inside edges of the sides and back, and some drawer bottoms are set on triangular glue blocks. Remove these fasteners or braces before disassembling the drawer. If the piece of furniture is an antique, the drawers were probably hand-fashioned. These drawers should not be repaired with plywood or hardboard.
Table leaves and other flat parts can warp unless they're properly sealed, and years of uneven humidity can leave them severely cupped. In most cases, unwarping them isn't too difficult.
To unwarp a board, work in summer. The traditional cure is exposure to wet grass and hot sun. Water a grassy area thoroughly, and set the board curved side up on the wet grass. As the dry side of the board absorbs moisture from the grass, the moist side -- the convex side -- is dried out by the sun, and the board unwarps. Unless the warp is caused by stress in the wood, the board should straighten out within a day.
When the board has straightened out, clamp it between two straight boards so that it will dry evenly. Before replacing it in the piece of furniture, seal the unfinished side with shellac to prevent it from warping again.
The foucs of the next section is caning, which is relatively easy to fix provided you're dealing with newer furniture.
In antique furniture, caning is usually handwoven. It is threaded through individual holes in the frame and woven in strand by strand. This type of caning should be replaced by a professional. In most newer furniture, the cane is prewoven. An entire sheet of cane is attached in a groove around the open frame. Sheet cane is easy to replace.
Start by removing the old cane. If you can, pull the cane out of the groove, using a chisel to pry up the spline that holds it. If the spline is stubborn, you may have to soak the area with a towel soaked in very hot water and wrung almost dry. When the adhesive has softened, place a block of wood under the caning and tap the block with a hammer. This should dislodge the caning and the spline from the seat frame. After removing the cane, clean out the groove with a chisel. Make sure it's completely clean and dry before you install the new cane.
Advertisement
To replace the cane, buy a new spline and new prewoven sheet caning, about 1 to 11/2 inches larger all around than the opening. Make sure the spline is the right width for the groove. Soak the cane and the spline in warm water for about 10 to 15 minutes to soften the fiber.
When the spline and the cane are pliable, blot them dry with a towel. Lay the caning over the groove, shiny side up. Starting at the center of one short side, pound the edge of the caning into the groove with a narrow wood wedge -- cut the wedge from a 1 X 2 or a 1 X 3, and use a hammer to tap it along the caning.
The bottom of the taper on the wedge should be slightly smaller than the groove. Work along the side of the frame toward the corners, wedging the cane firmly and squarely down into the groove. If the cane isn't securely wedged, it will come loose.
When the first side of the cane is in place, clamp the caned edge between two pieces of 1 X 2 or 1 X 3 to prevent the caning from popping out of the groove. Then stretch the sheet of cane across the frame and wedge the opposite side, starting at the center and working out.
Repeat the procedure, clamping each side as you go, to secure the remaining sides. As you work, the caning may start to dry out. If necessary, rewet it to keep it pliable.
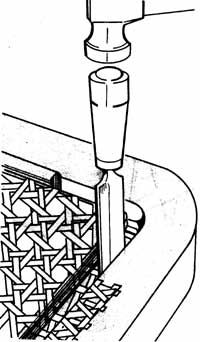
When the caning has been tapped into the groove all around the frame, trim off any excess at the outside corner of the groove. Set a sharp chisel into the groove to cut the cane. Then lay a narrow bead of white glue all around the groove on top of the caning.
Blot the spline dry, and force it into the groove over the caning, using a wooden or rubber mallet to drive it into the groove. Pull the spline tight as you go, and ease it around the corners. You may have to install the spline in several pieces; if so, make sure the ends butt together tightly to form a continuous spline. Finally, wipe off any excess glue.
Let the glue and the cane dry completely. As it dries, the caning will become taut. Let the job set for at least a week before you use it.
The final section of this article is devoted to repairing mirrors and frames.
How to Repair Mirrors and Frames
Although frames are really not pieces of furniture, they do play a role in furnishing and some frames can be very valuable. Antique frames were usually made from solid cabinet wood, such as walnut, cherry, or mahogany -- wood that's both hard to find and expensive today. For this reason, most old frames are well worth repairing. In this article, we'll discuss some easy ways to repair mirrors and frames to help you keep your wooden furniture in good condition. One common problem is loose joints.
Loose Joints
The usual problem with frames is separating miter joints (the joining pieces are cut at a 45-degree angle and joined to form a right angle). There are several ways to fix open miter joints, but the easiest way is glue. Force glue into the open joint with a glue injector, and clamp it with a corner or a strap clamp. Look for metal fasteners along the edges of the joint; if necessary, drive them back into the wood after the clamp closes the gap in the joint.
Advertisement
If the joint won't stay closed, it can be glued and nailed. Drill pilot holes to prevent the wood from splitting. You can either leave the nails flush with the surface of the wood or countersink them and fill the holes. If you leave the nails exposed, use decorative nails such as brass.
If the frame is a valuable antique and you don't want to use nails, close the joint with a corner spline. Clamp the frame in a vise, padding the wood with a piece of carpet or a thick layer of cloth. With a ripsaw, cut a notch into and across the corners of the joint along the edge of the frame. Cut a thin piece of matching wood to fit into the saw cut; test it in the cut, and adjust it as necessary. Spread a thin coating of glue onto both sides of the spline, insert the spline into the cut, and pull the joint together with a strap clamp. Let the glue dry completely. Then, with a sharp block plane, trim the edges of the spline flush with the surface of the frame, and sand them smooth. Spot-finish the spline area to match or refinish the entire frame.
Damaged Carvings
Chipped frames can be patched with a thick mixture of spackling compound or plaster of paris. Roughly form the design you want to duplicate with the patching compound. Position the rough patch material, and lightly press it against the frame. Then, with the tip of a craft knife or a toothpick, shape the compound so it blends in with the design. It will probably be impossible to match the design exactly, but the repair won't be noticeable.
Let the patch dry completely, and then spot-stain or paint it to blend it with the rest of the frame. Test the colors on a chunk of dried spackling compound or plaster of paris before you apply the mixture to the frame repair. You should be able to color-blend the patch perfectly.
As you've seen in this article, a lot goes into repairing wooden furniture. But these repairs are worth the time and effort, especially if it's an antique that is near and dear to you.