How to Decorate a Floor With Paint
Even the ugliest of wood floors, if it's reasonably level, can be redeemed with paint. The effort involved is minimal; the results are surprisingly good.
Tools:
- Measuring rule
- Screwdriver
- Bucket and sponge
- Scrub brush
- Putty knife
- Hammer
- Nail set
- Sanding block
- Rented floor polisher with steel wool pads
- Vacuum cleaner
- Soft pencil
- Chalk line
- Single-edge razor blades
- Paintbrushes for colors (size and number depend on design of floor)
- Large paintbrushes for varnish
Materials:
- Graph paper
- Household cleaner
- Clean rags
- Fine-grit sandpaper
- Plastic wood
- Grade 000 steel wool
- Tack cloths
- Light cardboard
- Masking tape
- Oil-base interior gloss or semigloss enamel
- Polyurethane varnish
Time: Varies with design of floor; for a simple pattern, about 1 week, including drying time
Advertisement
Planning the Floor Design
Measure the room and plan your floor design carefully. Make a floor plan of the room on graph paper, indicating doors, windows, and all floor obstructions, and draw your floor design on it in color. The easiest floor to paint is a plain one, all one color, but the possibilities are endless; stripes (in rainbow or earth colors), checkerboard or crossword patterns, borders on a plain ground, painted-on fool-the-eye rugs or tile patterns, supergraphics, art nouveau borders, or anything else you can think of. The only limitation is how much time you want to spend.
Buy paint after you decide on a pattern, and buy only as much as you'll need; use oil-base interior gloss or semigloss enamel. If you need special brushes, buy them when you buy the paint. Buy enough polyurethane varnish, preferably in a gloss finish, to give the floor three coats; read the label to figure coverage.
Preparing the Floor
Before you paint, remove the furniture and prepare the floor. Remove any floor registers. Wash the floor thoroughly with a strong solution of household cleaner, using a scrub brush if necessary to remove all old wax. Scrape off any paint or putty spots with a putty knife as you wash the floor. Rinse the floor carefully to remove all traces of soap; wipe with a clean rag and let dry completely.
Examine the floor and correct any irregularities. Use a nail set to drive protruding nailheads into the floor; sand any rough spots with fine-grit sandpaper. Fill cracks and nail holes with plastic wood, smoothing it in with the putty knife, and let the patches dry thoroughly. Finally, to make sure the new paint will adhere to the old finish, go over the floor with a rented floor polisher loaded with steel wool pads. Scour the edges of the floor lightly by hand with grade 000 steel wool.
Vacuum the floor thoroughly to remove dust and bits of steel wool; close doors and windows to keep dust out. Wipe the floor down with a tack cloth for a final cleaning.
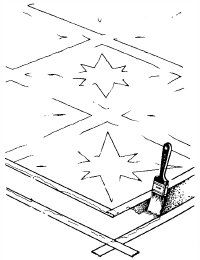
Transferring the Design
Transfer your design carefully to the prepared floor, using a soft pencil to mark light outlines. Wear clean, soft socks so you don't mar the floor. Measure carefully from the walls and snap chalk lines to mark long edges. For complicated patterns, mark a grid on the floor to correspond to your graph paper diagram. Transfer the pattern from the graph paper diagram to the floor, square by square; correct mistakes freehand. For simple repeat patterns, cut stencils from light cardboard with single-edge razor blades and trace the stencil design lightly onto the floor.
Painting the Floor
Paint one color at a time or one area of the room at a time, depending on the complexity of your pattern. Use one brush for each color. If the floor will have a solid background color under a pattern or border stripes, paint the background color first and let it dry completely before proceeding, at least 24 hours. Wear clean, soft socks while you work.
Use masking tape to separate large areas of color and to define stripes and borders. In general, paint large areas first and let them dry; then paint small patterns and detailed edgings. Let each color dry before applying another color directly next to it. When the entire design has been painted on the floor, let the floor dry for 24 hours; leave the door closed to keep dust out.
Varnishing the Floor
Seal the newly painted floor with polyurethane varnish. Wearing clean, soft socks, go over the floor lightly with a clean tack cloth. Apply varnish along the grain of the floorboards, brushing it on slowly to prevent air bubbles. Let the varnish dry for 12 hours and apply another coat, again brushing slowly along the grain of the floorboards to prevent air bubbles; let dry 12 hours. Apply a third coat of varnish and let dry at least 24 hours. Replace floor registers.
Let the floor dry for 2 or 3 days before moving furniture into the room; polyurethane hardens with time.
Now that you've re-vamped your floors, learn how to paint a wall mural next.