How to Build a Stone Wall

Gimme Shelter: Retaining Wall Basics
In this clip from Discovery Channel's "Gimme Shelter," John Harvey demonstrates how to create a retaining wall.
Discovery

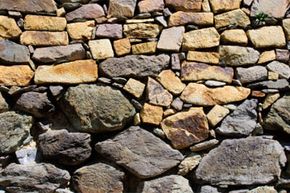
Beyond the written word, building with stone is one of the oldest and most enduring arts of human culture. There are stone walls in Britain -- still standing -- that date back to 3500 B.C. These days, there are much simpler, cheaper and faster ways to define our outdoor spaces, but none of them carry the precise character or look of a stone wall. That's the reason we still value them, whether living in the middle of a city or out on a farm. The simplest ingredients -- stone, gravity, ingenuity -- still create, for some of us, the most perfect solution.

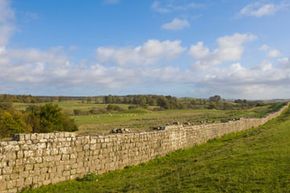
Make no mistake. You're involving yourself in quite a project if you choose to build this way. Stone is neither light to carry nor easy on your wallet, and when building a wall, the brainpower involved can be just as important as the brawn you'll be using. Just think of the stone walls that have been part of the New England landscape for decades, or the miles of wall standing in the United Kingdom for hundreds of years ... and how yours could still be standing centuries from now.

Advertisement

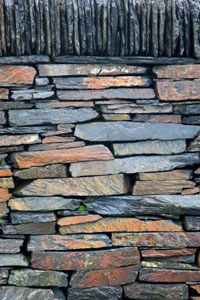
In this article, we'll talk about the options available -- and decisions to be made -- for building your wall, as well as the tools and materials you'll need. We'll focus primarily on the dry-stone technique, although these days almost any stone building project involves at least a little concrete. Mortared walls, which are constructed by applying a construction paste in between the stones as a fixative, are the other major option here and are very popular, but we'll concentrate mostly on the former: Dry-stone walls rely almost entirely on gravity to keep their enduring shape, and thus take more work to build correctly. However, many of the details apply to either project.

Decisions to Be Made

Firstly, are you going to do this entirely by yourself? We'll assume so, but plenty of the information in this article will be helpful as you come to terms with your project and hash out the details, even if you plan on bringing in help. The cost of transporting stone to your project site is one of the major considerations, to the degree that a paid contractor might end up being the least of your project's costs: Even a short wall could end up costing a couple grand in rocks alone, depending on how you source it. However, as a DIY devotee, you've probably already thought about that -- as well as the time needed for construction. Even the most accomplished dry-stone wallers only expect to create about 3.2 yards (3 meters) worth of wall per day [source: Henley]!

It's important to make sure you've chosen the right site for your wall: There are questions of zoning and licensure, of course, but there's also the question of neighbors. If you're looking to erect a border between your land and another person's land, you don't want to build right at that border unless you've agreed to share responsibility for the end result. Walls should be built from local stone, both for aesthetic and transportation reasons -- of course -- but also because of the weathering you can expect over time.

Advertisement

Likewise, you're going to want to check out the land itself: That baby tree will be huge one day, with roots you can't see. And even the most subtle slope will have a huge effect on the way your wall changes over time. Gravity is the most important ingredient in any stonework construction, and whether your wall is mortared or dry stone, you're going to be depending on that key force of nature to ensure that your wall succeeds for a long, long time. It's said that stone walls like these are in constant movement, which means the way you build the wall now is setting it on the course it'll follow for the rest of its existence.

The Question of Stone

wall made of slate
Because of its natural tendency to fracture in relatively straight lines, slate is perfect for building rock walls.
©iStockphoto/Thinkstock

For a dry-stone wall, your local stone should be of a hard, flat-cleaving stone such as shale, slate or schist. You want long angles -- meaning flat tops and bottoms -- when possible, so look for stone that naturally breaks into those shapes to ensure strength and durability of your finished project. The worst choice is igneous rock, whether found in the ground or in water, as its formation creates shapes that will work against you in wall building. (If you love the look of igneous rocks, of course, the mortared-wall choice is still available, as you'll see.)

Since sedimentary rocks are pressed by time and gravity into the same useful configuration as the hard stones mentioned above, they're a good choice as well. In fact, the relatively softer nature of metamorphic and sedimentary rocks can be a good thing, since you'll probably have to do a little stonemasonry to make everything fit together. Remember that "soft" is a relative term: Walls and structures made of sandstone and limestone -- both sedimentary rock -- can still last thousands of years!

Advertisement

It's just a matter, again, of considering your local conditions: A lot of wind from a dusty plain can shave limestone down over time, while a more volatile climate full of freezes and thaws actually works better with softer stone, since it's less likely to crack and change shape. Of course, a major part of building the wall is taking those forces and changes into account, and being mindful of those factors starts at the outset.

Your Blueprint

Once you have chosen and cleared the entire site, considering downhill gravity and drainage issues on the land itself, you can begin laying out your plan. Whether mortared or dry-stone, it's essential to define exactly what you want: how long the wall will be, how thick, how corners and gates will work, and so on.

Be exacting. A big part of the project is going to be making sure your decisions stay stable; for example, what if your plumb line weren't kept taut, and curved in the wind? You could end up building to what you think is a straight line, and end up with a bizarrely curved wall that'll eventually tear itself apart. On the other hand, if you want a curved wall, think about laying out a garden hose or similarly thick rope to plan the trench that will hold your first course of stone, then build the shape into the wall as you work.

Advertisement

While planning, keep a few rules of thumb in mind: Firstly, there is a huge difference between walls taller than 3 feet (0.9 meters) and walls that are shorter than that. While the base of a shorter wall should be equal to its height, anything higher than 3 feet (0.9 meters) requires an extra 8 inches (20 centimeters) in width for each foot of height. Therefore, a 3-foot (0.9-meter) wall has a 3-foot (0.9-meter) base, but a 7-foot (2.1 meter) wall needs a base of no less than 4.6 feet (1.4 meters) [source: Vivian].

The appeal of stone walling is its permanence: Half the task is keeping that in mind. The higher the wall, for example, the deeper you should sink it. For anything higher than waist level, you should dig your trench at least 2 feet (61 centimeters) -- or deeper, depending on the frost line for your particular region. (Frost forming and thawing will cause your wall to move up and down, but if your dry rock wall is sunk into the ground, that moisture can pass through the small openings in your structure.) On the other hand, for a shorter wall you need only worry about sinking it by 8 inches (20 centimeters) or so: Gravity will do the rest, as the wall figures itself out [source: Volk].

Advertisement

Materials and Preparation

Hadrian's Wall in the U.K.
Testament to longevity: Hadrian's Wall in the U.K. was built over the years of 112 to 130 A.D. Large stretches of the wall still stand [source: BBC].
©iStockphoto/Thinkstock

You've set a plan and you're raring to build your new wall. Make sure you have all the required items ready [source: Volk]:

  • Stone -- Figure on the total volume as being twice the height times the length, no matter what technique you use, but remember you'll be using stones of many different sizes, and the wall itself is going to settle in time, which means it's not as simple as eyeballing that total.
  • A wheelbarrow to carry your stones (and mix your mortar, if you like)
  • Crowbars or other tools for maneuvering heavier stones
  • Heavy boots, gloves and goggles
  • Something to dig your trench and a chisel for addressing minor issues with the stone
  • Stakes -- two stakes for every yard of wall length, a few inches taller than your finished project
  • String -- at least double the length of your wall.
  • Optional items: line level, mason's level, masonry hammers

Define your trench by nailing stakes along the outside edge of your workspace, putting down two stakes about every yard the length of the project. Make sure they're a good deal taller than your eventual wall height, because you'll be re-tying your line as the wall builds. Once the stakes are down, tie your twine to them at about a foot high to start, making sure it's taut.

Advertisement

The Footer

Once you've dug your trench, lay in your "footer" stones. Depending on the depth needed for your trench, your first layer, and even subsequent courses, may be entirely below ground level. Use the heaviest and ugliest stones, since you can bury odd ends and angles in the earth without worrying about them touching anything else. Lay them in several inches apart to help with drainage -- you can fill those spaces in with smaller rocks -- and if possible, try to create a shallow V shape down the center (the midpoint between each side of the wall, running the entire length of the structure). This will set up a support system in the levels (also called "courses" or "steps") that follow, where higher stones are pushing against each other from the two outer sides of the wall.

Keep in mind that gravity pulls straight down. That's the No. 1 rule to remember, because it makes the physics of the whole thing make more sense. You start with a level base, and each successive course you lay atop of it is going to be pulled straight down, which is what will keep the wall in the shape you define, hopefully for a very long time.

Advertisement

(If you're building a mortared wall, this first level gets a full concrete pour, as well as rebar -- reinforced steel rods -- the height of your finished project, planted at six-foot intervals. Of course, a dry-stone wall could benefit here from concrete as well, depending on whether you're willing to fudge your stance as a purist a little for the sake of a balanced foundation -- in that case, you would forego the rebar.)

Above Ground

strata of a dry stone wall showing larger stones at the base
This wall example shows the use of large, heavy stones in the foundation layers, and smaller stones toward the top of the structure.
©iStockphoto.com/Mac99

Raise your guide lines to the height of the first course -- or layer -- which should be about the average size of your thickest, biggest stones. Hold back the most attractive, uniform stones for the top of the wall, but it's more important to get rid of the heaviest stones first so you needn't lift them later, even if they're beautiful. Lay them out in parallel lines along both outside edges of your trench, then fill in the middle spaces with less perfect stones -- if you can, try to preserve that internal V slope, especially here at the beginning.

You're looking for a flattish outside surface as well as -- more importantly -- preserving topside flatness for the stones to come. If you've chosen a dry-stone technique, of course, you have already made some aesthetic choices here, so pay attention to the outer-vertical (the "face") only insofar as you don't get any strange gravitational effects by having the stones stick out too far in odd places. Either way, you're going to want to strive for flatness for each course.

Advertisement

Make sure the stones are as level and stable as possible as you work. It's always better to knock off a wobbly bit from a stone -- or dig out a chip in the one beneath -- than to shim them in with smaller rocks or wedges. Save those for the interior of the wall, because the pebble you shove in to fix a momentary problem is the first thing that's going to fall out once you walk away. (And once you've filled in the first course as well as you can, for a mortared wall you cover the whole course anyway.) If you've got a rock that would be great, except for one feature or problem it's giving you, the best way to split it off is to score around that troublesome bit (a half-inch or less) with a chisel before you try knocking if off.

Finally, every 6 feet (1.8 meters), you'll want a "tie" stone, which is one that you lay crosswise rather than along the parallel sides. This literally ties the wall together, pressing downward on the stones below in a way that brings the two sides together into a single wall, and the tie stones become more important as you build upwards. Two perfect halves of a wall, no matter how cunningly you fill in the middle, are not what you're aiming toward -- the tie stones are the key to the wall's strength and endurance.

Advertisement

Things Run Their Course

For subsequent courses, just move your guide lines up and proceed just as you set in previous layers -- using the same technique. Place your tie stones at the same intervals, use the imperfections of the level below to create a flatter surface for the next course, and don't forget to pay attention to your guide lines. Remember: If it's worth doing, it's worth doing right.

The only new element, now that you're building past the footer and first course, is that you need to be wary of building vertical holes into the wall's structure. Splits between stones on a course are called "joints," and joints that link upwards are called "runs." You don't want them -- even if you've been conscientious with your ties, they're a killer -- so make sure to follow this simple rule as you build upward:

Advertisement

Cover a big stone with two smaller ones on the next level, and when possible, always use larger stones to cover as many joints as possible. Follow this rule on the exterior walls, of course, but keep it in mind for the interior stones as well. A run that crosses through the middle of your wall is a bad idea -- it could pull whole sections down.

The Big Finish

For corners, edges and the top, you're looking for as much physical uniformity as you can get. Consider corners and ends the most important "tie" stones, as they're the most exposed and bring the whole thing together. They should sit perpendicular to the wall itself, like the other tie stones, while also working as mini-faces in their own right, holding the smaller interior bits inside while they settle. (A mortared wall especially counts on corner/end ties this way, since the entire structure is being held together by ingredients beyond gravity.)

The top stones are called "capstones" and generally should be as long, flat and uniform as you can find and hold back during your building process, to a reasonable weight. You don't want to injure yourself, of course, but you also don't want to create uneven weight stresses at the top of your wall. On the other hand, since you don't have to worry about holding up subsequent courses, you also get to have some fun with this level.

Advertisement

In closing, it's important also to note that -- as with any DIY project -- upkeep is a factor. While you're designing and working for permanence, and doing your best to build something that will last forever, you should keep an eye out for changes over time. Gravity works more slowly than we can see, which means issues may take a while to show up.

But the great thing about building something like this, with your own hands, is that repairs are made so much simpler. If a part of your wall develops issues, you already know how to fix them -- and you've already practiced for just such an occasion. After all, the way you've chosen to build your wall makes it a snap anyway. A mortared wall with cracks just needs mortar, and a dry-stone wall? Simple as stacking one stone on top of another.

Advertisement

Author's Note

There's something about a stone wall that evokes a timeless, solid feeling: After all, it's about as far back as architecture goes. Whether it's the first thing your guests see, a subtle feature in the backyard or the perfect finishing touch on an English garden, stone projects can't help but make a statement rich with meaning and history.

Related Articles

Sources

  • Barrett, Sara. "A Master of the Stone Wall Discusses the Perfect Fit." New York Times, July 2011. (May 3, 2012) http://www.nytimes.com/2011/07/07/garden/andrew-pighills-master-of-the-stone-wall-qa.html
  • Cook, Roger. "Lots of Groundwork Goes into the Best Rock Walls." This Old House, Aug 2010. (May 3, 2012) http://www.thisoldhouse.com/toh/article/0,,203319,00.html
  • Eade, Simon. "How To Build A Dry Stone Wall." Garden of Eaden, Apr 2011. (May 3, 2012) http://gardenofeaden.blogspot.com/2011/04/how-to-build-dry-stone-wall.html
  • Fields, Curtis. "The Forgotten Art of Building a Stone Wall." Yankee Magazine Press, 1965.
  • Gardner, Kevin. "The Granite Kiss." Norton Publishing, 2001.
  • Henley, Jon. "How to build a dry stone wall." The Guardian, Aug 2009. (May 3, 2012) http://www.guardian.co.uk/money/2009/aug/08/dry-stone-walling
  • Lawrence, Mike. "Step-by-step outdoor stonework: over twenty easy-to-build projects for your patio and garden." Storey Communications, Dec 1994.
  • McRaven, Charles. "Stonework." Storey Publishing, Jan 1997.
  • Sanders, Charles. "Build a stone wall." Backwoods Home Magazine, 1998. (May 3, 2012) http://www.backwoodshome.com/articles2/sanders70.html
  • Vivian, John. "Building Stone Walls." Vermont: Garden Way Publishing, 1976.
  • Ibid. "How to Build a Dry Stone Wall." Mother Earth News, Oct/Nov 1991. (May 3, 2012) http://www.motherearthnews.com/do-it-yourself/how-to-build-a-dry-stone-wall.aspx
  • Volk, Bill. "Building a natural stone wall." DIY Life, Jan 2008. (May 3, 2012) http://www.diylife.com/2008/01/27/building-a-natural-stone-wall

Advertisement

Advertisement

Loading...