How to Repair Hardwood Floors
If you are tired of floor coverings and want to restore the natural warmth and beauty of hardwood under the carpet, the job is difficult, but it can be done. You will have to remove the old finish and strip the floor down to the bare wood. Only then can you apply the new finish.
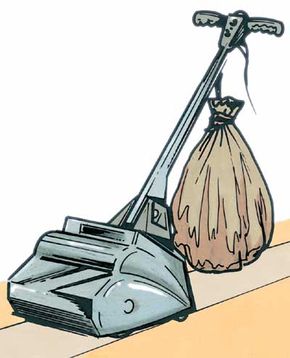
You'll need a drum sander with a dust bag attachment and a disk sander or edger, available at a tool rental store. The store can supply or recommend sandpaper. Buy open-coat sandpaper in 20, 40 and 100 grits.
Advertisement
Before you start, move everything out of the room. This includes curtains and draperies, pictures -- everything. Floor refinishing is messy, especially during the sanding operation.
Caution: Be sure to wear a safety mask and safety glasses to keep finish and wood particles from eyes and lungs during this process.
Step 1: Seal off all heating and cooling outlets with masking tape, and seal around all doorways except the one you will use (seal that one, too, when you are ready to start). Some sanding dust will get into the rest of the house, but sealing doorways and duct outlets will help reduce the mess.
Step 2: Carefully remove all quarter round, baseboard, and other molding at the floor. Check the entire floor for nails, and countersink any that protrude. Open the windows.
Step 3: For the first sanding, use 20-grit paper in the drum sander. Go back and forth over the entire floor, with the grain, overlapping each pass about three inches. At the end of each pass, you will have to lift the sander and move it over -- but be careful in doing this to avoid digging into the floor. Go slowly. Use the disk sander or a sanding block in areas near the walls where the drum sander cannot reach.
Step 4: Repeat the procedure with 40-grit paper, and then again with 100 grit. When you are satisfied that you have removed the old finishes, you can return the rental equipment.
Step 5: Vacuum the room thoroughly, including the walls and around windows, to remove all the dust. If you do not remove all the dust, you will obtain an inferior finish.
Step 6: If your floor is pine, use a pine floor primer to seal the wood. Give the primer an hour to dry before applying your finish. If your floor is oak, rub some turpentine on a small section to see what the wood would look like with a natural finish. If you like the way the floor looks, you need not stain it. If you decide to stain the wood, apply the stain evenly and let it dry thoroughly according to the directions.
Step 7: Apply the finish. Clear-finish polyurethane varnish is ideal. The first coat will tack-dry in about 15 minutes and will be ready for the second coat in about an hour. When the second coat dries, buff the floor. For a high gloss, wait overnight and apply a third coat using a mixture of one part reducer to four parts finish. Let this coat dry overnight before use. After the third coat, the floor can be shined with a dry mop. If you prefer, natural varnish is a traditional finish coat that requires more care to apply. It is slower drying, and there is more chance for dust to foul the finish. It is subject to checking as it grows older, though when applied properly it dries water-clear for a beautiful finish. Follow it with a coat of wax and buff.
Note: If a prefinished flooring is installed, refer to the manufacturer's instructions for refinishing and maintaining the floors.
Now that we've dealt with the major operations, we can divide and conquer some of the minor floor repairs. In our next section, we will cover squeaky floors and stars and carpet burns.