A Guide to Furniture Finishes

Putting the finish on furniture is the final payoff for all the hours you've spent removing the old finish, making repairs, sanding, staining, and smoothing. Some might consider the finishing step as routine, others might think it's creative. Either way, it is usually easy to do, if you use the right materials, take your time, and exercise a little patience. In this article, we'll discuss how to pick the best finish for your furniture wood. We'll also review some application techniques, including preparation work and drying tips, so whatever finish you choose should provide a long-lasting look.

Types of Finish

Furniture finishes can be classified into several basic types: varnish, penetrating resin, shellac, lacquer, wax, and oil. All these finishes are designed to protect the wood and to bring out its natural beauty, and all of them can be assessed in terms of how well they accomplish these objectives. Consequently, choosing a finish comes down to two essential factors: How do you want the wood to look? How durable do you want the finished surface to be?

Of the six basic finishes, all can be beautiful, but when it comes to durability, two types outperform all the others: varnish and penetrating resin. Varnish, the most durable of all finishes, is available in high-gloss, satin, and flat forms for whatever surface shine you want. Applying varnish can be difficult, but the results are worth the work. Penetrating resin sinks into the wood to give it a natural look and feel; it is easy to apply and durable. The other furniture finishes do have their advantages.

Oil, for instance, produces a very natural finish. Shellac dries fast and is easy to use. But for most refinishing, varnish or penetrating resin is probably the best choice.

Whatever finish you choose, it's important to know exactly what you're working with. Some finishes can be mixed and some cannot. Each finish has its own individual application techniques; each finish requires different tools and materials. Before you buy and apply a finish, always read the ingredient and application information on the container. And always follow the manufacturer's instructions and recommendations.

The one requirement common to all finishes is a dust-free environment during application. Providing this environment isn't easy, but it can be done. Consider using a finish that dries with a matte or flat surface; this type of finish gives you the opportunity to remove dirt and lint with rubbing abrasives.

In most cases, how a piece of furniture stands up to wear is as important as how it looks. Durability is a primary consideration in choosing a finish. The most durable finishes, varnish and penetrating resin, are thus the two basic finishes for refinishing. Varnish is the more protective of the two because it is a surface coat; damage to the varnish does not always extend to the wood. Penetrating resin hardens in the wood itself. Although it doesn't protect the surface from damage as effectively as varnish, it may stand up to heavy use better because it's easy to reapply and doesn't chip or craze.

If varnish is your choice, check the next section on how to work with this durable, slow-drying finish.

Advertisement
How to Varnish Furniture

Varnish, one of the toughest of the finishes, is superior to the other traditional finishes. It enhances and gives warmth to the grain of the wood and is resistant to impact, heat, abrasion, water, and alcohol. It can be used as a topcoat over worn finishes. Varnish provides a clear finish, but it darkens the wood slightly. It is available in high-gloss, semigloss or satin, and matte or flat surface finishes. There are many types to choose from, but it's important to decide on one that will work well with your furniture wood.

Types of Varnish

The traditional varnish is based on natural resins and oils and is thinned with mineral spirits or turpentine. Spar varnish is a natural varnish formulated to stay tacky; it should never be used for furniture. Synthetic varnishes are based on synthetic resins and require special thinners.

The best of the synthetic varnishes is the polyurethane type; polyurethanes are clear, non-yellowing, and very tough. Other synthetic varnishes are the phenolics, used for exterior and some marine work, and the alkyds, often used in colored preparations. Phenolic and alkyd varnishes yellow with age and are not recommended for refinishing. With any type of varnish, look for quick drying to minimize dust problems. Use spray varnish only where brushing is impractical, such as on wicker or rattan.

Water-base varnishes offer similar results without the cleanup hassle and toxicity. Most dry clear to the touch in 15 to 30 minutes. They don't crack, chip, or bubble, and they are water- and alcohol-resistant. Best of all, these varnishes do not yellow. However, when applied in several coats, the finish might begin to cloud, depending on the wood.

Special Requirements

Natural varnish can be used with any stain or filler. The sealer for natural varnish is thinned shellac or a mixture of 1 part varnish and 1 part turpentine or mineral spirits. Do not mix brands or types of varnish. Polyurethane varnish is not compatible with all stains and fillers. Before buying, read the labels to make sure you're using compatible materials. Some polyurethanes can be thinned for use as a sealer; some do not require sealers. Some sanding sealers are compatible with polyurethanes.

Water-base varnish can be used over stain and filler, provided you allow the undercoats to fully cure. This process can take up to a month. You can also apply a sealer coat of shellac between the two if you don't want to wait.

Be aware that varnish generally dries very slowly and can be difficult to apply, so it's important to know how to use this finish.

Application Techniques

Apply varnish with a new, clean, natural-bristle brush. Use only new varnish. Varnish that's been used several times may contain lumps of hardened varnish from around the sides and rim of the container. These lumps can really cause trouble. If you plan the job properly, you probably won't have enough varnish left to be wasteful. Leftover varnish can be used on parts that won't show or projects where the finish isn't critical.

Bare wood to be finished with varnish must be properly prepared, and sanded. (For guidelines on sanding, click here.) Finished wood to be top-coated must be cleaned and lightly sanded. Immediately before applying the varnish, clean each surface thoroughly with a tack cloth.

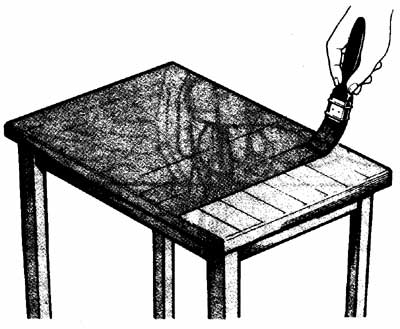
It's much easier to apply varnish to horizontal surfaces than vertical surfaces. Before you start to work, turn the piece of furniture so that its major surfaces are horizontal. If the piece has drawers, doors, shelving, and other removable parts, take them out or off and finish them horizontally. Work on only one surface at a time, and work on large surfaces last.

Apply varnish to the prepared wood with long, smooth, even strokes, laying the varnish along the grain in strips the width of the brush. Do not touch the brush to the rim of the varnish container; shake or tap off excess varnish inside the container or on a strike can. The varnish should flow onto the surface of the wood, with no drag. If the brush starts to pull or if you see small missed or thin spots, add about 1 ounce of thinner to the varnish.

For natural varnish, use turpentine or mineral spirits. For polyurethane varnish, use the thinner recommended by the manufacturer. Stir the thinner gently into the varnish, being careful not to raise any bubbles.

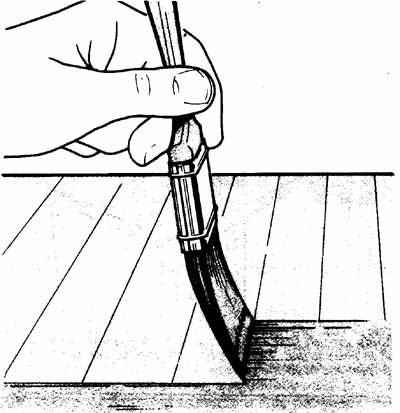
Apply varnish in even strokes across the grain of the wood.

Apply varnish first along the grain of the wood, flowing it on in even
strips. Then apply more varnish across the grain to level and even the surface.

After laying on an even coat of varnish in strips along the grain of the wood, apply more varnish in even strokes across the grain of the wood to level and even the surface. The varnish should be as even and level as possible, with no thick or thin spots, but a thin coat is better than a thick one.

Thick coats of varnish take longer to dry, and they tend to crack as the varnish ages. As you work, remove dust and lint from the wet finish with a rosin lint picker.

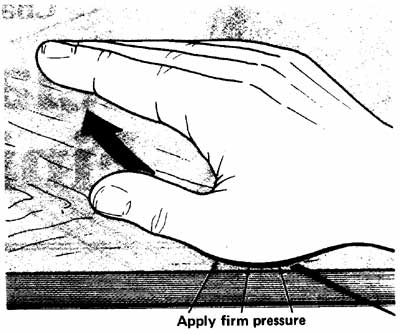
Smooth the surface by stroking it very lightly along the grain with an almost dry brush.

After leveling the varnish across the grain, smooth the surface by stroking it
very lightly along the grain with an almost dry brush. Pick off dust and lint as you work.

To finish each surface, tip off the wet varnish in the direction of the grain. Use an almost dry brush for this step. Holding the brush at a slight angle to the surface, very lightly stroke the surface of the varnish to remove brush marks and even the surface. Smooth the entire varnished surface, working in strips along the grain of the wood. As you work, pick off dust and lint with a lint picker. Any remaining brush marks will disappear as the varnish dries.

Varnish must be applied carefully to prevent thick spots. At outside corners, work from the flat surface toward the corner; lift the brush as it nears the corner and before it flips down over the edge. This prevents a buildup of varnish along the edge. At inside corners, work an inch or two away from the corner; then brush the varnish into the corner, tip it off, and leave it alone. This method prevents buildup on many flat-surface brushings.

Spots that tend to hold varnish, such as tiny potholes, should be coated just once with varnish and tipped just once with the brush. Repeated tipping will leave a bulge.

Brush lengthwise along rungs, spindles, and other turnings. On carved moldings, apply the finish to the carvings first with a fairly dry brush; then finish the flat surfaces with the tip of the brush. Finally, use a very dry brush to go over the carvings and then the flats, leveling the finish and removing any fat edges, sags, or runs. On raised panel doors, finish the panels first and then move on to the flat framing. The finish will build up at the miters in the frame where they meet the panel; remove the excess with a very dry brush, working from the corner out.

Drying and Recoating

Drying times for natural varnish average about 24 hours, but water-base varnish and polyurethanes often dry more quickly. Dampness slows drying, so it's recommended that you extend all drying times if you're applying varnish in humid or wet weather. Also, drying times are not necessarily curing times, and new varnish is easily damaged. Always let the finish dry at least 24 hours or as long as the manufacturer recommends; if possible, let it dry a couple of days or more.

Pick off lint and dust only while the surface is wet or sticky; too much interference could damage it.

Many varnishes require two or even three coats for a smooth finish -- use your own judgment, and follow the manufacturer's recommendations. Between coats of varnish, let the first coat of varnish harden or dry, as recommended by the manufacturer.

Some two-coat varnishes should be applied 10 to 15 hours from the time the first coat was applied, but in general it's best to wait at least 24 hours -- longer, if possible. When the first coat is completely dry, lightly sand the varnished wood in the direction of the grain, using grade 7/0 sandpaper on a padded sanding block. Abrade the surface evenly, but don't cut it deeply.

Clean away all sanding residue with a tack cloth, and apply the second coat of varnish the same way as you did the first. Repeat this procedure, sanding the varnished wood carefully, if a third coat of varnish is required.

In addition to varnish, another option that stands up well to heavy use is a penetrating resin finish. Check out the next section for when and how to use this type of finish.

Advertisement

How to Apply a Penetrating Resin Finish

Penetrating resin finishes, unlike varnish, are not surface finishes; they soak into the wood to harden the fibers themselves. Wood treated with penetrating resin has a very natural look and feel, as if it were unfinished, and the grain is strongly highlighted. Penetrating resin is very durable and withstands heavy wear; it is both easy to apply and easy to repair. It dries clear, but it darkens the wood slightly. It is also available in several stain colors.

Because penetrating resin must soak into the wood, it is best used on open-grained woods. Very close-grained woods may not absorb it deeply. On stripped wood, all old filler must be removed. If filler is left in the wood, the finish will not be absorbed.

Penetrating resin is recommended for use on oily hardwoods, such as rosewood and teak, and is especially effective on oak and walnut. It is often preferable to varnish for use on large pieces of furniture and complex carvings. It dries relatively slowly, but because it is not a surface finish, dust is not a problem. A penetrating resin finish is very hard to remove for future refinishers, so it's important to choose the right one for the job.

Types of Penetrating Resin

Penetrating resin finishes are formulated with two different types of resins: phenolic and alkyd. There is little difference in performance between these types, but phenolic-base compounds may penetrate the wood more deeply than alkyd types.

Special Requirements

Penetrating resin can be used over any stain except varnish- or vinyl-base types. No filling or sealing is required. Before applying penetrating resin on bleached or stained surfaces, test it on a hidden part of the piece.

Application Techniques

Wood to be finished with penetrating resin must be properly prepared and sanded. Because the finish does not coat the surface of the wood, any rough spots or other defects will be accentuated when the resin is applied. Immediately before applying the resin, clean the piece of furniture thoroughly with a tack cloth.

Whenever possible, penetrating resin should be applied to horizontal surfaces. If the piece of furniture has removable parts, remove them and finish them horizontally. Apply penetrating resin with a clean brush or cloth, with No. 0000 steel wool, or pour it directly onto the wood. Work on small areas at a time. On rungs or spindles, apply the resin with a clean cloth one rung at a time.

Spread the resin liberally and evenly over the wood. The appearance of the surface isn't critical, but the amount of resin used on each surface should be consistent. As you work, watch the wood surface. Some open-grained woods soak up the finish very quickly, others -- especially close-grained hardwoods -- absorb it slowly and may not absorb much. Apply resin until the wood stops absorbing it.

Let the resin set for about 30 to 45 minutes. During this time, keep the surface wet, adding more resin to any dry spots that appear. All surfaces should be shiny. After 30 to 45 minutes, when the wood will not absorb any more resin and the surface is still wet, firmly wipe off the excess finish with clean, absorbent cloths. The surface of the wood should be completely dry, with no wet, shiny spots.

Drying and Recoating

Let the newly applied resin dry for 24 hours. If glossy patches appear on the wood during the drying period, remove them immediately. Add resin to these areas to soften the dried finish, and wipe off the liquid resin so that the wood is dry.

After 24 hours, smooth the wood gently with No. 000 or 0000 steel wool; then clean it thoroughly with a tack cloth. Apply a second coat of penetrating resin, letting it penetrate and wiping off the excess as above. If necessary on very open-grained woods, apply a third coat of resin; wait 24 hours and smooth the surface with steel wool before application, as above. No wax or other surface coat is needed.

If you need a finish that is easy to apply and dries quickly, then check out the next section for tips on when and how to use a shellac finish.

Advertisement

How to Shellac Furniture

Shellac is the easiest of the classic finishes to apply. It produces a very fine, mellow finish, and it accentuates the natural grain of the wood. It is especially attractive on walnut, mahogany, and fine veneer woods. It polishes well and is the basis for the traditional French polish finish on very fine furniture. Shellac is applied in several thin coats. It dries fast and can be recoated after four hours. Application mistakes can occur since many coats are required, but they are easy to fix.

The big drawback to shellac is that it is not durable. Shellac is easily damaged and dissolves in both water and alcohol. White rings are usually a problem. Shellac cannot be applied in very humid weather because humidity turns it white. Shellac finishes absorb moisture and sometimes turn hazy or white with age. Repairs are easy, but frequent retouching is necessary. Shellac tends to be soft after it dries, so waxing is almost essential to protect the surface. It is best used on decorative pieces that don't have to stand up to hard wear. Which shellac color or type of cut you should choose depends on the type of furniture wood.


Shellac Colors and Cuts

Shellac is available in two colors: white and orange. White shellac is used for light woods and is thinned with denatured alcohol for use as a sealer. It can be tinted with alcohol-soluble aniline dye and is sometimes available in colors. Orange shellac gives an amber color to the wood; this is often desirable on dark woods. It is especially attractive on walnut, mahogany, and teak.


Shellac is sold in several cuts, or concentrations. The most common type is a 4-pound cut. Shellac must usually be thinned or cut with denatured alcohol before application, as directed by the manufacturer. For sealer, thin 1 part of 3- or 4-pound-cut white shellac with 4 parts denatured alcohol. For finish coats, thin 1 part 4-pound shellac with 2 parts alcohol.


 Shellac Thinning Proportions for 4-pound Base

 Cut Shellac
Alcohol
 1/2 pound
1 part
5 parts
 1 pound
1 part
2 parts
 2 pound
4 parts
3 parts
 21/2 pound
2 parts
1 part
 3 pound
4 parts
1 part

Special Requirements

Shellac can be used over any stain except alcohol-base types and over any filler. Thinned shellac is recommended for sealer coats. Use denatured alcohol to thin shellac; use alcohol or ammonia for cleanup. Shellac has a very short shelf life; old shellac does not dry properly. Buy just enough for the job, and junk any leftover shellac. Some manufacturers shelf-date shellac.


Basic Application Techniques

Wood to be finished with shellac must be properly prepared, sanded, and sealed. (For guidelines on how to seal furniture,
click here.) Immediately before applying shellac, clean each surface thoroughly with a tack cloth. Use a new, clean, good-quality brush, and use only new shellac, thinned to a 1-pound cut. Work on one area at a time.

To apply shellac, flow it liberally onto the surface, working in long, smooth strokes along the grain of the wood. Keep the surface really wet with the shellac, and apply the finish from dry to wet edges. After coating the surface completely, tip off the shellac along the grain of the wood. Use an almost dry brush for this step. Holding the brush at a slight angle to the surface, very lightly stroke the surface of the shellac to remove brush marks and even the surface. Smooth the entire shellacked surface, working in strips along the grain of the wood.

The French Polish Finish Technique

This shellac finishing technique produces a much more durable surface than the standard shellac finish. French-polished surfaces have a very distinctive, velvety sheen, and the grain and color of the wood are emphasized. It is best used on close-grained woods and fine veneers. Use only water stain or spirit-base non-grain-raising (NGR) stain under French polish; other types may bleed or lift.

To apply a French polish finish, mix 2 tablespoons of boiled linseed oil into 1 pint of 1-pound-cut shellac. Make a palm-size pad of cheesecloth, and wrap it in a clean, lint-free linen or cotton cloth. The pad should just fit in your palm. Dip the pad into the shellac/oil mixture; don't soak it. Make sure the surface of the pad is not wrinkled.


Apply the shellac/oil mixture to the prepared wood, spreading it evenly along the grain to cover the entire surface; work with a quick padding stroke, blending your strokes carefully. Then rub the wet surface with the pad, using a firm circular or figure-eight motion over the wood. Continue this circular rubbing for about 45 minutes, using plenty of downward pressure and adding shellac as the mixture is worked into the wood. The surface should be evenly glossy, with no dark spots or stroke marks.


Let the rubbed shellac/oil mixture dry for 24 hours; then apply another coat of shellac/oil as above. Rub the second coat in for 45 minutes, and let it dry for two to three days. Apply a third coat the same way.


Let the wood dry for at least a week, but not more than 10 days, after the final coat. Finally, clean the surface, wax the finished wood with a good-quality paste wax, and buff it to a fine sheen
.

Apply the shellac/oil mixture and rub it in with a circular or figure-eight motion.

The French Polish Finish is achieved by hand-rubbing. Apply the shellac/oil mixture
and rub it in with a circular or figure-eight motion. Continue rubbing
for 45 minutes, adding more finish as necessary

Drying and Recoating

Shellac dries in about 30 minutes and can be recoated after four hours. Let the new shellac set for a full four hours. Make sure drying time is adequate. Shellac is soft, and it can pick up sandpaper grains or steel wool shreds if it isn't completely dry. This can result in a nightmare of smoothing to remove the debris.


When the shellac is completely dry, lightly sand the surface with grade 7/0 open-coat sandpaper on a padded sanding block. Clean the sanded surface thoroughly with a tack cloth, and then apply a second coat of shellac, as above. Let the shellac dry for four hours; then repeat, sanding and cleaning the surface, to apply a third coat. Additional coats of shellac can be added, if you want a smoother surface; let each coat dry thoroughly before applying a new one, and buff the finish with fine steel wool between coats.


Let the final coat of shellac harden for 48 hours. With grade No. 0000 steel wool, remove the gloss from the finished surface, rubbing carefully along the grain of the wood. Do not rub across the grain. When the gloss is completely removed, let the piece of furniture stand for 48 hours. Then apply a good-quality paste wax to the finished wood, and buff the surface to a shine with a soft cloth or the buffing attachment of an electric drill.

Another option to consider is a lacquer finish, which dries quickly but can be difficult to apply depending on the job. Learn about when and how to lacquer furniture in the next section.

Advertisement

How to Lacquer Furniture

Lacquer is the fastest-drying of the finishes for wooden furniture. It is more durable than shellac -- although it is very thin -- and must be applied in many thin coats. It is available in high-gloss, satin, and matte finishes, in clear form and in several clear stain colors.

Dust-free drying is not a problem, but because lacquer dries so fast -- sometimes almost instantly -- it is very difficult to work with. Brushing lacquers are not recommended for amateur use; spraying lacquers must be applied with a motorized spray gun. Lacquer fumes can be both toxic and explosive. For these reasons, lacquer is not usually used in amateur refinishing. For small jobs, lacquer can be applied with aerosol spray cans. This is expensive, but it works well. It's important to know what type of lacquer to use for the job.

Special Requirements

Lacquer can be used on most woods, but it cannot be used on mahogany and rosewood; the oils in these woods will bleed through the finish. Lacquer can be used over lacquer-base, non-grain-raising (NGR), and water stains, and over lacquer-base fillers. It cannot be used over other finishes, or over oil-base stains or many fillers; the solvents in lacquer will dissolve other finishes and incompatible stains and fillers. Thinned lacquer or shellac or a compatible lacquer-base sanding sealer should be used as a sealer under a lacquer finish.

Application Techniques

Wood to be finished with lacquer must be properly prepared, sanded, and sealed. Immediately before applying lacquer, clean the piece of furniture thoroughly with a tack cloth. Use only aerosol spray lacquer, and protect your working area with dropcloths or newspaper. Make sure ventilation is adequate.

Diagram of spraying lacquer in strips on wooden furniture.

With the can about 18 inches from
the surface, spray lacquer in even
strips from side to side, top to bottom.
Overlap the strips slightly to equalize
the thickness of the lacquer film.

Before applying lacquer, test the spray can on a piece of newspaper or cardboard. Spray cans have different patterns of spray; practicing and watching the test spray pattern will give you enough control to properly cover the surface you're finishing.

Apply lacquer slowly and evenly, holding the spray can upright about 18 inches away from the surface of the wood.
If you work farther away than this, the lacquer will tend to "orange peel," dimpling like the skin on an orange. If you work closer than 18 inches, too much lacquer may be applied to the surface, causing runs and sags in the finish. First spray the top edge of the surface; then cover the entire surface in horizontal strips, from side to side, top to bottom. As you work, overlap the lacquer spray patterns slightly.

The edges of each sprayed area are thin; the centers are thick. Overlapping equalizes the thickness of the lacquer film, keeping the surface even. Never try to equalize the film by brushing the lacquer.

Apply only a thin coat of lacquer; this finish must be applied in many thin layers.

Drying and Recoating

Lacquer dries in no more than half an hour, but it must cure completely between coats. Let the newly sprayed wood dry for about 48 hours, or as directed by the manufacturer. Then lightly smooth the surface with No. 000 steel wool, and clean it thoroughly with a tack cloth. Apply a second coat of lacquer as above. For a smoother finish, let the second coat dry for 48 hours, smooth the surface with No. 000 steel wool, and apply a third coat of lacquer as above.

Runs and sags are usually caused by too much lacquer, but they don't always appear on the first couple of coats. The solvent in each coat of lacquer softens the dried lacquer under it to meld the coats together. As you apply more coats of lacquer, the bottom coats soften, and the lacquer film gets thicker; any unevenness can cause sags. For a very rich, deep finish, use many very thin coats of lacquer. Let the lacquer dry completely between coats, and rub the surface between coats with grade FFF powdered pumice and boiled linseed oil on a cheesecloth or felt pad.

After applying the final coat of lacquer, let the piece of furniture dry for 48 hours; then lightly buff the lacquered surface with No. 0000 steel wool. Clean the surface thoroughly with a tack cloth and apply a good-quality paste wax. Buff the waxed surface to a fine gloss.

If you want a finish that is not really permanent, check the next section for information on a paste wax finish, which is easy to apply and maintain.

Advertisement

How to Wax and Seal Furniture

Paste wax, often used to protect finishes, is sometimes used to finish bare wooden furniture. This is most successful on hard, close-grained woods, such as maple, that have been sanded absolutely smooth.

Some waxes have color added, for use on dark woods such as walnut. These waxes add color to the wood, and are especially helpful if the finish on the wood is blotchy, but they do not stain the wood or restore the finish. Paste wax is easy to apply, and is nonsticky and heat-resistant, but it is easily damaged and liable to wear. It must be reapplied periodically. Paste wax is more commonly used over a sealer stain to color, seal, and finish new or stripped wood.

Sealer stain finishes, including commercial systems, are available in several colors. Sealer stains produce a very even color, with no lap marks or dark spots. They are fairly tough and are very easy to apply. They are not very water-resistant and must often be recoated periodically. But before you begin the project, it's important to know the type of wood you are working with.

Special Requirements

Paste wax can be applied directly over prepared bare or stained wood; thinned shellac is recommended as a sealer coat. Sealer stains should be applied directly over prepared bare wood; no other sealer is required. Open-grained woods should be filled before a wax finish is applied; any paste filler is compatible. Wax and sealer stain finishes can be used on new or stripped wood.

How to Apply Paste Wax

Wood to be finished with paste wax must be thoroughly sanded and sealed with a coat of thinned shellac. When the sealer is completely dry, rub the wood along the grain with No. 0000 steel wool; then clean the piece of furniture thoroughly with a tack cloth.

Apply paste wax sparingly with a clean, lint-free cloth pad, rubbing the wax on with a circular motion to form a thin, even coating. Work on a small area at a time. Some manufacturers recommend that the wax be applied with a damp -- not wet -- pad. If you use water, make sure the surface is dry before you polish it.

Let the wax dry completely, as recommended by the manufacturer. Then wipe the waxed surface firmly with a clean cloth to remove excess wax. When the waxed surface is even, polish it to a shine with a clean cloth. To complete the finish, apply one or two more coats of wax, as above. Polish each coat completely before applying the next coat.
 
How to Apply a Sealer Stain Finish

Wood to be finished with a sealer stain finish must be properly prepared and sanded; no other preparation is necessary. Thoroughly mix the sealer stain. Apply the stain evenly along the grain with a clean brush or cloth, and let it stand for 10 to 15 minutes; then wipe off the excess with a clean cloth. Let the wood dry for 24 hours and apply a second coat of stain, as above. To complete the finish, apply one or two coats of paste wax, as above. Polish each coat thoroughly with a clean cloth.

For a natural finish look on your wooden furniture, learn how and when to use Danish oil and other modern finishing oils in the next section.

Advertisement

How to Apply Oil Finish on Furniture

An oil finish is designed to protect wood and bring out its natural beauty, which makes it a popular finish for revitalizing wooden furniture.

Oil is penetrating and durable; it is water- and alcohol-resistant, and gives wooden furniture an attractive natural sheen and texture. Hand-rubbed oil finishes can be beautiful, but only if they're properly applied. Danish and tung oil finishes are far superior to the traditional linseed oil; linseed oil is sticky and hard to apply. Any oil finish must be reapplied periodically, but Danish and tung oil require far less reapplication than linseed oil. It's important to choose the right oil finish for your furniture project.

Types of Oil Finishes

Modern oil finishes -- Danish oil, a synthetic, and natural tung-oil sealers -- are penetrating finishes, but they should be applied periodically. Tung-oil finishes are available in semigloss and high-gloss forms, and also in several stain colors. Danish oil usually has a satin finish.

A linseed oil finish is rich and glossy, but many applications are required for a good finish. The classic linseed oil finish is a mixture of equal parts of boiled linseed oil and turpentine. There are many variations on the linseed oil finish. One of the best of them is the Mary Roalman finish, which consists of equal parts of boiled linseed oil, turpentine, and natural varnish. Mix the linseed oil finishes several days before you use them. For most pieces, a pint of each ingredient is plenty.

Special Requirements

Oil finishes can be applied directly over prepared bare or stained wood. Only water or non-grain-raising (NGR) stains should be used; oil-base stains interfere with the penetration of the oil. Stain-color tung-oil sealers stain and finish in one operation. Very open-grained woods should be filled before an oil finish is applied; any paste filler is compatible. No sealing is required.

Application Techniques

Wood to be finished with oil must be thoroughly sanded to even out the open pores to create a smooth surface. No sealing is necessary. Before applying the finish, clean the piece of furniture thoroughly with a tack cloth.

Apply the oil -- Danish oil, tung-oil sealer, linseed oil, or the Mary Roalman mixture -- with a clean cheesecloth pad, using a circular or figure-eight motion to work it into the wood. Apply oil evenly and liberally, until the wood has stopped absorbing it; work on one surface at a time. Apply oil until the wood is evenly oiled and the surface has stopped absorbing.

Rub the oil firmly into the wood with the heels of your hands, working along the grain. Continue rubbing for about 15 minutes; as you rub, the warmth you generate will help the oil penetrate into the wood. Danish oil and tung oil may not require such extensive rubbing; follow the manufacturer's specific instructions. Finally, after thoroughly rubbing all surfaces, wipe the piece of furniture clean with a clean cloth. You must remove all excess oil; there should be no oil -- or, if you're using a linseed finish, only a very thin film of oil -- on the surface of the wood.

Diagram of oil being applied by hand to wooden furniture.

Apply oil liberally until the wood stops absorbing it; working along
the grain, rub it firmly into the wood with the heels
of your hands. Then wipe off all excess oil.

Drying and Recoating

Danish oil and tung oil dry more quickly than linseed oil. In most cases, they can be reapplied after 12 to 24 hours; follow the manufacturer's specific instructions. Linseed-oil finishes must dry for about a week; drying takes longer in very humid weather. Do not recoat a linseed-oil finish until it's completely dry, with no trace of stickiness.

When the first coat of oil is completely dry, apply further coats until the finish is rich and hard. Danish oil and tung-oil sealers may require only one additional application, but linseed-oil finishes should be given 10 to 20 additional coats. Rub each additional coat of oil thoroughly into the wood, as above, and then wipe off all excess oil. Let each coat of oil dry thoroughly before applying the next -- at least one week between the first several coats, longer between later coats. If the oil isn't completely dry between coats, the finished surface will be sticky.

Choosing a furniture finish can be difficult because you have many options to choose from. Varnish, penetrating resin, shellac, lacquer, paste wax, and oil were all created to help protect furniture wood. But the guidelines in this article will help you choose the one that works best with your type of wood and how you want the furniture to eventually look.


Advertisement

Advertisement

Loading...