How to Build a Pond

© 2013 Discovery Communications

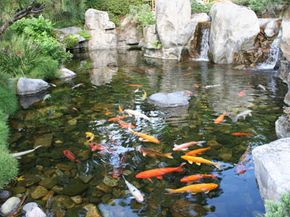
­Homeowners often expand their living spaces by building outdoor rooms and gardens. Garden and landscaping experts say that gardens should stimulate all the senses: sight, sm­ell, hearing, taste and touch. The principles of feng shui demand incorporation of the vital, energy-giving elements earth, fire, wood, metal and water. Most of these features occur naturally in the outdoors, and you may already have added those that don't to your yard in the form of a grill (fire and metal). But sound is one of the easiest senses to overlook when planning your garden, and unless you have a waterfront home or a stream running through your property, water probably isn't a natural feature in your outdoor living space. How can you fill these voids in your garden world? By bringing both sound and water to your home with a pond.

­Deciding where to build your pond is one of the most critical decisions you'll make. To ease this decision a little, determine where you can't put a pond. Ask your utility co­mpanies to mark the location of underground power, cable, natural gas and water lines. You'll also need to locate your sewer or septic drain lines, since you don't want to dig into them.

Advertisement

Of the areas left available, not all will be suitable for a pond. Low-lying areas flood in heavy rains, and the pond will suffer from contamination by lawn fertilizer or herbicides from the run-off of rain and routine watering. Avoid areas with heavy tree cover -- digging there is difficult and damaging to the trees. Also, when the leaves drop in the fall, they'll pollute your pond. Finally, the site must be big enough for the pond you want to build. Ideally, your pond will be on level ground with stable soil, close to electricity and water sources, in the correct mix of sun and shade, and located where you can always enjoy it.

Now that you've figured out where your pond will go, let's take a look at the different varieties of ponds you can build.

Kinds of Ponds

Koi pond
©­iStockphoto.com/BestShot

­There are different kinds of ponds just as there are different kinds of shrubs. One kind of bush blocks out unsightly views; another kind attracts butterflies. Ponds can be noisy, serene or vibrant with wildlife. They can support flashing koi or aromatic aquatic blooms. Think about what you'll enjoy the most -- fish, flowers, both?

Here are some general guidelines for koi ponds and water gardens:

Advertisement

Koi ponds need a large surface area and a depth of 3 to 4 feet (0.9 to 1.2 meters) in mild climates [source: Lowe's, Barber]. If you live in a very cold climate and want to overwinter your fish in the pond, you'll need to include a section of the pond that's deep enough to give the fish 12 to 16 inches (30.5 to 40.6 centimeters) of water below the ice layer [source: The Water Garden].

Koi ponds require a pump and filter system to remove fish wastes and keep the water clear and healthy. They generally don't have plants because the koi eat and otherwise destroy them, creating pond pollution. Koi ponds need shade to keep the fish cool and to prevent algae growth. Incorporating a current in the water by circulating it through a stream or waterfall forces the fish to exercise and stay healthy. In the absence of plants, this circulation is necessary to oxygenate (add oxygen to) the water.

Water gardens include aquatic plants and flowers, and may include a sprinkling of goldfish. The plants require several hours of sun each day to prosper and produce blooms. Water gardens can be small and only need 18 to 24 inches (45.7to 61 centimeters) of depth [source: Lowe's, Barber]. If you strike the perfect balance between fish and plants, you may not need a pump or filter system. Water plants don't like to be disturbed, so any current or inflow from a waterfall or fountain should be gentle.

­Style comes into play next. Is your home and landscaping formal or informal? Water f­eatures in a formal setting tend to be geometric: square, rectangular, oval, L-shaped or circular. In an informal or natural setting, ponds can have a more irregular shape. Check out water features at local botanical gardens, garden tours and pond specialty stores for inspiration.

Other things to consider are your budget and the time and effort you want to put into building and maintaining your pond. Small ponds require more maintenance. Large ponds require more skill to build. Keep in mind that if you decide to get your feet wet with a small pond at first, you can always expand later by adding ponds and connecting waterways.

On the next page, we'll look what tools and supplies you need to build your pond.

Pond Building Tools and Equipment

With common household and garden tools, first-time do-it-yourself pond builders can manage the excavation and construction of ponds ranging from 100 to 800 gallons (379 to 3,028 liters) [source: Barber, Better Homes and Gardens].

To prepare the pond site, you'll need:

Advertisement

  • Rope or garden hose
  • Chalk or spray paint
  • Square spade
  • Rounded shovel
  • Wheelbarrow
  • Measuring tape
  • Level
  • A straight board long enough to span the width and length of the pond
  • Rake
  • Fine sand

To construct the pond, you'll need:

  • Underlayment
  • Pond liner
  • Bricks or heavy rocks
  • Pump
  • Filter
  • Tubing, pipes and fittings
  • Skimmer (optional)
  • Aerator (optional)
  • Heater (optional)
  • Lighting (optional)
  • Water
  • Material to finish pond edge

Now it's time to get started building your pond. First, you have to know how deep it's going to be. That all depends on what type of liner you bought. The liner keeps your pond from seeping into the ground. There are two types of pond liner: pre-formed and flexible. You've probably seen the pre-formed type at home and garden stores. They come in a variety of shapes, sizes and depths, but they limit your creativity.

Flexible liners are giant sheets of plastic or rubber that can be manipulated to create an infinite variety of sizes, depths and shapes. The most recommended flexible pond liner material is EPDM (ethylene propylene diene monomer), a synthetic rubber that's stable and safe for plants and fish. EPDM can contract and expand to stretch over growing roots under your pond or cope with earth shifts. It's highly resistant to ultraviolet radiation (UV rays from the sun) and atmospheric gasses that cause plastics to break down, and it can be installed in temperatures as low as -40 degrees Fahrenheit (-40 degrees Celsius). If you go with a flexible liner, you'll need to know the area (total size) of your pond before you purchase the liner and underlayment, and the volume of water it will hold to make sure you choose a pump and filter system powerful enough to circulate and clean the water.

To figure out what size liner you need, measure across the longest part of the pond, then across the widest part and down to the deepest part. Plug your numbers into this formula:

  • Liner length = pond length + (2 x pond depth) + 2 feet
  • Liner width = pond width + (2 x pond depth) + 2 feet
  • Liner area (total size of liner) = liner length x liner width

[source: Better Homes and Gardens]

Now that you've decided what kind of pond you want and found the right spot for it, it's time to build. Start by outlining the shape. If you're using a pre-formed pond, put it upside-down on your pond site and trace around it with chalk or spray paint. If you're using flexible liner, use a rope or garden hose to shape your outline.

Keep reading to find out exactly how to dig and line your new pond.

Pond Building Instructions

If this pond wasn't level, it could cause quite a few headaches.
©­iStockphoto.com/Imageegaml

­With the square spade, undercut and remove sod from the interior of your outline, then switch to the rounded shovel and start digging.

For a pre-formed liner, you'll need to dig to fit its depth contours. For each type of liner, start digging where the pond will be deepest and work to the edges. Vary the depth of flexible liner ponds to enhance fish viewing and create ledges around the perimeter for plants, stones and safety. The perimeter ledge should be 3 to 6 inches (7.5 to 15 centimeters) below the pond edge and 6 to 12 inches (15 to 30 centimeters) wide, dropping straight down like a step to the next level [source: Better Homes and Gardens]. If you plan to build a raised waterfall or streambed, move the excavated dirt to that spot.

Advertisement

Apply a .5 to 1 inch (1.3 to 2.5 centimeter) layer of sand, or underlayment, on all levels of the pond and rake it smooth. This will help to prevent punctures and tears in the liner from rocks and roots that may rise up under the pond after installation. Next, cover every surface of the hole with underlayment, bending and pleating it to fit. The underlayment should extend over the pond edge and far enough around so that it stays in place when you put the liner over it. Then, you'll place your liner in the hole. The pond liner extends over the pond edge by about 2 feet (0.6 meters). You'll trim excess liner after laying your edging material. If you want your pond edging to be level with the pond, you'll need to dig a rim around the outside of your perimeter wide and deep enough to seat your edging material. Slightly lowering the ground bordering your pond will also allow rain and irrigation water to drain away from it.

Leveling your pond edge is critical. If one side is lower than another, the pond will look lopsided, water will escape from the low side and the liner will show on the high side. To see if the edges are level, place a long, straight board across the pond and center the level on it. Check for level around all sides of the pond and raise or lower the edges as necessary. The entire excavation must be level for pre-formed ponds. Otherwise, the form will sag, twist and crack.

In the next section, we'll discuss the electric component of your pond, and then we'll finally get it filled and ready to go.

Finishing a Pond

Backyard pond waterfall
©­iStockphoto.com/TerryHealy

­At this point, you're ready to install electric outlets and any underground plumbing you'll need for an external pump and waterfall features. Be sure you comply with local regulations on these points. Water and electricity are a deadly combination; be safe and call in a professional electrician. Some of the electric components you may need for your pond are a filter, pump, aerator and skimmer.

A filter removes waste materials from the water to keep the pond clean and clear. The pump circulates pond water through the filter to flowing water features, such as fountains or waterfalls. An aerator infuses water with oxygen, but if you have good circulation and surface area, you may not need one. A skimmer traps floating leaves and surface debris. It's usually installed just outside the pond perimeter.

Advertisement

Now comes the liner that started it all. Get someone to help you carry the liner to the pond and center it in the hole, making sure you have it right side up. Use hands and bare feet to form the liner to the contours of the pond, tucking and folding as necessary. Drape the excess liner over the edge and place a few smooth stones there and around the upper ledge to hold the liner in place while you fill the pond. Measure hose for the pump so that it draws water from the lowest level of the pond but doesn't touch the bottom. If you're using a submersible pump, you can put it into place.

Water volume will be indicated on pre-formed liners. Use the following formulas to determine volume of formal flexible liner ponds:

  • Square or rectangle: length x width x depth x 7.5 = gallons
  • Round: diameter x diameter x depth x 5.9 = gallons
  • Oval: depth x width x length x 6.7 = gallons

[source: Lowe's]

For ponds with irregular shapes and varying depths, use the formula for oval ponds to get a rough ­ estimate of volume. Attach a flow meter to your hose when you fill the pond to get a more accurate measurement. You'll need this figure if you need to medicate fish or treat the water with additives. It'll also come in handy if you want to install a heater to keep your fish warm and active during the winter.

Sweep dirt or debris from the liner, then start running water into the pond. The liner will shift and settle as the pond fills. Adjust the holding stones to prevent the liner from stretching under the weight of water. Rearrange folds as necessary. Allow the liner to settle for several days after the pond is full.

Finish the pond by placing your edging materials around it and trimming the excess liner. Use these scraps to pad stones, planters, pumps and fountains that you put inside the pond. Also, save a few to use as patches if something tears the liner.

Next, we'll show you how to fill your pond with life.

Pond Flora and Fauna

Flowers and fishies
©iStockphoto.com/cjmckendry

­Your pond is finished, but it's not complete until it supports life -- the swimming kind, the blooming kind or both.

Before you add fish to your pond, the water needs to mellow into something more natural than tap water. While it was settling into your liner, it was also ridding itself of chemical additives like chlorine that are harmful to fish and plants. Cycle the water through your filter system and check your pump operation for at least a week before introducing fish.

Advertisement

Meanwhile, you can landscape your pond. If you've built a koi pond, you'll add plantings aro­und the pond and possibly a few container plants on the plant ledge. If you're including goldfish in a water garden, get the plants in now to oxygenate the water and control algae growth. Pond plants that require soil will need to be potted in pond-safe containers with a layer of gravel on top to keep the soil from floating away in the water. Examples of these plants are: water lilies, a floating leaf plant; arrowhead, a plant that grows at the edges of ponds; and curly pondweed, a fully submerged plant. Floating plants, such as water hyacinths, have trailing roots that take nutrients directly from the water.

When you're ready to add fish, check the pH of your pond water­ with a commercially available kit. Koi and goldfish thrive in neutral to slightly alkaline water, pH 7 to 8 [source: Nash]. Introduce fish over a period of days or weeks up to or below the fish stocking level for your pond. To determine how many fish you can have, allow 5 gallons (19 liters) for each inch (2.5 centimeters) of goldfish. Koi need twice that volume [source: Nash]. Remember that fish grow, so figure your stocking level for adult size fish.

Your fish don't really need hiding places. Pond plants provide shade, food and shelter for goldfish. The depth and shady location of koi ponds provide protection from predators and sun exposure. If you decide to give them a bolthole, make sure that anything you put in the pond is smooth and rounded. This will protect both your fish and the pond liner.

Learn how to keep your pond in good condition on the next page.

Tips to Maintain a Healthy Pond

The simplest way to keep your pond clean and healthy is to avoid overfeeding your fish. Give them only what they'll eat immediately and don't feed them while they're hibernating in the winter. Otherwise, routine maintenance chores include:

  • Skimming leaves and debris from the surface and bottom with a net as needed
  • Cleaning the basket of an installed skimmer
  • Changing or cleaning filters as recommended
  • Adding water to compensate for evaporation
  • Changing 10 to 20 percent of the water weekly
  • Checking and adjusting the pH of the water
  • Noting changes in your plants and fish

[source: Barber]

Advertisement

Your fish will tell you if they aren't getting enough oxygen. They'll come to the surface and ­suck air or congregate under waterfalls where the oxygen level of the water is higher. Reduce the number of plant leaves covering the pond surface, adjust the flow rate of your pump or introduce an aerator to correct this problem.

Don't worry about mosquitoes and other insects that lay their eggs in ponds. Your fish will eat the larvae when they hatch.

When the temperature drops below 50 degrees Fahrenheit (10 degrees Celsius), fish hibernate. Stop feeding them and turn off the pump. If you live where the pond is likely to freeze, drain your pipes and disconnect and store the pump and underwater lights. Bring indoors any plants that can't survive the winter. Trim dead leaves and blooms from hardy water lilies and lotuses and place their pots in the deepest water until spring reawakens your pond.

Lots More Information

Related HowStuffWorks Articles

More Great Links

  • Barber, Terry Anne. Setup and Care of Garden Ponds. Neptune City, NJ: T.F.H. Publications, 2007.
  • Better Homes and Gardens. Water Gardens: Pools, Streams & Fountains. Des Moines, Iowa: Meredith Books, 2006.
  • Burtle, Gary J. "Managing Fish Ponds During a Drought." The University of Georgia Cooperative Extension. (Accessed 12/4/2008) http://pubs.caes.uga.edu/caespubs/pubcd/SB49/SB49.htm
  • Lowe's How-To Library. "Planning and Building a Water Garden." Lowes.com. (Accessed 11/24/2008) http://www.lowes.com/lowes/lkn?action=howTo&p=LawnGarden/waterGarden
  • Moramarco, Donna. "Building a Water Garden or Fish Pond." Learn2Grow. (Accessed 11/ 24/2008) http://www.learn2grow.com/projects/watergardening/inground/buildingwatergardenfishpond.aspx
  • Nash, Helen and Marilyn M. Cook. Water Gardening Basics. New York: Sterling Publishing Co., Inc., 1999.
  • The Water Garden. "Steps for Constructing a New Pond." Building Your Own Watergarden. 2003. (Accessed 11/24/2008) http://watergarden.com/pages/build_wg.html
  • Thomas, Charles M. and Richard M. Koogle. Ortho's All About Building Waterfalls, Pools, and Streams. Des Moines, Iowa: Meredith Books, 2002.