How to Repair Furniture Veneer
Because veneer is only a thin layer of wood attached with glue to a solid base, it is very vulnerable to damage on wood furniture. On old furniture, the glue that holds the veneer is often not water-resistant. Prolonged humidity or exposure to water can soften the glue, letting the veneer blister, crack, or peel.
Veneer is also easily damaged from the surface, and old veneers are often cracked, buckled, or broken, with chips or entire pieces missing. On this page, we'll discuss basic techniques to repair veneer on your wood furniture for any at-home furniture refinishing or restoration project.
Advertisement
In most cases, as long as the veneer layer is basically in good shape, the thinness that makes it damage-prone also makes it easy to repair. Undamaged veneer can be reglued; chips and bare spots can be filled with matching veneer. If you're careful to match the grain, the repairs will hardly show. Following are the most common problems:
Blisters
Small blisters in veneer can usually be flattened with heat.
To protect the surface, set a sheet of wax paper and then a sheet of smooth cardboard on the surface, and cover the cardboard with a clean cloth. Press the blistered area firmly with a medium-hot iron. If there are several blisters, move the iron slowly and evenly back and forth. Be careful not to touch the exposed surface with the iron.
Check the surface every few minutes or so as you work, and stop pressing as soon as the blisters have flattened. Leaving the cardboard in place, weight the repair area solidly for 24 hours. Then wax and polish the surface.
Large blisters must usually be slit, because the veneer has swelled. With a sharp craft knife or single-edge razor blade, carefully cut the blister open down the middle, along the grain of the wood. Be careful not to cut into the base wood. Then cover the surface and apply heat as above, checking every few seconds as the glue softens; if the glue has deteriorated and does not soften, carefully scrape it out and insert a little carpenters' glue under the slit edges of the bubble with the tip of the knife.
Be careful not to use too much glue. If necessary, wipe off any excess as the blister flattens. As soon as one edge of the slit bubble overlaps the other, carefully shave off the overlapping edge with a craft knife or razor blade. Heat the blister again; if the edges overlap further, shave the overlapping edge again. When the blister is completely flattened, weight the repair area solidly for 24 hours. Then wax and polish the entire surface.
Loose Veneer
Lifted veneer occurs most often at the corners of tabletops, on cabinet and dresser edges, legs, and drawer fronts. If the loose veneer is undamaged, it can be reglued.
First, remove the residue of old glue left on the back of the veneer and on the base wood. With a sharp craft knife or razor blade, carefully scrape out as much of the old glue as possible. Don't lift the veneer any further; if you bend it up, you'll damage it.
After scraping out as much old glue as you can, clean the bonding surfaces with benzene or naphtha to remove any residue; glue left under the loose area will interfere with the new adhesive. If any glue still remains, sand the bonding surfaces lightly with fine-grit sandpaper, then wipe them clean with a soft cloth moistened with mineral spirits. If more than one veneer layer is loose, clean each layer the same way.
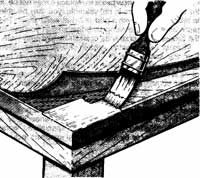
The veneer can be reattached with contact cement, but you may prefer to use carpenters' glue because it sets more slowly and allows repositioning. To reglue the veneer, apply contact cement to both bonding surfaces and let it set, as directed by the manufacturer. If necessary, set a small tack or two between the layers to keep them from touching. If you'd prefer to use carpenters' glue, use a small brush to spread it along the grain. Then, starting at the solidly attached veneer and working out toward the loose edge, smooth the loose veneer carefully into place.
Contact cement bonds immediately, so make sure the veneer is exactly matched; if you're using carpenters' glue, press from the center out to force out any excess, and wipe the excess off immediately. If more than one veneer layer is loose, work from the bottom up to reglue each layer.
Reglued veneer, whatever adhesive is used, should be clamped or weighted. To protect the surface, cover it with a sheet of wax paper; make sure all excess glue is removed. Set a buffer block of scrap wood over the newly glued area, and use another block or a soft cloth to protect the opposite edge or side of the surface. Clamp the glued and protected surface firmly with C-clamps or hand screws, for one to two days. Then remove the clamps and the buffers, and wax and polish the entire surface.
Cracked or Broken Veneer
If the veneer is lifted and cracked, but not broken completely through, it can be reglued. Large areas may be easier to repair if you break the veneer off along the cracks. Broken veneer can be reglued, but you must be very careful not to damage the edges of the break. Do not trim ragged edges; an irregular mend line will not be as visible as a perfectly straight line.
Before applying glue to the veneer, clean the bonding surfaces carefully, as above. Fit the broken edges carefully together to make sure they match perfectly. Then apply contact cement to both surfaces, or spread carpenters' glue on the base wood. Set the broken veneer carefully into place, matching the edges exactly, and press firmly to knit the broken edges together. Clamp the mended area. Refinishing may be necessary when the mend is complete; if so, use a non-wash-away paint and varnish remover, and treat the veneered surface very gently.
Chipped or Missing Veneer
Replacing veneer is easy, but finding a new piece to replace it may not be. If the piece of furniture is not valuable, you may be able to take the patch from a part of it that won't show. The patch area must be along an edge, so that you can lift the veneer with a craft knife or a stiff-bladed putty knife.
In most cases, patch veneer should not be taken from the same piece of furniture; you'll have to buy matching veneer to make the repair. If only a small piece is missing, you may be able to fill in the hole with veneer edging tape, sold at many home centers and lumberyards. Or, if you have access to junk furniture, you may be able to salvage a similar veneer from another piece of furniture. For larger patches, or if you can't find a scrap piece of matching veneer, buy a sheet of matching veneer from a specialized wood supplier. National veneer suppliers can be found by searching the Internet.
To fit a chip or very small patch, set a sheet of bond paper over the damaged veneer. Rub a very soft, dull lead pencil gently over the paper; the edges of the damaged area will be exactly marked on the paper. Use this pattern as a template to cut the veneer patch. Tape the pattern to the patching wood, matching the grain of the new veneer to the grain of the damaged area. Cut the path firmly and carefully with a sharp craft knife; it's better to make it too big than too small.
To make a larger patch, tape the patching veneer firmly over the damaged area with masking tape, with the grain and pattern of the patch matching the grain and pattern of the damaged veneer. Make sure the patch is flat against the surface, and securely held in place.
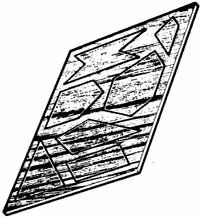
Cut the patch in an irregular shape, as illustrated, or in a boat or shield shape; these shapes will be less visible than a square or rectangular patch would be. Cut the patch carefully with a craft knife, scoring through the patching veneer and through the damaged veneer layer below it.
Untape the patching sheet and pop out the patch. With the tip of the craft knife, remove the cut-out patch of damaged veneer; if necessary, score it and remove it in pieces. Be very careful not to damage the edges of the patch. Be very careful not to damage the edges of the patch area. Remove only the top veneer layer; do not cut into the base wood. Remove any old glue and clean the base wood as above.
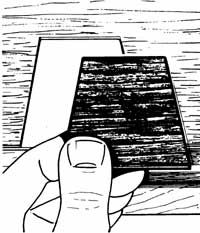
Test the fit of the patch in the hole. It should fit exactly, flush with the surrounding surface, with no gaps or overlaps. If the patch is too big or too thick, do not force it in. Carefully sand the edges or the back with fine-girt sandpaper to fit it to the hole.
Glue the fitted patch into place with contact cement or carpenters' glue, as above, and clamp or weight it solidly. Let the repair dry for one to two days; then very lightly sand the patch and the surrounding veneer. Refinish the damaged area or, if necessary, the entire surface or piece of furniture.
Now that your wood surfaces have been repaired, you're ready to start staining, right? Well, not quite. Before you can apply any sort of finish to wood, you have to prepare the surface by sanding it down. In the next section, you will learn all about sanding, including how to get into those tricky, tight spaces.