How to Refinish Furniture

Is Grandma's hand-me-down china hutch looking a little worse for wear? How about that coffee table the kids just can't seem to remember not to put their sippy-cups on? Instead of just tossing out those favorite furniture pieces that are showing their age, why not take on a refinishing project?

In this article, you'll find dozens of tips that will walk you through the process of refinishing wood furniture -- the right way. You'll find:

Advertisement

  • Staining Wood Furniture Basics Get a quick overview of what actually goes into staining wood furniture on this page. Learn why it's important to strip off the old finish thoroughly and what other preparation measures you may have to take to ensure the wood is ready to take a stain.
  • How to Remove Furniture Stains and Discoloration One of the most important steps in furniture refinishing is getting rid of stains and discoloration from the wood. If you take care of this before you apply a new stain, you'll be amazed at how great the refinished piece looks. Learn some tips for removing stains on this page.
  • How to Bleach Wood Furniture Sometimes discoloration in wood needs a little more elbow grease and a little bit stronger solution. That's where bleaching techniques come in. Be sure to read this section before attempting to bleach wood, however. Some woods don't take to bleaching well, so you don't want to ruin your piece by not being informed.
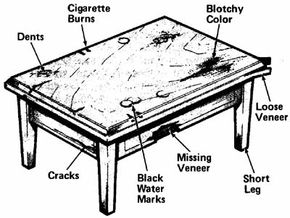
  • How to Repair Furniture Scratches, Dings, and Dents Most dings and dents in wood furniture can be easily repaired with the helpful techniques outlined in this section. If the scratch is significantly deep, however, you'll need to do a bit more work. Find out how to assess and repair all types of dings here.
  • How to Repair Furniture Cracks and Gouges Some damage to wood furniture is a bit more serious than a scratch or a dent. If you're faced with cracks and gouges, don't dispair. The helpful techniques on this page will set you in the right direction.
  • How to Repair Furniture Burns Don't get all fired up about a burn on your wood furniture. Just like other damage, a scorch mark can be repaired with some simple techniques. You'll learn how to repair all kinds of burns, including the most common -- cigarette burns -- on this page.
  • How to Repair Furniture Veneer Veneer is a thin layer of wood attached with glue to a solid base. And because it is so thin, it is prone to damage. Learn how to repair a veneer surface in this section, including fixing blisters, chips, cracks, and more.
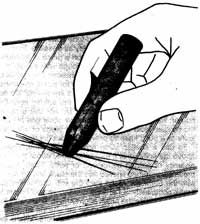
  • How to Sand Wood Furniture Another crucial step in refinishing furniture is sanding. The better you prep your surface for staining, the better the wood will take the stain. This page offers tips on sanding technique as well as suggestions on what type of sandpaper and steel wool to use on the job.
  • How to Choose a Furniture Stain Choosing a stain not only depends on the look you're trying to achieve but also on what type of wood you're working with. Learn more about choosing a stain in this section, including descriptions of the various stains available today.
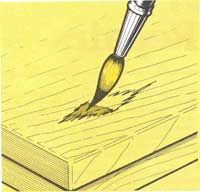
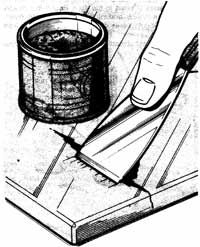
  • Staining Techniques for Wood Furniture Brush up on staining techniques for wood furniture on this page. You'll learn how to apply the various types of stain to get the best coverage, and what you need to do to after you've applied the stain. Also find out what types of wood work well with lightening stains.
  • How to Choose a Furniture Finish After all the hard work you've put into repairing, sanding, and staining your piece, you want to make sure it looks good for years to come. That's where furniture finishes come in. Take a look at this page for tips on how to choose a furniture finish.
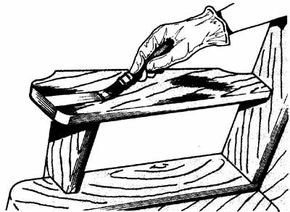
  • How to Varnish Furniture Varnish is probably the most popular wood furniture finish because it not only enhances the look of the wood but is very durable. On this page, you'll learn about the types of varnishes available and how best to apply them to your wood piece.
  • How to Apply a Penetrating Resin Furniture Finish Like varnish, penetrating resin is very durable to wear and tear. However, this type of finish actually soaks into the wood, so it is not ideal for all wood types. Learn more about penetrating resin and how to apply it in this section.
  • How to Shellac Furniture Shellac is very easy to apply, but unfortunately, this furniture finish is not very durable. That doesn't mean it isn't worth using, however. Since shellac creates such a beautiful finish, it is often used on find wood pieces that don't withstand a lot of wear and tear. Find out more about shellac on this page.
  • How to Lacquer Furniture In general, lacquer is very difficult to work with and must be applied in several very thin coats in order to get the desired finish. If you just must use lacquer on your wood piece, take a look at the tips on this page before you begin.
  • How to Wax and Seal Furniture While not the most long-lasting solution, wax and sealer stain finishes are relatively easy to apply and can add some necessary color to blotchy wood. Find out when it's best to use waxes and seals on your furniture in this section.
  • How to Apply Oil Finish on Furniture The purpose of oil finishes is to bring out the natural beauty of the wood. Because of this, oil is only useful with certain woods and with certain types of furniture. Learn about some of the most popular oils -- Danish and tung oil finishes -- on this page.
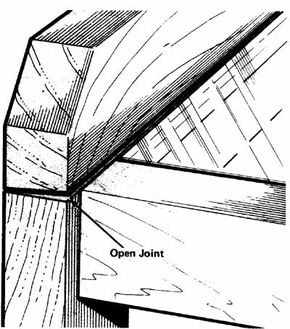
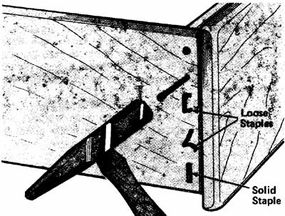
  • Assessing Unfinished Furniture There are several things you should look out for when purchasing unfinished furniture, including the type of wood used, if the joints are secure, and if the piece is well sanded and ready for finishing. Find these tips and more in this section.
  • Distressing Unfinished Furniture When working on a piece of unfinished furniture, you often want to give the piece a little bit of character so it doesn't look so brand new. Learn distressing techniques on this page, including how to make sure to don't distress too much and end up with a battered look.
  • How to Repair Furniture Hardware After all your efforts at refinishing, it would be a shame if your piece lost its luster because of shoddy furniture hardware. Learn how to repair furniture hardware on this page to make sure your piece not only looks good but functions well.

Staining Wood Furniture Basics

After stripping, examine the piece of furniture for surface and structural problems like burns, stains, cracks and loose veneer.
© Publications International, Ltd.

Staining wooden furniture isn't just a matter of stripping off one finish and applying another. Preparing the wood takes both time and elbow grease, but it's vital to the success of your refinishing job. The finish is only as good as the preparation for it. You may end up spending more time on this step than you did on of the other furniture refinishing stages, but your results will be worth the effort.

Staining wooden furniture can be a big job, filled with the apprehension that you might ruin the piece. Hopefully, this article can give you peace of mind. In the following sections, we will walk you through the entire staining process -- bleaching, sanding, staining, and sealing. Let's get started with some questions you'll have to ask yourself before you begin staining.

Advertisement

First, take a good look at the piece of furniture. How has the stripping process affected it? Are the joints loose? Do burns, stains, or other blemishes still show? Are veneers loose or bubbled? Before you prepare and stain the wood, repair the damage. Any problems you ignore now will show up all too clearly later; the finish will accentuate the damage.

Second, look at the wood itself. What kind of wood is it? Is the grain open or closed? The type of wood determines the preparation -- open-grained woods should usually be filled; some woods may need special treatment. Is the piece of furniture made with more than one kind of wood? If it is, you may have to bleach or stain the less conspicuous wood -- usually the less expensive one--so that it matches the main surfaces.

Finally, look at the color and texture of the stripped wood. Is there an old stain or filler left in the wood? It should usually be bleached out. Is the color blotchy or uneven? Is one part of the furniture darker than another? Is the wood darker or lighter than you want it to be? Can you see a distinct grain pattern?

With any piece of furniture, the stain you choose will determine how the wood should be prepared. Not all finishes can be used with all sealers and fillers. Not all stains require the same amount of preparation. Before you prepare a piece of furniture for staining, make sure you're familiar with the special characteristics and requirements of the stain you plan to use. Read the ingredient and application information on the container, and follow the manufacturer's instructions and recommendations. Make sure you use compatible sealers and fillers as specified by the manufacturer and as outlined in the accompanying chart.

Think you're ready to begin? Well, before you can start staining or even sanding, you might have to do something about discolorations in the wood's surface. In the next section, you will learn the various techniques for bleaching wood.

How to Remove Furniture Stains and Discoloration

Spot-staining is tricky, but it is sometimes successful. Apply stain to the repair area with an artists' brush.
© Publications International, Ltd.

From scratches to discoloration, the surfaces of your wood furniture are vulnerable to all kinds of damage. Luckily, many of the problems can be fixed. Learn how to repair everything from gouges to burns. You'll even find tips for repairing furniture veneer and hardware. We'll start by discussing surface stains and discoloration.

Removing Stains and Discoloration

Most finishes protect the surface of wood furniture by forming a protective coating. To repair a damaged finish coating, work only to the depth that it's affected. On any surface, work carefully, and don't remove more of the finish than you have to. Here are some common problems:

Advertisement

White spots:

Shellac and lacquer finishes are not resistant to water and alcohol. Spills and condensation from glasses can leave permanent white spots or rings on these finishes. To remove these white spots, first try polishing the surface with liquid furniture polish; buff the surface firmly. If this doesn't work, lightly wipe the stained surface with denatured alcohol. Use as little alcohol as possible; too much will damage the finish.

If neither polishing nor alcohol treatment removes the white spots, the damaged finish must be treated with abrasives. Gentle abrasives can be purchased from a home-supply store. To make your own gentle abrasive, mix cigarette ashes to a paste with a few drops of vegetable oil, light mineral oil, or linseed oil. Rub the ash-oil paste over the stained area, along the grain of the wood, and then wipe the surface clean with a soft cloth. If necessary, repeat the procedure. Stubborn spots may require several applications. Then wax and polish the entire surface.

If rubbing with ashes is not effective, go over the stained area with a mixture of rottenstone and linseed oil. Mix the rottenstone and oil to a thin paste, and rub the paste gently over the stain, along the grain of the wood. Rottenstone is a fast-cutting abrasive, so rub very carefully. Check the surface frequently to make sure you aren't cutting too deep. As soon as the white spots disappear, stop rubbing and wipe the wood clean with a soft cloth. Then apply two coats of hard furniture wax and buff the wood to a shine.

Blushing:

Blushing, a white haze over a large surface or an entire piece of furniture, is a common problem with old shellac and lacquer finishes. The discoloration is caused by moisture, and it can sometimes be removed the same way white spots are removed.

Buff the surface lightly and evenly with No. 0000 steel wool dipped in linseed oil. Work with the grain of the wood, rubbing evenly on the entire surface, until the white haze disappears. Then wipe the wood clean with a soft cloth, apply two coats of hard furniture wax, and buff the surface to a shine.

Blushing can sometimes be removed by reamalgamation. If the surface is crazed or alligatored, reamalgamation should be used instead of steel-wool rubbing. If neither rubbing nor reamalgamation removes the haze, the piece of furniture must be refinished.

Black spots:

Black spots are caused by water that has penetrated the finish completely and entered the wood. They cannot be removed without damage to the finish. If the spots are on a clearly defined surface, you may be able to remove the finish from this surface only; otherwise, the entire piece of furniture will have to be stripped. When the finish has been removed, bleach the entire stained surface with a solution of oxalic acid. Then refinish as necessary.

Ink stains:

Ink stains that have penetrated the finish, like black water spots, cannot be removed without refinishing. Less serious ink stains can sometimes be removed. Lightly buff the stained area with a cloth moistened with mineral spirits; then rinse the wood with clean water on a soft cloth. Dry the surface thoroughly, and then wax and polish it.

If this does not remove the ink, lightly rub the stained area, along the grain of the wood, with No. 0000 steel wool moistened with mineral spirits. Then wipe the surface clean and wax and polish it. This treatment may damage the finish. If necessary, refinish the damaged spot as discussed below. If the area is badly damaged, the entire surface or piece of furniture will have to be refinished.

Grease, tar, paint, crayon, and lipstick spots: These spots usually affect only the surface of the finish. To remove wet paint, use the appropriate solvent on a soft cloth -- mineral spirits for oil-base paint, water for latex paint. To remove dry paint or other materials, very carefully lift the surface residue with the edge of a putty knife. Do not scrape the wood, or you'll scratch the finish. When the surface material has been removed, buff the area very lightly along the grain of the wood with No. 0000 steel wool moistened with mineral spirits. Then wax and polish the entire surface.

Wax and gum spots:

Wax and gum usually come off easily, but they must be removed carefully to prevent damage to the finish. To make the wax or gum brittle, press it with a packet of ice wrapped in a towel or paper towel. Let the deposit harden; then lift it off with your thumbnail. The hardened wax or gum should pop off the surface with very little pressure. If necessary, repeat the ice application. Do not scrape the deposit off, or you'll scratch the finish.

When the wax or gum is completely removed, buff the area very lightly along the grain of the wood with No. 0000 steel wool moistened with mineral spirits. Then wax and polish the entire surface.

Spot Refinishing

Any repair that involves removing the damaged finish completely -- deep scratches, gouges, burns, or any other damage -- also involves refinishing the repair area. Spot refinishing is not always easy, and it's not always successful, especially on stained surfaces. If the damage isn't too bad, it's worth trying. If you'll have to touch up several areas on one surface, you're probably better off refinishing the surface or the piece of furniture completely.

To stain one area on a surface, use an oil-based stain that matches the surrounding stain. You may have to mix stains to get a good match. Test the stain on an inconspicuous unfinished part of the wood before working on the finished surface.

Before applying the stain, prepare the damaged area for finishing. Sealing is not necessary. Apply the stain to the damaged area with an artists' brush or a clean cloth, covering the entire bare area. Let the stain set for 15 minutes and then wipe it off with a clean cloth. If the color is too light, apply another coat of stain, wait 15 minutes, and wipe again. Repeat this procedure until you're satisfied with the color; then let the stain dry according to the manufacturer's instructions.

Lightly buff the stained surface with No. 0000 steel wool, and wipe it clean with a tack cloth. Apply a new coat of the same finish already on the surface -- varnish, penetrating resin, shellac, or lacquer -- over the newly stained area, feathering out the new finish into the surrounding old finish. Let the new finish dry for one to two days, and lightly buff the patched area with No. 0000 steel wool. Wax the entire surface with hard paste wax, and polish it to a shine.

Some woods need a stronger technique to get rid of discoloration. In the next section, you'll learn the various techniques for bleaching wood.

How to Bleach Wood Furniture

© 2006 Publications International To even blotchy areas and to lighten the wood slightly overall, apply laundry bleach full-strength along the grain of the wood over the entire surface.

In most cases, bleaching is essentially a first-aid measure, not a routine part of refinishing. A piece of furniture should be bleached if the surface is marked by stains, black rings, or water spots; if the wood is discolored or blotchy; if the color is uneven; or if an old stain or filler is left after the finish is removed. Old filler is often a problem with oak, walnut, and mahogany.

Bleaching can also be used to even the color of a piece of furniture made with two or more woods. It can lighten the darker wood to match the lighter one.

Advertisement

Before you use bleach on any piece of furniture, make sure the wood is suitable for bleaching. Some woods don't accept bleach well -- cherry and satinwood, for instance, should never be bleached. Some woods, such as bass, cedar, chestnut, elm, redwood, and rosewood, are very difficult to bleach, and some -- notably pine and poplar -- are so light that bleaching makes them look lifeless.

Birch, maple, and walnut can be bleached, but bleaching destroys their distinctive color. And the rare woods -- mahogany, teak, and the other choice woods -- seldom benefit from bleaching. Common woods that are easy to bleach, and may benefit from it, include ash, beech, gum, and oak.

Choosing a Bleach

Not all bleaching jobs call for the same type of bleach. Depending on the problem you want to correct, you may need a very strong bleaching agent or a relatively mild one. Below are some common bleach options you might want to consider.

  • Laundry Bleach: This mild bleach can solve most refinishing color problems, from stain or filler not removed in stripping to ink stains and water spots. It works well for blotchy areas and for slight overall lightening, but it won't change the color of the wood drastically. Before you use a stronger bleach on any piece of furniture, try laundry bleach; it usually does the trick.
  • Oxalic Acid: Oxalic acid, sold in powder or crystal form, is used to remove black water marks from wood. It is also effective in restoring chemically darkened wood to its natural color. You're not likely to encounter this problem unless you have a piece of furniture commercially stripped because lye and ammonia, the chemicals that discolor wood, are not recommended for nonprofessional use. Oxalic acid must be used on the entire surface of the wood, because in most cases it also bleaches out old stain. You may have to bleach the entire piece of furniture to get an even color. Oxalic acid is more effective in lightening open-grained wood than close-grained.
  • Two-Part Bleaches: The two-part commercial wood bleaches are used to lighten or remove the natural color of wood. If you want a dark old piece to fit in with a roomful of blond furniture, this is the bleach to use. Two-part bleach is very strong and must be used carefully; wear rubber gloves and safety goggles. This type of bleach is also expensive. Several brands are available.

Bleaching Techniques

Whatever bleach you use, remember that the results are permanent -- you may be able to restain if you make the wood too light, but uneven bleaching is very hard to remedy. Make sure the wood is absolutely clean, and touch it as little as possible. The bleach must penetrate the wood evenly. Before applying the bleach, test it on a scrap piece of the same wood or on a hidden part of the piece of furniture. Make sure you know exactly what the bleach will do and how fast. In general, bleaches act quickly on soft woods and slowly on hard woods. Bleaching isn't difficult, but it does require some precautions -- bleaches are fairly strong chemicals. The stronger ones can damage skin, eyes, and lungs. Wear rubber gloves and safety goggles when working with bleach, and make sure your working area is well ventilated. Follow the bleach manufacturer's instructions exactly. If you get bleach on your skin, wash it off immediately. Bleaching also requires careful application and removal. With any bleach, use a synthetic-bristle brush -- the chemicals will damage natural bristles. Apply the bleach along the grain of the wood, wetting the surface evenly and thoroughly; there should be no dry spots and no puddles. Let the bleach work as detailed below. After bleaching, wipe the wood clean with a damp cloth. To remove any residue, neutralize the wood thoroughly; use an ammonia solution for oxalic acid, a borax solution for laundry bleach or two-part bleaches. Wash the bleached wood thoroughly with the appropriate neutralizer; be careful not to overwet it. Then, working quickly to prevent water damage, rinse the wood with clean water and dry it thoroughly with a soft cloth. Let the piece of furniture dry for at least two days before doing any further work on it.

Laundry Bleach

Apply laundry bleach full-strength, brushing it evenly over the entire surface. If you're removing spots or lightening discolored areas, apply bleach full-strength to those areas. Laundry bleach works quickly. After a minute or two, you should be able to see the stain fading. If you're bleaching out an old stain, wipe the bleach off with a damp cloth when the stain has lightened.

If you're spot-bleaching to remove spots or blend color areas, wait until the bleached spots are roughly the same color as the rest of the wood; then apply bleach again over the entire surface. Remove the bleach with a damp cloth when the color is even. Finally, neutralize the treated wood with a solution of 1 cup of borax dissolved in 1 quart of hot water. Neutralize, rinse with clean water, and dry it thoroughly.

Oxalic Acid

Oxalic acid is not caustic, but it is poisonous. Wear rubber gloves and safety goggles, and make sure ventilation is adequate. To prepare the acid, mix a saturated solution with warm water: 1 ounce of powder or crystals per 1 cup of warm water. Make sure you prepare enough bleach to treat the entire surface or piece of furniture.

Apply the acid solution evenly to the wood, brushing it on along the grain to cover the entire surface. On soft wood, you'll see results very quickly; on hard woods the bleaching takes longer. Let the acid work for about 20 minutes, then wipe it off with a damp cloth. If the surface isn't fully or evenly bleached, reapply the acid as necessary. On hard woods, complete bleaching may take up to an hour. Wipe the wood clean with a damp cloth, and wash it with clean water. Then neutralize it with a solution of 1 cup of household ammonia and 2 quarts of water. Rinse it again with clean water, and dry it thoroughly.

Two-Part Bleaches

Two-part bleach is easy to use, and usually works very quickly. The two components of the bleach -- labeled "1" and "2" or "A" and "B" -- are usually applied separately. Read the manufacturer's instructions and follow them exactly. The first solution is usually allowed to work for about 20 minutes before the second solution is applied.

Following the directions carefully, apply the first solution and let it work; then apply the second solution. One treatment usually bleaches the wood completely, but if the wood isn't light enough, treat it again. Wipe the bleached wood clean with a damp cloth, and then neutralize it with a solution of 1 cup of borax dissolved in 1 quart of hot water. Rinse the wood with clean water, and dry it thoroughly.

Post-Bleach Treatment

Treatment with any bleach raises the grain of the wood, even when the piece of furniture has already been thoroughly sanded. To prevent the raised grain from affecting the finish, it must be resanded to the level of the wood surface after the wood is dry.

After bleaching, let the piece of furniture dry for at least two days. Then sand the grain down lightly with grade 5/0 or 6/0 sandpaper; be careful not to roughen the surface. Because there may still be some chemical residue in the wood, wear a breathing mask and use a vacuum to remove sanding dust. Wipe the wood clean with a tack cloth.

One other complication of bleaching, especially with laundry bleach, is that the wood may be left with a whitish or grayish color. This is not serious; it indicates that the bleach has dried out the fibers of the wood surface. On hard woods, it disappears when the finish is applied. On soft woods, the gray color may be pronounced and the loose fibers obvious. To remove them, rub the wood firmly along the grain with No. 000 steel wool; rub the entire bleached area, and make sure the color is even. The grayish cast will disappear completely when the finish is applied.

Read the next page to find what to do if your furniture has scratches, dings, or dents.

How to Repair Furniture Scratches, Dings, and Dents

Wax furniture-patching sticks can be used to hide fairly deep scratches; press the stick firmly to fill the scratch.
© Publications International, Ltd.

Old or new, wooden furniture often shows signs of extensive use: scratches, dings, and dents. Most of these surface damages are easy to repair, unless the problem is severe and extensive.

Scratches

To hide small scratches quickly, break the meat of a walnut, pecan, or Brazil nut and rub it along the scratch. The oil in the nut meat will darken the raw scratch.

Advertisement

Where many shallow scratches are present, apply hard paste wax to the surface with No. 0000 steel wool, stroking very lightly along the grain of the wood. Then buff the surface with a soft cloth. For shallow scratches on an otherwise sound shellac or lacquer finish, reamalgamation can be used to restore the finish.

For one or two deeper scratches, furniture-patching wax sticks are usually effective. These retouching sticks, made in several wood colors, are available at hardware and sometimes grocery stores. Choose a stick to match the finish. To use the wax stick, run it firmly along the scratch, applying enough pressure to fill the scratch with wax. Remove any excess wax with the edge of a credit card or other thin plastic card. Let the wax dry; then buff with a soft cloth.

Badly scratched surfaces should usually be re-finished, but to hide one or two very deep scratches, you may be able to stain the raw area to match. Apply oil-based stain with an artists' brush, drawing it carefully along the scratch; let it stand for 15 minutes and wipe it off. If necessary, repeat this procedure until the scratch matches the rest of the wood.

Let the area dry completely, as directed by the stain manufacturer. Then apply hard paste wax and buff the waxed surface to a shine.

Dings

Dings are tiny chips in the finish, usually caused by a sharp blow. The wood may not be affected. To repair a ding, use a sharp craft knife to remove any loose finish in or around the ding. Work carefully, scraping the damaged spot with the flat, sharp edge of the knife blade; do not scratch the spot. Then very carefully feather the edges of the ding with No. 0000 steel wool.

Clean the ding area with a soft cloth moistened in mineral spirits, and let it dry completely. Then, with an artists' brush, carefully apply new finish to the spot -- varnish, shellac, lacquer, or enamel -- to match the rest of the finish. The spot will be very noticeable at first. Let the finish dry; it will be glossy. Then lightly buff the spot with No. 0000 steel wool, and wax and polish the entire piece of furniture. The ding should blend perfectly when the job is complete.

Dents

Small, shallow dents in pine and other soft woods are usually easy to remove; large and deep dents, especially in hard wood, are harder to repair. Dents are easiest to remove from bare wood. Very large, shallow dents are probably best left untreated. Very deep dents should be filled, as detailed below for cracks and gouges.

Use a fine pin or needle to drive a series of small holes in a stubborn dent; then swell the wood to raise the dent.
© Publications International, Ltd.

On finished surfaces, you'll have to remove the finish around the damaged area. Using fine-grit sandpaper, carefully remove the finish for about 1/2 inch around the spot. To raise the wood in the dent, apply a few drops of water to the dent and let the water penetrate the wood for a day or so. Do not wet the entire surface. This treatment may be enough to raise the dent, especially if the dent is shallow and the wood is soft.

If this doesn't raise the dent, soak a cloth in water and wring it out. Place the damp cloth, folded in several layers, over the dent; then press the cloth firmly with a warm iron.

Be careful not to touch the iron directly to the wood. This moist heat may be enough to swell the wood and raise the dent. If it isn't, apply a commercial wood-swelling liquid to the area and give it time to work -- about a day or so, as directed by the manufacturer.

For deep dents that can't be raised with water, heat, or wood sweller, use a fine straight pin or needle to drive a series of holes in the dent. Pound the straight pin in about 1/4 inch, and carefully pull it out with pliers; the holes should be as small as possible. Then treat the dent you would for a shallow dent. The pinholes let the water penetrate the wood's surface. If you're careful, the holes won't show when the wood has been raised.

After the dent has been raised, let the wood dry for about a week, and then refinish the damaged area as above. Let the finish dry completely. Lightly buff the new finish with No. 0000 steel wool, and then wax and polish the entire surface.

Deeper cracks and gouges in the surface may require additional work. Learn the basic steps to repair cracks and gouges on wooden furniture in the next section.

How to Repair Furniture Cracks and Gouges

Fill deep cracks and gouges with wood filler or water putty; leave the filler slightly high to allow for shrinkage as it dries. When the patch is dry, sand it smooth.
© Publications International, Ltd.

Cracks and gouges are a common problem on wood furniture, especially if the piece is old or is excessively used. Some basic restoration techniques can remove these problems as long as the damage hasn't gone beyond the surface.

Cracks and gouges should be filled so that they're level with the surface of the wood. For very small holes, like staple holes, wood-tone putty sticks can be used. If you can't match the wood, several colors can be mixed together. To use a putty stick, wipe it across the hole and smooth the surface with your finger. If you plan to finish or refinish the wood, let the putty dry for at least a week before proceeding further.

Advertisement

For larger holes, wood filler and water putty are the easiest fillers. These fillers can be used on bare or finished wood. Wood filler is available in several colors, and water putty can be tinted with oil or water stain.

However, wood filler and water putty patches are usually noticeable, and may look darker than the wood. For the best results, test the patch on an inconspicuous surface to make sure the color is right.

Wood Filler

To use wood filler, carefully clean the crack or gouge with the tip of a craft knife, then press the plastic firmly in with the tip of a craft knife or the edge of a putty knife. Wood filler shrinks slightly as it dries, so press it in tightly and leave it mounded slightly above the surface of the wood.

Wood filler dries fairly quickly, but let it set for at least two days. Then smooth the patch lightly with fine-grit sandpaper and buff the area with No. 0000 steel wool. If surrounding finish is involved, feather the edges so that the new patch blends in with it. Then, if necessary, stain the patch and buff it lightly with No. 0000 steel wool. Apply finish to match the rest of the surface, using an artists' brush and feathering the edges. Let the finish dry and then lightly buff it with No. 0000 steel wool; clean the area of any residue, and wax and polish the surface.

Water Putty

Water putty dries flint-hard, usually harder than the wood being patched. It's best used on bare wood. Water putty can be toned with oil and water stains, but you'll have to experiment to come up with a perfect match. To use water putty, mix the powder with water to the consistency of putty; then trowel it into the break with a putty knife, leaving the patch slightly high. Let the patch dry completely, and sand and steel-wool the area smooth and level with the surrounding surface. Finish the surface as above, or finish the entire piece of furniture.

Shellac Sticks

For the most professional patching job, use shellac sticks to fill cracks and gouges. Shellac sticks leave the least conspicuous patch and are very effective on finished wood that's in good condition. Shellac sticks are available in several wood-tone colors; use a stick that matches the finish as closely as possible. Practice on scrap wood before working on a piece of furniture.

Heat the shellac stick over an alcohol lamp or a propane torch, holding a palette or putty knife between the stick and the flame to keep it from dripping.
© Publications International, Ltd.

Carefully clean the crack or gouge with the tip of a craft knife. Shellac sticks must be heated and melted to fill the crack. The best heat source for this is an alcohol lamp or a propane torch turned to a low setting. Do not use a match to soften the stick; the smoke from the match may discolor the shellac. Do not use a range burner; liquid shellac could damage either gas or electric ranges. Hold the stick over the blade of a palette knife or a putty knife to prevent it from dripping.

To use a shellac stick, hold it to the heat source above the knife, until it has softened to about the consistency of glazing compound or putty. Then quickly press the softened shellac into the crack and smooth it with the hot knife. Make sure the soft shellac fills the break completely; it hardens quickly, so you'll have to work fast. Leave the patch slightly high. Then, with the heated putty knife blade, trowel the shellac smooth.

Let the patch set for one to two hours. When the shellac is hard, plane or sand the surface smooth and level. The finish surrounding the break usually doesn't have to be retouched, but the surface can be coated with shellac, if desired. Apply the shellac finish. To make the shellac match a satin-gloss finish, rub the surface smooth with No. 0000 steel wool and linseed oil.

To fill very deep holes, use wood plastic or water putty to fill the hole almost level. Let the filler dry completely, and then fill the indentation with a shellac stick.

Wood Patch

If a hole or split is very large, don't overlook the possibility of filling it with a piece of wood cut and trimmed to fit perfectly. If the patching wood can be taken from the piece of furniture in a spot that won't show, the repair may be almost impossible to detect.

Fit the wood patch into the hole or split; use carpenters' glue to bond it to the surrounding wood. Leave the patch slightly high. When the glue is completely dry, sand the plug smoothly level with the surface of the surrounding wood. Then refinish the piece of furniture.

Even if the wooden surface is burned, it can still be repaired. Tips for removing mild scorches and for fixing more serious burns are outlined in the next section.

How to Repair Furniture Burns

To remove a burn spot, scrape away the charred wood with a craft knife; feather the edges of the depression.
© Publications International, Ltd.

Burns on wood furniture can range from scorches to deep char, but the usual problem is cigarette burns. These damages can be removed as long as the problem doesn't go beyond the surface and extensively affect the wood.

Scorches from cigarettes or cigars are usually the easiest to remove. Buff the scorched area with a fine steel wool pad moistened with mineral spirits until the scorch disappears. Then wipe it clean and wax and polish the surface.

Advertisement

More serious burns require the removal of the charred wood. Shallow burns, when repaired, will always leave a slight indentation in the wood, but this depression will not be conspicuous. Deep burn holes can be filled.

First, remove the damaged wood. With the flat sharp edge of a craft knife, very carefully scrape away the charred wood. For deep burns, use a curved blade. Do not scratch the burn area. Scrape away the char right to the bare wood, feathering out the edges. Any burned or scorched spots will show, so all the burn crust must be removed. Work carefully to avoid scratching the wood with the point of the knife.

When the charred wood has been completely removed, lightly sand the edges of the groove or trench to level it with the surrounding surface as much as possible. Press lightly into the groove with fine-grit sandpaper, removing only the char from the burned area. Be careful not to damage the surrounding finish. If you're not sure all the burn has been removed, wet the sanded area. If water makes the burned area look burned again, you haven't removed all the char.

With deep burns, the groove left after the char is removed will probably be quite noticeable. Level the groove as much as possible with fine-grit sandpaper, but stay close to the edges of the groove. If you sand too far out from the burn area, the damaged area will be very visible as a wide saucer-shaped indentation. If the depression isn't too deep, try swelling the wood as detailed above for dents. If you're left with a deep gouge, the burn area can be filled with wood plastic or a shellac stick.

After smoothing out the burn, refinish the damaged area. Let the new finish dry for one or two days, and then lightly buff the patch with No. 0000 steel wool to blend the edges into the old finish. Finally, wax and polish the entire piece of furniture.

Veneer, a thin layer of wood attached with glue to a solid base, is particularly vulnerable to damage. In the next section, we'll show you how to make various repairs to this surface.

How to Repair Furniture Veneer

To repair a large blister in veneer, slit it and insert a little glue under the edges; then flatten it with heat.
© Publications International, Ltd.

Because veneer is only a thin layer of wood attached with glue to a solid base, it is very vulnerable to damage on wood furniture. On old furniture, the glue that holds the veneer is often not water-resistant. Prolonged humidity or exposure to water can soften the glue, letting the veneer blister, crack, or peel.

Veneer is also easily damaged from the surface, and old veneers are often cracked, buckled, or broken, with chips or entire pieces missing. On this page, we'll discuss basic techniques to repair veneer on your wood furniture for any at-home furniture refinishing or restoration project.

Advertisement

In most cases, as long as the veneer layer is basically in good shape, the thinness that makes it damage-prone also makes it easy to repair. Undamaged veneer can be reglued; chips and bare spots can be filled with matching veneer. If you're careful to match the grain, the repairs will hardly show. Following are the most common problems:

Blisters

Small blisters in veneer can usually be flattened with heat.

To protect the surface, set a sheet of wax paper and then a sheet of smooth cardboard on the surface, and cover the cardboard with a clean cloth. Press the blistered area firmly with a medium-hot iron. If there are several blisters, move the iron slowly and evenly back and forth. Be careful not to touch the exposed surface with the iron.

Check the surface every few minutes or so as you work, and stop pressing as soon as the blisters have flattened. Leaving the cardboard in place, weight the repair area solidly for 24 hours. Then wax and polish the surface.

Large blisters must usually be slit, because the veneer has swelled. With a sharp craft knife or single-edge razor blade, carefully cut the blister open down the middle, along the grain of the wood. Be careful not to cut into the base wood. Then cover the surface and apply heat as above, checking every few seconds as the glue softens; if the glue has deteriorated and does not soften, carefully scrape it out and insert a little carpenters' glue under the slit edges of the bubble with the tip of the knife.

Be careful not to use too much glue. If necessary, wipe off any excess as the blister flattens. As soon as one edge of the slit bubble overlaps the other, carefully shave off the overlapping edge with a craft knife or razor blade. Heat the blister again; if the edges overlap further, shave the overlapping edge again. When the blister is completely flattened, weight the repair area solidly for 24 hours. Then wax and polish the entire surface.

Loose Veneer

Lifted veneer occurs most often at the corners of tabletops, on cabinet and dresser edges, legs, and drawer fronts. If the loose veneer is undamaged, it can be reglued.

Loose veneer can be reglued. Apply [b]glue to the base wood, press the veneer into place, and clamp it firmly.
© Publications International, Ltd.

First, remove the residue of old glue left on the back of the veneer and on the base wood. With a sharp craft knife or razor blade, carefully scrape out as much of the old glue as possible. Don't lift the veneer any further; if you bend it up, you'll damage it.

After scraping out as much old glue as you can, clean the bonding surfaces with benzene or naphtha to remove any residue; glue left under the loose area will interfere with the new adhesive. If any glue still remains, sand the bonding surfaces lightly with fine-grit sandpaper, then wipe them clean with a soft cloth moistened with mineral spirits. If more than one veneer layer is loose, clean each layer the same way.

The veneer can be reattached with contact cement, but you may prefer to use carpenters' glue because it sets more slowly and allows repositioning. To reglue the veneer, apply contact cement to both bonding surfaces and let it set, as directed by the manufacturer. If necessary, set a small tack or two between the layers to keep them from touching. If you'd prefer to use carpenters' glue, use a small brush to spread it along the grain. Then, starting at the solidly attached veneer and working out toward the loose edge, smooth the loose veneer carefully into place.

Contact cement bonds immediately, so make sure the veneer is exactly matched; if you're using carpenters' glue, press from the center out to force out any excess, and wipe the excess off immediately. If more than one veneer layer is loose, work from the bottom up to reglue each layer.

Reglued veneer, whatever adhesive is used, should be clamped or weighted. To protect the surface, cover it with a sheet of wax paper; make sure all excess glue is removed. Set a buffer block of scrap wood over the newly glued area, and use another block or a soft cloth to protect the opposite edge or side of the surface. Clamp the glued and protected surface firmly with C-clamps or hand screws, for one to two days. Then remove the clamps and the buffers, and wax and polish the entire surface.

Cracked or Broken Veneer

If the veneer is lifted and cracked, but not broken completely through, it can be reglued. Large areas may be easier to repair if you break the veneer off along the cracks. Broken veneer can be reglued, but you must be very careful not to damage the edges of the break. Do not trim ragged edges; an irregular mend line will not be as visible as a perfectly straight line.

To mend veneer, cut a patch in an irregular shape; any of these shapes will be less visible than a square.
© Publications International, Ltd.

Before applying glue to the veneer, clean the bonding surfaces carefully, as above. Fit the broken edges carefully together to make sure they match perfectly. Then apply contact cement to both surfaces, or spread carpenters' glue on the base wood. Set the broken veneer carefully into place, matching the edges exactly, and press firmly to knit the broken edges together. Clamp the mended area. Refinishing may be necessary when the mend is complete; if so, use a non-wash-away paint and varnish remover, and treat the veneered surface very gently.

Chipped or Missing Veneer

Replacing veneer is easy, but finding a new piece to replace it may not be. If the piece of furniture is not valuable, you may be able to take the patch from a part of it that won't show. The patch area must be along an edge, so that you can lift the veneer with a craft knife or a stiff-bladed putty knife.

In most cases, patch veneer should not be taken from the same piece of furniture; you'll have to buy matching veneer to make the repair. If only a small piece is missing, you may be able to fill in the hole with veneer edging tape, sold at many home centers and lumberyards. Or, if you have access to junk furniture, you may be able to salvage a similar veneer from another piece of furniture. For larger patches, or if you can't find a scrap piece of matching veneer, buy a sheet of matching veneer from a specialized wood supplier. National veneer suppliers can be found by searching the Internet.

To fit a chip or very small patch, set a sheet of bond paper over the damaged veneer. Rub a very soft, dull lead pencil gently over the paper; the edges of the damaged area will be exactly marked on the paper. Use this pattern as a template to cut the veneer patch. Tape the pattern to the patching wood, matching the grain of the new veneer to the grain of the damaged area. Cut the path firmly and carefully with a sharp craft knife; it's better to make it too big than too small.

Before gluing the patch in, test it for fit; it should fit exactly, flush with the surrounding surface, with no gaps.
© Publications International, Ltd.

To make a larger patch, tape the patching veneer firmly over the damaged area with masking tape, with the grain and pattern of the patch matching the grain and pattern of the damaged veneer. Make sure the patch is flat against the surface, and securely held in place.

Cut the patch in an irregular shape, as illustrated, or in a boat or shield shape; these shapes will be less visible than a square or rectangular patch would be. Cut the patch carefully with a craft knife, scoring through the patching veneer and through the damaged veneer layer below it.

Untape the patching sheet and pop out the patch. With the tip of the craft knife, remove the cut-out patch of damaged veneer; if necessary, score it and remove it in pieces. Be very careful not to damage the edges of the patch. Be very careful not to damage the edges of the patch area. Remove only the top veneer layer; do not cut into the base wood. Remove any old glue and clean the base wood as above.

Test the fit of the patch in the hole. It should fit exactly, flush with the surrounding surface, with no gaps or overlaps. If the patch is too big or too thick, do not force it in. Carefully sand the edges or the back with fine-girt sandpaper to fit it to the hole.

Glue the fitted patch into place with contact cement or carpenters' glue, as above, and clamp or weight it solidly. Let the repair dry for one to two days; then very lightly sand the patch and the surrounding veneer. Refinish the damaged area or, if necessary, the entire surface or piece of furniture.

Now that your wood surfaces have been repaired, you're ready to start staining, right? Well, not quite. Before you can apply any sort of finish to wood, you have to prepare the surface by sanding it down. In the next section, you will learn all about sanding, including how to get into those tricky, tight spaces.

How to Sand Wood Furniture

Always sand with the grain of the wood, making long, light, even strokes with a padded sanding block.
© Publications International, Ltd.

Sanding, more than any other part of refinishing, is a process that can't be rushed. It must be done by hand; power tools can damage the wood. It must be done carefully and thoroughly and always with the grain. But it's a demanding technique only in terms of time, because what it requires is chiefly patience. The care you put into sanding will determine the quality of the finish. Before you begin the work, make sure you know the basics.

Sanding Technique

The first rule of sanding is to work with the grain of the wood, because cross-grain sanding can leave permanent and very obvious scratches. The second rule is to use a sanding block, because you can't exert even sanding pressure without one.                   

Advertisement

For flat surfaces, the block should be padded; an unpadded block has no give, and grit caught under the sandpaper can scratch the wood as you work. For curved surfaces, your best bet is a thick piece of foam padding or sponge covered with sandpaper. The padding shapes itself to the curves, providing firm, even pressure.

Good sanding technique is easy to learn and apply. Using a sanding block, sand in long, light, even strokes along the grain of the wood. Don't press hard; too much pressure can cause gouging at the edge of the sanding block. Change the sandpaper as soon as it clogs or wears smooth.

To smooth the wood evenly and thoroughly, work with successively finer grades of sandpaper. The slight roughness left by the first sanding will be removed in the next sanding; the final sanding will remove the last traces of roughness. Start sanding with coarse-grit paper -- grade 3/0 for most woods or grade 4/0 for very soft woods, such as pine or poplar. Work up to grades 4/0, 5/0, and finally 6/0 sandpaper. Although finer-grit paper would theoretically produce a smoother surface, sanding with too fine a paper can clog the wood and interfere with finishing.

Sand the entire piece of furniture with each grade of sandpaper before moving on to the next grade. Between sandings, brush off or vacuum up all sanding debris, and then wipe the wood clean with a tack cloth. Dust or grit caught under the paper can scratch the wood.

If there are tight corners you can't get at with sandpaper, use a very sharp scraper to very carefully smooth the wood in these. Scrapers can leave gouges or scratches, so use them only when sanding isn't possible.

Rungs, Rounds, and Spindles

Narrow rungs, spindles, legs, and other round parts need special treatment. Hard sanding with coarse-grit paper, with or without a block, can flatten or deform round parts; only the minimum of wood should be removed. To sand round parts, cut narrow strips of fine-grit -- grades 5/0 and 6/0 -- sandpaper; don't use coarser grades at all.

Wrap a strip of sandpaper around the part, crosswise, and pull the ends back and forth to buff-sand the wood. Move up and down each round, changing your angle of sanding as you work to smooth the wood evenly. Be careful not to leave horizontal grooves in the wood at the edges of the sandpaper strips.

On carvings, sand lightly along the grain, pressing the sandpaper into the carving. Be careful not to flatten the wood.
© Publications International, Ltd.

Carvings

Carvings, especially shallow ones, must be treated carefully. Because coarse sanding could blur the lines of the carving, use only fine-grit sandpaper, grades 5/0 and 6/0, to smooth the stripped wood; work without a sanding block. Sand lightly along the grain of the wood, pressing the paper into cutout areas with your fingertips. Sand as far down into the carving as you can, but be careful not to flatten rounded surfaces.

Crevices and Curved Edges

Sand along crevices with a strip of sandpaper creased to fit into the angle of the crevice. Sand only along the crevice, and use slow strokes; keep the pressure even.

Make sure the sandpaper doesn't slip. If you're not careful, you could damage the edges of the wood at the sides of the crevice. Sand convex curves carefully along the curve, pressing lightly with your fingers and being careful not to damage any adjoining surfaces or edges. To smooth concave curves, use a piece of dowel the same diameter as the curve. Wrap a piece of sandpaper around the dowel, and push it carefully back and forth along the curve. At the ends of the curve, be careful not to slam the dowel into any adjoining surfaces.

Veneers and Fine Patinas

If the piece of furniture you're working on is veneered, it must be treated very carefully. The usual sanding techniques could cause serious damage to the wood. The same thing is true for wood with a fine patina -- normal sanding will remove the patina. For the best results, veneers and pieces with a fine patina should be smoothed very gently. 

To sand a concave curve, use a piece of dowel, the same diameter as the curve, wrapped in sandpaper.
© Publications International, Ltd.

Smooth sturdy whole-surface veneers with fine-grit sandpaper, grades 5/0 and 6/0. Do not use coarser grades. On very thin veneers and wood with a patina, smoothing is best done with steel wool. The technique is essentially the same as for sanding; all you really need is patience.

Start working with No. 0 steel wool if the surface is rough, and work up to Nos. 00 and 000 for the final smoothing. If the surface is smooth, use only the finer grades of steel wool. Between grades, brush off or vacuum up all dust and steel wool debris, then wipe the wood clean with a tack cloth.

Raising the Grain

When wood is moistened, the cells that make up the grain swell, raising the grain above the surface of the wood. Any liquid causes this reaction; even when the wood is smoothly sanded, the finish itself acts to raise the grain. To prevent the appearance of a raised grain in the finished piece of furniture, the grain should be purposely raised and then sanded down before the finish is applied after the final sanding.

The simplest grain-raiser is water. Sponge the sanded piece of furniture with cold water, soaking the wood evenly and thoroughly; then wipe off any excess. The wood must be evenly wet, with no dry spots and no puddles, or it may dry with water stains. Be especially careful not to overwet veneers; the glue that holds them may be water-soluble.

Let the wood dry completely. When it's thoroughly dry, the raised fibers of the grain will stick up stiffly above the surface. With grade 5/0 or 6/0 sandpaper, lightly smooth these raised fibers down to the surface of the wood; use No. 000 steel wool on very delicate surfaces. Be careful not to roughen the surface. Then brush off or vacuum up the sanding debris, and wipe the wood clean with a tack cloth.

Finally, you're ready to start staining, right? Not so fast. There's a great deal to know about stains before you start painting one on. In the next section, we'll help you choose the right stain for your wood.

How to Choose a Furniture Stain

Before staining a piece of furniture, brush a little finish on an inconspicuous area to see how the finished wood looks without a stain.
© 2006 Publications International

Wood is a beautiful material, but not all wood is equally beautiful. The choice woods are prized chiefly for the beauty of their color and grain; the common furniture woods are less desirable not because they don't work as well but because they don't look as nice.

Antiques, whether hardwood or softwood, are often beautiful simply because the wood has acquired a patina that new wood doesn't have. In furniture refinishing, one great equalizer is used to make the wood look better: stain.

Advertisement

Staining is done for a variety of reasons. Properly used, stain can emphasize the wood grain and give a light wood character. It can make a new wood look old or a common wood look like a rare one. It can pull together a two-wood piece, restore color to bleached areas, and change or deepen the color of any wood. Staining is not always advisable, but it can solve a lot of problems.

Before you stain any piece of furniture, take a good look at it. If it's made of cherry, maple, mahogany, rosewood, aged pine, or any of the rare woods, the wood should probably not be stained; these woods look best in their natural color. If the wood is light, with a relatively undistinguished grain, it may benefit considerably from a stain. Beech, birch, poplar, ash, gum, and new pine are usually stained before finishing. Some woods, like oak, are attractive either stained or unstained. In general, it's better not to stain if you're not sure it would improve the wood.

The type of wood is not the only guideline for staining; your own preference should be the deciding factor. To get an idea of how the piece of furniture would look unstained, test an inconspicuous spot -- on the bottom of a table, for example -- with whatever finish you plan to apply. The finish itself will darken the wood and bring out the grain. If you like the way it looks, there's no need to stain the wood. If you want a darker color or a more pronounced grain pattern, go ahead and stain it.

Once you know what type of wood you are working with, it will be easier to choose a stain that will enliven and restore the wood. There are many types to choose from.

Choosing a Stain

Several types of stains are available: wiping stains, water-base stains, varnish and sealer stains, NGR stains. Some stains are combined with a sealer, and these are usually labeled as stain/sealers. Not all are easy to use or guaranteed to give good results, so take a few minutes to plan and read the labels.

The first consideration is the finish you plan to use. Most finishes can be applied over most types of stain, but polyurethane varnish cannot be applied over some stains. If you want to use a polyurethane finish -- and this type of finish is both good-looking and very durable -- look for a stain that's compatible with polyurethane. If you can't find a compatible stain, you'll have to apply a clear penetrating resin sealer over a noncompatible stain. Varnish can be applied over this sealer if you want a shiny finish.

The second consideration in choosing a stain is the job you want it to do. The most commonly used furniture stains are based on pigments mixed in oil or turpentine, or on aniline dyes mixed in turpentine, water, alcohol, or a volatile spirit. Other types of stains include varnish stains, sealer stains, and organic stains.

Pigmented Oil Stains

The pigmented oil stains are nonpenetrating. They consist of pigments mixed in linseed oil, turpentine, mineral spirits, or a similar solvent. They are sometimes also available in gel form. They are inexpensive and easy to apply, but unless the grain of the wood is very open, they usually blur or mask the grain pattern.

These stains usually don't work well on hardwoods but can be used for slight darkening on close-grained hardwoods, such as maple. The lightening stains are pigmented oil stains. Pigmented oil stains are applied by wiping and are removed after the desired color is achieved. The intensity of the color is controlled by the length of time the stain is left on the wood. Drying time can be long, and the stain must be well sealed to prevent bleeding through the finish. The wood should also be sealed before application. The colors fade over time.

Penetrating Oil Stains

The penetrating oil stains are very popular; they consist of aniline dyes mixed with turpentine or a similar solvent. They are inexpensive and easy to apply, but they tend to penetrate unevenly. For this reason, they don't work well on hardwoods and are best used on pine and other softwoods. They can be used for slight darkening on close-grained hardwoods, such as maple.

Penetrating oil stains are applied by wiping and are removed after the desired color is achieved. The intensity of the color is controlled by the length of time the stain is left on the wood. Drying time is relatively long, and the stain must be well sealed to prevent bleeding through the finish. This stain is very hard to remove once it's dry. The colors are rich and clear, but they fade over time.

NGR (Non-Grain-Raising) Stains

The NGR stains consist of aniline dye mixed with denatured alcohol or a volatile spirit, such as methanol. They are expensive, and they can be difficult to use. Alcohol-base stains fade over time and must be sealed well to prevent bleeding; they cannot be used with shellac. Spirit-base NGR stains don't fade or bleed, and they produce a more uniform color.

Alcohol- and spirit-base NGR stains dry very quickly. Apply them with very quick, even brushing. Repeated thin applications are best to minimize overlaps. One color can be applied directly over another, but too dark a color must be bleached out. NGR stains are recommended for use on hardwoods, especially close-grained woods, where oil stains would not be absorbed properly. They should not be used on softwoods.

Varnish Stains

Varnish stain is a nonpenetrating stain, consisting of aniline dye in a varnish base. It is used by manufacturers to finish drawers, backs, and other hidden parts because it's inexpensive and no further finish is required, but it looks cheap and is generally not recommended for refinishing.

Sealer Stains

The sealer stains are nonpenetrating mixtures of dye in a varnish, shellac, or lacquer base. Two coats are usually required, and the surface must often be protected with paste wax. No further finishing is required.

Organic Stains

Several organic-base stains can be made for use on pine and other woods. The most common organic stain uses tobacco as the color, but stains can also be made from bark, roots, tea, berries, and other natural sources. These stains are interesting, but they're not recommended unless you're an accomplished refinisher.

Using the right staining techniques can save you time and help you avoid messes. We'll review the best ways to mix and apply stain in the next section.

Staining Techniques for Wood Furniture

Brush oil stain on with a clean brush, flowing it evenly along the grain of the wood to cover the entire surface.
© Publications International, Ltd.

Whatever type of stain you're using, the most important part of the process is getting the color you want. You may be able to buy stain in the color you want. If not, and if you have a sample of the stain color you want, take it to the paint store and have a color mixed to match. Experiment, mixing small amounts of stain and applying test batches to scrap wood, until you get the right color.

Although a wide range of stain colors is available, you can mix almost any color with two or more of the four basic shades: light oak (tan), walnut (brown), maple (yellow-orange), and mahogany (red). Most manufacturers provide mixing proportions for various effects.

Advertisement

To dull any color, add a drop or two of black. Mix small amounts of stain at first; then, starting full-strength and thinning the stain gradually with the proper solvent, test the stain on scrap wood until you have the right color. Keep track of the proportions so you'll be able to duplicate the mixture. When you like the color, test it again on a hidden part of the piece of furniture. If the piece is made of two or more woods, you may have to mix stain separately for each wood, but this is often not necessary.

When you're satisfied with the stain color, mix enough stain to treat the entire piece of furniture. Do not mix brands or types of stain, and do not change brands or types in the middle of the job. It's better to have stain left over than to run out of stain with one table leg or chair arm to go.

Whatever stain you're using, it's best to go carefully. If you're not sure the color is right, thin the stain to lighten it and apply several coats of stain until the color is as deep as you want it. Always test the stain in an inconspicuous spot, and stain the least conspicuous surfaces first. It may take longer this way to get the effect you want, but the only way to salvage a badly applied stain is to bleach it out and start over.

To prevent drip marks and uneven color, turn the piece of furniture so that the surface being stained is always horizontal. If you're working on a large piece and this isn't practical, start at the bottom and work up. Always work quickly, applying stain smoothly and evenly over the entire surface.

Pigmented or Penetrating Oil Stains

Apply pigmented or penetrating oil stain with a clean brush, flowing stain evenly along the grain of the wood. You can also use a clean cloth or sponge to apply penetrating stain. Let pigmented oil stain set for about 10 to 15 minutes, until the surface of the stain starts to turn dull, then firmly wipe off the excess stain with a clean cloth dampened with stain.

Penetrating oil stains work more quickly than pigmented ones. Wipe off the excess immediately for a light color, or let it set as long as 15 to 20 minutes for a darker color.

Oil stain can be modified to some extent if you don't like the effect. If the wood is too dark, soak a clean cloth in turpentine or mineral spirits and rub the wood firmly and evenly along the grain. This will lighten the stain but not remove it. If part of the grain is too dark, wrap a cloth around your index finger, dip it into turpentine or mineral spirits, and lightly rub the grain you want lightened. If part of the grain is too light, use an artists' brush to carefully apply more stain just to the grain.

Let the completed stain dry for about 24 hours. If the color isn't dark enough, repeat the staining procedure.

Water-base Stains

Water-base stains should be used on clean, bare wood or on new wood. Apply stain with a new brush, flowing it on quickly and evenly along the grain of the wood. Use long, smooth strokes. Try not to overlap your strokes; a double layer of stain will dry twice as dark as a single one. It's better to use several thinned coats of stain than one dark one to minimize brush overlap marks.

Water-base stain can be adjusted if you're working on relatively small surfaces. To apply water-base stain by this method, flow it onto the surface liberally; then wipe off the excess, stroking along the grain with a clean cloth. The intensity of the color is determined by the length of time the excess is left on the wood; wipe immediately for a light color or let the stain set for a darker shade. Let the completed stain dry for about 24 hours. If the color isn't dark enough, repeat the staining procedure.

Oil stain allows some leeway for color adjustment. If part of the grain is too light, use an artists' brush to apply more stain to the lighter areas.
© Publications International, Ltd.

NGR Stains

NGR stain, either alcohol- or spirit-base, is applied like water-base stain, but this type of stain dries so quickly that it can be hard to apply. Use a medium-size new brush to apply NGR stain, flowing it on quickly and evenly along the grain of the wood. Make long, smooth, light strokes, and try not to overlap the strokes. Brush overlap marks will dry twice as dark as the rest of the stain.

To minimize overlap marks, it's better to use several thinned coats of stain than one dark one.

NGR stains cannot be adjusted and should not be applied in very humid weather. An unsatisfactory stain must be bleached out. Let the stain dry completely before finishing the wood -- about half an hour for alcohol-base stain and about one hour for methanol- or other spirit-base stain.

Lightening

Dark wood can be lightened with stain for an interesting light-dark effect. Lightening is not recommended for fine woods because it covers the natural color and grain of the wood; as a last resort, though, it can be effective. Lightening works best on open-grained wood; the effect of a lighter color is produced because the grain is filled with a light or white pigment. The lightening agent is sometimes thinned white oil-base paint, but more often it is pigmented oil stain.

Apply the oil stain as above, and let it set to achieve the desired effect. Wipe off excess stain, and let the stained wood dry completely.

Post-Stain Treatment

Any stain, even an oil-base stain, may raise the grain of the wood slightly. If necessary, remove this slight roughness when the stain is completely dry, but smooth the wood very carefully to avoid removing the stain. To smooth wood treated with oil-base stain, rub it gently with No. 000 or 0000 steel wool. To smooth wood treated with water-base or NGR stain, sand it very lightly with fine-grit sandpaper. Remove all sanding debris with a tack cloth. Sanding may remove water-base stain in spots; if the surface is uneven in color, you may have to apply another coat of stain.

To complete your post-stain treatment, you will have to apply a coat of sealer. For a full explanation of this process, move on to the next section.

How to Choose a Furniture Finish

Putting the finish on furniture is the final payoff for all the hours you've spent removing the old finish, making repairs, sanding, staining, and smoothing. Some might consider the finishing step as routine, others might think it's creative. Either way, it is usually easy to do, if you use the right materials, take your time, and exercise a little patience.

In the next few pages, we'll discuss how to pick the best finish for your furniture wood. We'll also review some application techniques, including preparation work and drying tips, so whatever finish you choose should provide a long-lasting look.

Advertisement

Types of Finish

Furniture finishes can be classified into several basic types: varnish, penetrating resin, shellac, lacquer, wax, and oil. All these finishes are designed to protect the wood and to bring out its natural beauty, and all of them can be assessed in terms of how well they accomplish these objectives. Consequently, choosing a finish comes down to two essential factors: How do you want the wood to look? How durable do you want the finished surface to be?

Of the six basic finishes, all can be beautiful, but when it comes to durability, two types outperform all the others: varnish and penetrating resin. Varnish, the most durable of all finishes, is available in high-gloss, satin, and flat forms for whatever surface shine you want. Applying varnish can be difficult, but the results are worth the work. Penetrating resin sinks into the wood to give it a natural look and feel; it is easy to apply and durable. The other furniture finishes do have their advantages.

Oil, for instance, produces a very natural finish. Shellac dries fast and is easy to use. But for most refinishing, varnish or penetrating resin is probably the best choice.

Whatever finish you choose, it's important to know exactly what you're working with. Some finishes can be mixed and some cannot. Each finish has its own individual application techniques; each finish requires different tools and materials. Before you buy and apply a finish, always read the ingredient and application information on the container. And always follow the manufacturer's instructions and recommendations.

The one requirement common to all finishes is a dust-free environment during application. Providing this environment isn't easy, but it can be done. Consider using a finish that dries with a matte or flat surface; this type of finish gives you the opportunity to remove dirt and lint with rubbing abrasives.

In most cases, how a piece of furniture stands up to wear is as important as how it looks. Durability is a primary consideration in choosing a finish. The most durable finishes, varnish and penetrating resin, are thus the two basic finishes for refinishing. Varnish is the more protective of the two because it is a surface coat; damage to the varnish does not always extend to the wood. Penetrating resin hardens in the wood itself. Although it doesn't protect the surface from damage as effectively as varnish, it may stand up to heavy use better because it's easy to reapply and doesn't chip or craze.

If varnish is your choice, check the next section on how to work with this durable, slow-drying finish.

How to Varnish Furniture

Apply varnish first along the grain of the wood, flowing it on in even strips. Then apply more varnish across the grain to level and even the surface.
© Publications International, Ltd.

Varnish, one of the toughest of the finishes, is superior to the other traditional finishes. It enhances and gives warmth to the grain of the wood and is resistant to impact, heat, abrasion, water, and alcohol. It can be used as a topcoat over worn finishes. Varnish provides a clear finish, but it darkens the wood slightly. It is available in high-gloss, semigloss or satin, and matte or flat surface finishes. There are many types to choose from, but it's important to decide on one that will work well with your furniture wood.

Types of Varnish

The traditional varnish is based on natural resins and oils and is thinned with mineral spirits or turpentine. Spar varnish is a natural varnish formulated to stay tacky; it should never be used for furniture. Synthetic varnishes are based on synthetic resins and require special thinners.

Advertisement

The best of the synthetic varnishes is the polyurethane type; polyurethanes are clear, non-yellowing, and very tough. Other synthetic varnishes are the phenolics, used for exterior and some marine work, and the alkyds, often used in colored preparations. Phenolic and alkyd varnishes yellow with age and are not recommended for refinishing.

With any type of varnish, look for quick drying to minimize dust problems. Use spray varnish only where brushing is impractical, such as on wicker or rattan.

Water-base varnishes offer similar results without the cleanup hassle and toxicity. Most dry clear to the touch in 15 to 30 minutes. They don't crack, chip, or bubble, and they are water- and alcohol-resistant. Best of all, these varnishes do not yellow. However, when applied in several coats, the finish might begin to cloud, depending on the wood.

Special Requirements

Natural varnish can be used with any stain or filler. The sealer for natural varnish is thinned shellac or a mixture of 1 part varnish and 1 part turpentine or mineral spirits. Do not mix brands or types of varnish. Polyurethane varnish is not compatible with all stains and fillers. Before buying, read the labels to make sure you're using compatible materials. Some polyurethanes can be thinned for use as a sealer; some do not require sealers. Some sanding sealers are compatible with polyurethanes.

Water-base varnish can be used over stain and filler, provided you allow the undercoats to fully cure. This process can take up to a month. You can also apply a sealer coat of shellac between the two if you don't want to wait.

Be aware that varnish generally dries very slowly and can be difficult to apply, so it's important to know how to use this finish.

Varnish Application Techniques

Apply varnish with a new, clean, natural-bristle brush. Use only new varnish. Varnish that's been used several times may contain lumps of hardened varnish from around the sides and rim of the container. These lumps can really cause trouble. If you plan the job properly, you probably won't have enough varnish left to be wasteful. Leftover varnish can be used on parts that won't show or projects where the finish isn't critical.

Bare wood to be finished with varnish must be properly prepared, and sanded. (For guidelines on sanding, click here.) Finished wood to be top-coated must be cleaned and lightly sanded. Immediately before applying the varnish, clean each surface thoroughly with a tack cloth.

It's much easier to apply varnish to horizontal surfaces than vertical surfaces. Before you start to work, turn the piece of furniture so that its major surfaces are horizontal. If the piece has drawers, doors, shelving, and other removable parts, take them out or off and finish them horizontally. Work on only one surface at a time, and work on large surfaces last.

Apply varnish to the prepared wood with long, smooth, even strokes, laying the varnish along the grain in strips the width of the brush. Do not touch the brush to the rim of the varnish container; shake or tap off excess varnish inside the container or on a strike can. The varnish should flow onto the surface of the wood, with no drag. If the brush starts to pull or if you see small missed or thin spots, add about 1 ounce of thinner to the varnish.

For natural varnish, use turpentine or mineral spirits. For polyurethane varnish, use the thinner recommended by the manufacturer. Stir the thinner gently into the varnish, being careful not to raise any bubbles.

After laying on an even coat of varnish in strips along the grain of the wood, apply more varnish in even strokes across the grain of the wood to level and even the surface. The varnish should be as even and level as possible, with no thick or thin spots, but a thin coat is better than a thick one.

Thick coats of varnish take longer to dry, and they tend to crack as the varnish ages. As you work, remove dust and lint from the wet finish with a rosin lint picker.

After leveling the varnish across the grain, smooth the surface by stroking it very lightly along the grain with an almost dry brush. Pick off dust and lint as you work.
© Publications International, Ltd.

To finish each surface, tip off the wet varnish in the direction of the grain. Use an almost dry brush for this step. Holding the brush at a slight angle to the surface, very lightly stroke the surface of the varnish to remove brush marks and even the surface. Smooth the entire varnished surface, working in strips along the grain of the wood. As you work, pick off dust and lint with a lint picker. Any remaining brush marks will disappear as the varnish dries.

Varnish must be applied carefully to prevent thick spots. At outside corners, work from the flat surface toward the corner; lift the brush as it nears the corner and before it flips down over the edge. This prevents a buildup of varnish along the edge. At inside corners, work an inch or two away from the corner; then brush the varnish into the corner, tip it off, and leave it alone. This method prevents buildup on many flat-surface brushings.

Spots that tend to hold varnish, such as tiny potholes, should be coated just once with varnish and tipped just once with the brush. Repeated tipping will leave a bulge.

Brush lengthwise along rungs, spindles, and other turnings. On carved moldings, apply the finish to the carvings first with a fairly dry brush; then finish the flat surfaces with the tip of the brush. Finally, use a very dry brush to go over the carvings and then the flats, leveling the finish and removing any fat edges, sags, or runs. On raised panel doors, finish the panels first and then move on to the flat framing. The finish will build up at the miters in the frame where they meet the panel; remove the excess with a very dry brush, working from the corner out.

Drying and Recoating

Drying times for natural varnish average about 24 hours, but water-base varnish and polyurethanes often dry more quickly. Dampness slows drying, so it's recommended that you extend all drying times if you're applying varnish in humid or wet weather. Also, drying times are not necessarily curing times, and new varnish is easily damaged. Always let the finish dry at least 24 hours or as long as the manufacturer recommends; if possible, let it dry a couple of days or more.

Pick off lint and dust only while the surface is wet or sticky; too much interference could damage it.

Many varnishes require two or even three coats for a smooth finish -- use your own judgment, and follow the manufacturer's recommendations. Between coats of varnish, let the first coat of varnish harden or dry, as recommended by the manufacturer.

Some two-coat varnishes should be applied 10 to 15 hours from the time the first coat was applied, but in general it's best to wait at least 24 hours -- longer, if possible. When the first coat is completely dry, lightly sand the varnished wood in the direction of the grain, using grade 7/0 sandpaper on a padded sanding block. Abrade the surface evenly, but don't cut it deeply.

Clean away all sanding residue with a tack cloth, and apply the second coat of varnish the same way as you did the first. Repeat this procedure, sanding the varnished wood carefully, if a third coat of varnish is required.

In addition to varnish, another option that stands up well to heavy use is a penetrating resin finish. Check out the next section for when and how to use this type of finish.

How to Apply a Penetrating Resin Furniture Finish

Penetrating resin finishes, unlike varnish, are not surface finishes; they soak into the wood to harden the fibers themselves. Wood treated with penetrating resin has a very natural look and feel, as if it were unfinished, and the grain is strongly highlighted. Penetrating resin is very durable and withstands heavy wear; it is both easy to apply and easy to repair. It dries clear, but it darkens the wood slightly. It is also available in several stain colors.

Because penetrating resin must soak into the wood, it is best used on open-grained woods. Very close-grained woods may not absorb it deeply. On stripped wood, all old filler must be removed. If filler is left in the wood, the finish will not be absorbed.

Advertisement

Penetrating resin is recommended for use on oily hardwoods, such as rosewood and teak, and is especially effective on oak and walnut. It is often preferable to varnish for use on large pieces of furniture and complex carvings. It dries relatively slowly, but because it is not a surface finish, dust is not a problem. A penetrating resin finish is very hard to remove for future refinishers, so it's important to choose the right one for the job.

Types of Penetrating Resin

Penetrating resin finishes are formulated with two different types of resins: phenolic and alkyd. There is little difference in performance between these types, but phenolic-base compounds may penetrate the wood more deeply than alkyd types.

Special Requirements

Penetrating resin can be used over any stain except varnish- or vinyl-base types. No filling or sealing is required. Before applying penetrating resin on bleached or stained surfaces, test it on a hidden part of the piece.

Penetrating Resin Application Techniques

Wood to be finished with penetrating resin must be properly prepared and sanded. Because the finish does not coat the surface of the wood, any rough spots or other defects will be accentuated when the resin is applied. Immediately before applying the resin, clean the piece of furniture thoroughly with a tack cloth.

Whenever possible, penetrating resin should be applied to horizontal surfaces. If the piece of furniture has removable parts, remove them and finish them horizontally. Apply penetrating resin with a clean brush or cloth, with No. 0000 steel wool, or pour it directly onto the wood. Work on small areas at a time. On rungs or spindles, apply the resin with a clean cloth one rung at a time.

Spread the resin liberally and evenly over the wood. The appearance of the surface isn't critical, but the amount of resin used on each surface should be consistent. As you work, watch the wood surface. Some open-grained woods soak up the finish very quickly, others -- especially close-grained hardwoods -- absorb it slowly and may not absorb much. Apply resin until the wood stops absorbing it.

Let the resin set for about 30 to 45 minutes. During this time, keep the surface wet, adding more resin to any dry spots that appear. All surfaces should be shiny. After 30 to 45 minutes, when the wood will not absorb any more resin and the surface is still wet, firmly wipe off the excess finish with clean, absorbent cloths. The surface of the wood should be completely dry, with no wet, shiny spots.

Drying and Recoating

Let the newly applied resin dry for 24 hours. If glossy patches appear on the wood during the drying period, remove them immediately. Add resin to these areas to soften the dried finish, and wipe off the liquid resin so that the wood is dry.

After 24 hours, smooth the wood gently with No. 000 or 0000 steel wool; then clean it thoroughly with a tack cloth. Apply a second coat of penetrating resin, letting it penetrate and wiping off the excess as above. If necessary on very open-grained woods, apply a third coat of resin; wait 24 hours and smooth the surface with steel wool before application, as above. No wax or other surface coat is needed.

If you need a finish that is easy to apply and dries quickly, then check out the next section for tips on when and how to use a shellac finish.

How to Shellac Furniture

The French Polish Finish is achieved by hand-rubbing. Apply the shellac/oil mixture and rub it in with a circular or figure-eight motion. Continue rubbing for 45 minutes, adding more finish as necessary
© Publications International, Ltd.

Shellac is the easiest of the classic finishes to apply. It produces a very fine, mellow finish, and it accentuates the natural grain of the wood. It is especially attractive on walnut, mahogany, and fine veneer woods. It polishes well and is the basis for the traditional French polish finish on very fine furniture.

Shellac is applied in several thin coats. It dries fast and can be recoated after four hours. Application mistakes can occur since many coats are required, but they are easy to fix.

Advertisement

The big drawback to shellac is that it is not durable. Shellac is easily damaged and dissolves in both water and alcohol. White rings are usually a problem. Shellac cannot be applied in very humid weather because humidity turns it white. Shellac finishes absorb moisture and sometimes turn hazy or white with age. Repairs are easy, but frequent retouching is necessary.

Shellac tends to be soft after it dries, so waxing is almost essential to protect the surface. It is best used on decorative pieces that don't have to stand up to hard wear. Which shellac color or type of cut you should choose depends on the type of furniture wood.

Shellac Colors and Cuts

Shellac is available in two colors: white and orange. White shellac is used for light woods and is thinned with denatured alcohol for use as a sealer. It can be tinted with alcohol-soluble aniline dye and is sometimes available in colors. Orange shellac gives an amber color to the wood; this is often desirable on dark woods. It is especially attractive on walnut, mahogany, and teak.

Shellac is sold in several cuts, or concentrations. The most common type is a 4-pound cut. Shellac must usually be thinned or cut with denatured alcohol before application, as directed by the manufacturer. For sealer, thin 1 part of 3- or 4-pound-cut white shellac with 4 parts denatured alcohol. For finish coats, thin 1 part 4-pound shellac with 2 parts alcohol.

Special Requirements

Shellac can be used over any stain except alcohol-base types and over any filler. Thinned shellac is recommended for sealer coats. Use denatured alcohol to thin shellac; use alcohol or ammonia for cleanup. Shellac has a very short shelf life; old shellac does not dry properly. Buy just enough for the job, and junk any leftover shellac. Some manufacturers even shelf-date shellac.

Basic Application Techniques

Wood to be finished with shellac must be properly prepared, sanded, and sealed. Immediately before applying shellac, clean each surface thoroughly with a tack cloth. Use a new, clean, good-quality brush, and use only new shellac, thinned to a 1-pound cut. Work on one area at a time.

To apply shellac, flow it liberally onto the surface, working in long, smooth strokes along the grain of the wood. Keep the surface really wet with the shellac, and apply the finish from dry to wet edges. After coating the surface completely, tip off the shellac along the grain of the wood. Use an almost dry brush for this step. Holding the brush at a slight angle to the surface, very lightly stroke the surface of the shellac to remove brush marks and even the surface. Smooth the entire shellacked surface, working in strips along the grain of the wood.

The French Polish Finish Technique

This shellac finishing technique produces a much more durable surface than the standard shellac finish. French-polished surfaces have a very distinctive, velvety sheen, and the grain and color of the wood are emphasized. It is best used on close-grained woods and fine veneers. Use only water stain or spirit-base non-grain-raising (NGR) stain under French polish; other types may bleed or lift.

To apply a French polish finish, mix 2 tablespoons of boiled linseed oil into 1 pint of 1-pound-cut shellac. Make a palm-size pad of cheesecloth, and wrap it in a clean, lint-free linen or cotton cloth. The pad should just fit in your palm. Dip the pad into the shellac/oil mixture; don't soak it. Make sure the surface of the pad is not wrinkled.

Apply the shellac/oil mixture to the prepared wood, spreading it evenly along the grain to cover the entire surface; work with a quick padding stroke, blending your strokes carefully. Then rub the wet surface with the pad, using a firm circular or figure-eight motion over the wood. Continue this circular rubbing for about 45 minutes, using plenty of downward pressure and adding shellac as the mixture is worked into the wood. The surface should be evenly glossy, with no dark spots or stroke marks.

Let the rubbed shellac/oil mixture dry for 24 hours; then apply another coat of shellac/oil as above. Rub the second coat in for 45 minutes, and let it dry for two to three days. Apply a third coat the same way.

Let the wood dry for at least a week, but not more than 10 days, after the final coat. Finally, clean the surface, wax the finished wood with a good-quality paste wax, and buff it to a fine sheen.

Drying and Recoating

Shellac dries in about 30 minutes and can be recoated after four hours. Let the new shellac set for a full four hours. Make sure drying time is adequate. Shellac is soft, and it can pick up sandpaper grains or steel wool shreds if it isn't completely dry. This can result in a nightmare of smoothing to remove the debris.

When the shellac is completely dry, lightly sand the surface with grade 7/0 open-coat sandpaper on a padded sanding block. Clean the sanded surface thoroughly with a tack cloth, then apply a second coat of shellac, as above. Let the shellac dry for four hours; repeat, sanding and cleaning the surface, to apply a third coat. Additional coats of shellac can be added, if you want a smoother surface; let each coat dry thoroughly before applying a new one, and buff the finish with fine steel wool between coats.

Let the final coat of shellac harden for 48 hours. With grade No. 0000 steel wool, remove the gloss from the finished surface, rubbing carefully along the grain of the wood. Do not rub across the grain. When the gloss is completely removed, let the piece of furniture stand for 48 hours. Then apply a good-quality paste wax to the finished wood, and buff the surface to a shine with a soft cloth or the buffing attachment of an electric drill.

Another option to consider is a lacquer finish, which dries quickly but can be difficult to apply depending on the job. Learn when and how to lacquer furniture in the next section.

How to Lacquer Furniture

With the can about 18 inches from the surface, spray lacquer in even strips from side to side, top to bottom. Overlap the strips slightly to equalize the thickness of the lacquer film.
© Publications International, Ltd.

Lacquer is the fastest-drying of the finishes for wooden furniture. It is more durable than shellac -- although it is very thin -- and must be applied in many thin coats. It is available in high-gloss, satin, and matte finishes, in clear form and in several clear stain colors.

Dust-free drying is not a problem, but because lacquer dries so fast -- sometimes almost instantly -- it is very difficult to work with. Brushing lacquers are not recommended for amateur use; spraying lacquers must be applied with a motorized spray gun. Lacquer fumes can be both toxic and explosive. For these reasons, lacquer is not usually used in amateur refinishing. For small jobs, lacquer can be applied with aerosol spray cans. This is expensive, but it works well. It's important to know what type of lacquer to use for the job.

Advertisement

Special Requirements

Lacquer can be used on most woods, but it cannot be used on mahogany and rosewood; the oils in these woods will bleed through the finish. Lacquer can be used over lacquer-base, non-grain-raising (NGR) and water-base stains and over lacquer-base fillers. It cannot be used over other finishes or over oil-base stains or many fillers; the solvents in lacquer will dissolve other finishes and incompatible stains and fillers. Thinned lacquer or shellac or a compatible lacquer-base sanding sealer should be used as a sealer under a lacquer finish.

Lacquer Application Techniques

Wood to be finished with lacquer must be properly prepared, sanded, and sealed. Immediately before applying lacquer, clean the piece of furniture thoroughly with a tack cloth. Use only aerosol spray lacquer, and protect your working area with dropcloths or newspaper. Make sure ventilation is adequate.

Before applying lacquer, test the spray can on a piece of newspaper or cardboard. Spray cans have different patterns of spray; practicing and watching the test spray pattern will give you enough control to properly cover the surface you're finishing.

Apply lacquer slowly and evenly, holding the spray can upright about 18 inches away from the surface of the wood.

If you work farther away than this, the lacquer will tend to "orange peel," dimpling like the skin on an orange. If you work closer than 18 inches, too much lacquer may be applied to the surface, causing runs and sags in the finish.

First spray the top edge of the surface; then cover the entire surface in horizontal strips, from side to side, top to bottom. As you work, overlap the lacquer spray patterns slightly.

The edges of each sprayed area are thin; the centers are thick. Overlapping equalizes the thickness of the lacquer film, keeping the surface even. Never try to equalize the film by brushing the lacquer.

Apply only a thin coat of lacquer; this finish must be applied in many thin layers.

Drying and Recoating

Lacquer dries in no more than half an hour, but it must cure completely between coats. Let the newly sprayed wood dry for about 48 hours, or as directed by the manufacturer. Then lightly smooth the surface with No. 000 steel wool, and clean it thoroughly with a tack cloth. Apply a second coat of lacquer as above. For a smoother finish, let the second coat dry for 48 hours, smooth the surface with No. 000 steel wool, and apply a third coat of lacquer as above.

Runs and sags are usually caused by too much lacquer, but they don't always appear on the first couple of coats. The solvent in each coat of lacquer softens the dried lacquer under it to meld the coats together. As you apply more coats of lacquer, the bottom coats soften, and the lacquer film gets thicker; any unevenness can cause sags. For a very rich, deep finish, use many very thin coats of lacquer. Let the lacquer dry completely between coats, and rub the surface between coats with grade FFF powdered pumice and boiled linseed oil on a cheesecloth or felt pad.

After applying the final coat of lacquer, let the piece of furniture dry for 48 hours; then lightly buff the lacquered surface with No. 0000 steel wool. Clean the surface thoroughly with a tack cloth and apply a good-quality paste wax. Buff the waxed surface to a fine gloss.

If you want a finish that is not really permanent, check the next section for information on a paste wax finish, which is easy to apply and maintain.

How to Wax and Seal Furniture

Paste wax, often used to protect finishes, is sometimes used to finish bare wood furniture. This is most successful on hard, close-grained woods, such as maple, that have been sanded absolutely smooth.

Some waxes have color added for use on dark woods such as walnut. These waxes add color to the wood, and are especially helpful if the finish on the wood is blotchy, but they do not stain the wood or restore the finish.

Advertisement

Paste wax is easy to apply, and is nonsticky and heat-resistant, but it is easily damaged and liable to wear. It must be reapplied periodically. Paste wax is more commonly used over a sealer stain to color, seal, and finish new or stripped wood.

Sealer stain finishes, including commercial systems, are available in several colors. Sealer stains produce a very even color, with no lap marks or dark spots. They are fairly tough and are very easy to apply. They are not very water-resistant and must often be recoated periodically. But before you begin the project, it's important to know the type of wood you are working with.

Special Requirements

Paste wax can be applied directly over prepared bare or stained wood; thinned shellac is recommended as a sealer coat. Sealer stains should be applied directly over prepared bare wood; no other sealer is required. Open-grained woods should be filled before a wax finish is applied; any paste filler is compatible. Wax and sealer stain finishes can be used on new or stripped wood.

How to Apply Paste Wax

Wood to be finished with paste wax must be thoroughly sanded and sealed with a coat of thinned shellac. When the sealer is completely dry, rub the wood along the grain with No. 0000 steel wool; then clean the piece of furniture thoroughly with a tack cloth.

Apply paste wax sparingly with a clean, lint-free cloth pad, rubbing the wax on with a circular motion to form a thin, even coating. Work on a small area at a time. Some manufacturers recommend that the wax be applied with a damp -- not wet -- pad. If you use water, make sure the surface is dry before you polish it.

Let the wax dry completely, as recommended by the manufacturer. Then wipe the waxed surface firmly with a clean cloth to remove excess wax. When the waxed surface is even, polish it to a shine with a clean cloth. To complete the finish, apply one or two more coats of wax, as above. Polish each coat completely before applying the next coat.

How to Apply a Sealer Stain Finish

Wood to be finished with a sealer stain finish must be properly prepared and sanded; no other preparation is necessary. Thoroughly mix the sealer stain. Apply the stain evenly along the grain with a clean brush or cloth, and let it stand for 10 to 15 minutes; then wipe off the excess with a clean cloth. Let the wood dry for 24 hours and apply a second coat of stain, as above. To complete the finish, apply one or two coats of paste wax, as above. Polish each coat thoroughly with a clean cloth.

For a natural finish look on your wooden furniture, learn how and when to use Danish oil and other modern finishing oils in the next section.

How to Apply Oil Finish to Furniture

Apply oil liberally until the wood stops absorbing it; working along the grain, rub it firmly into the wood with the heels of your hands. Then wipe off all excess oil.
© Publications International, Ltd.

An oil finish is designed to protect wood and bring out its natural beauty, which makes it a popular finish for revitalizing wood furniture.

Oil is penetrating and durable; it is water- and alcohol-resistant, and gives wooden furniture an attractive natural sheen and texture. Hand-rubbed oil finishes can be beautiful, but only if they're properly applied. Danish and tung oil finishes are far superior to the traditional linseed oil; linseed oil is sticky and hard to apply. Any oil finish must be reapplied periodically, but Danish and tung oil require far less reapplication than linseed oil. It's important to choose the right oil finish for your furniture project.

Advertisement

Types of Oil Finishes

Modern oil finishes -- Danish oil, a synthetic, and natural tung-oil sealers -- are penetrating finishes, but they should be applied periodically. Tung-oil finishes are available in semigloss and high-gloss forms, and also in several stain colors. Danish oil usually has a satin finish.

A linseed oil finish is rich and glossy, but many applications are required for a good finish. The classic linseed oil finish is a mixture of equal parts of boiled linseed oil and turpentine. There are many variations on the linseed oil finish. One of the best of them is the Mary Roalman finish, which consists of equal parts of boiled linseed oil, turpentine, and natural varnish. Mix the linseed oil finishes several days before you use them. For most pieces, a pint of each ingredient is plenty.

Special Requirements

Oil finishes can be applied directly over prepared bare or stained wood. Only water or non-grain-raising (NGR) stains should be used; oil-base stains interfere with the penetration of the oil. Stain-color tung-oil sealers stain and finish in one operation. Very open-grained woods should be filled before an oil finish is applied; any paste filler is compatible. No sealing is required.

Oil Application Techniques

Wood to be finished with oil must be thoroughly sanded to even out the open pores to create a smooth surface. No sealing is necessary. Before applying the finish, clean the piece of furniture thoroughly with a tack cloth.

Apply the oil -- Danish oil, tung-oil sealer, linseed oil, or the Mary Roalman mixture -- with a clean cheesecloth pad, using a circular or figure-eight motion to work it into the wood. Apply oil evenly and liberally, until the wood has stopped absorbing it; work on one surface at a time. Apply oil until the wood is evenly oiled and the surface has stopped absorbing.

Rub the oil firmly into the wood with the heels of your hands, working along the grain. Continue rubbing for about 15 minutes; as you rub, the warmth you generate will help the oil penetrate into the wood. Danish oil and tung oil may not require such extensive rubbing; follow the manufacturer's specific instructions. Finally, after thoroughly rubbing all surfaces, wipe the piece of furniture clean with a clean cloth. You must remove all excess oil; there should be no oil -- or, if you're using a linseed finish, only a very thin film of oil -- on the surface of the wood.

Drying and Recoating

Danish oil and tung oil dry more quickly than linseed oil. In most cases, they can be reapplied after 12 to 24 hours; follow the manufacturer's specific instructions. Linseed-oil finishes must dry for about a week; drying takes longer in very humid weather. Do not recoat a linseed-oil finish until it's completely dry, with no trace of stickiness.

When the first coat of oil is completely dry, apply further coats until the finish is rich and hard. Danish oil and tung-oil sealers may require only one additional application, but linseed-oil finishes should be given 10 to 20 additional coats. Rub each additional coat of oil thoroughly into the wood, as above, and then wipe off all excess oil. Let each coat of oil dry thoroughly before applying the next -- at least one week between the first several coats, longer between later coats. If the oil isn't completely dry between coats, the finished surface will be sticky.

Sometimes a furniture project isn't a refinishing job. Working with unfinished furniture has its own quirks. Find out more on the next page.

Assessing Unfinished Furniture

Examine the joints to make sure they're well matched and fastened; gaps between pieces are hard to deal with.
© Publications International, Ltd.

Out of all the different types and styles of unfinished furniture, how do you know which pieces are worth buying? And once you locate a good piece of unfinished furniture, how do you distress it and give it that antique feel?

These are the questions we'll answer in the next few pages. We'll start at square one, by telling you what to look for when selecting unfinished furniture.

Advertisement

Assessing Unfinished Furniture

Price, unfortunately, is the first indicator. You really get what you pay for with this furniture. Before you buy any unfinished piece, comparison shop to get an idea of what's available. Most unfinished furniture is pine, but some is made with other woods. Whatever type of wood is used, the quality of the wood and the workmanship that goes into the piece can vary tremendously.

When you find a piece of furniture you like, take a good look at it. Is the wood clear or full of knots, smooth or rough? Cheap furniture is usually knotty and sap-streaked; the more expensive pieces are made with better-quality wood. What state is the wood in? Cheap furniture is probably raw, and may have rough edges and deep saw gouges. Good unfinished furniture is often already sanded, ready for finishing.

Another important consideration is how well the piece of furniture is made. Most unfinished furniture is assembled with staples driven by a power staple gun. Unless the stapling is carefully done, the joints may not be secure. How sturdy is the piece? Does it have wobbly legs, or are parts of it poorly fastened together? You can fix loose joints, but it's hard to salvage a piece that's badly matched or falling apart completely.

Are doors and drawers aligned properly, and do they work smoothly? If they don't, is it because they're the wrong size for the opening or because of loosely or inaccurately fastened hardware or drawer guides? You can deal with mechanical problems, but a part that's too big or too small can never be adjusted. Examine all moving parts to make sure they're cut, joined, and assembled properly. Finishing can do a lot, but it can't remake a shoddy piece.

The style of the funiture also is important. Look at the style. Do you like the lines of the piece? Will it do the job you want it for? Don't settle for a piece of furniture that's the wrong size or style; it isn't worth working on something you don't really want. On the other hand, a piece of furniture that's basically right can be given any character you like with different hardware, trim moldings, decorations, or special finishes.

Before you make a final decision, assess the work you'll have to do to get the piece ready to finish -- cleaning out knotholes and sap pockets, regluing legs, renailing drawers, repairing splits, smoothing splintered edges, changing hardware. How much time and effort will it take? How much hardware and trim will you have to add? Are the size and style right? Do you like the wood? How much are you saving by buying the piece unfinished? It all comes down to one basic question: Is it worth it? If you choose carefully, it is.

Assessing Surface Damage

No matter how carefully you shop, unfinished furniture is likely to have a few problems. The joints may be loose; moving parts may stick. There are usually a few knots in the wood, and these will bleed through the finish if they aren't sealed. There are almost always rough edges or saw marks. Before you distress the wood, take the time to deal with these problems. Your results will more than justify the effort.

Loose joinery and poor assembly: The first step in working with unfinished furniture is making sure it's solid. Examine the joints to locate any weak points; drawers are especially likely to need refastening. If the staples or other fasteners are solid, renailing may not be needed, but if they're off-center or don't look very secure, reinforce them by driving finishing nails next to them. Drill pilot holes for the nails to keep the wood from splintering. If the staples are loose, pull them out with pliers, and renail the joint. Fill the staple holes with wood filler.

In stapled joints, drive nails to secure weak points where staples are loose or missing; leave well-driven staples in place. Fill the staple holes with wood plastic.
© Publications International, Ltd.

Loose legs, rungs, arms, or spindles should be reglued. Test all parts of the piece to make sure they're secure, and reglue or refasten any loose part.

If the piece has drawers, they should work smoothly. Check the drawer guides, inside the frame, and the runners on the bottom edges of the drawer. They should be square and securely fastened, with no protruding nail heads. Refasten the guides or runners, if necessary, and countersink protruding nail heads with a nail set.

Pin knots should be removed completely so they don't work loose after finishing. Pry out the knot with a knife, and fill and seal the hole.
© Publications International, Ltd.

Knots and sap pockets: Examine the wood carefully for spots where sap has flowed or resin beaded on the surface. Scrape off hardened resin, and clean knots and sap pockets with turpentine on a soft cloth. If large knots are loose, remove them entirely; then apply carpenters' glue around the edges and replace the knots, flush with the surface.

If small knots are loose -- pin knots -- remove them completely and fill the holes with wood plastic or water putty. Seal all knots and sap pockets with a coat of 1-pound-cut white shellac; if the shellac is completely absorbed, apply two or more coats, as needed, to seal the knots completely.

Rough edges: To correct surface roughness, sand the edge smooth. If there are low spots or gaps in an edge, fill them with wood filler or water putty and then sand the filler smooth. Square edges should be very slightly rounded before finishing; smooth and round them with fine-grit sandpaper on a sanding block. Do not plane edges; planing could splinter the wood.

Saw notches and splinters: Dull saw blades leave notches and splinters, and you're likely to find these problems anywhere the wood has been cut or joined. If the notches are very shallow, you may be able to sand them out. In most cases, you'll have to fill them with wood plastic, and then sand the filler smooth.

Now you're ready to begin the process of distressing the wood, which is covered on the next page.

Distressing Unfinished Furniture

You can simulate age by battering the entire piece of furniture lightly and evenly with a piece of 1x3 studded with flatheaded tacks.
© Publications International, Ltd.

Properly prepared and finished, unfinished furniture usually looks exactly like what it is: brand new. If you want a piece of furniture to look well worn, you can achieve the illusion of age with the technique of distressing.

Basically, distressing is adding the effects of years of wear and tear in just a few minutes. Old furniture usually has dents, dings, and worn edges; rungs may be flattened, chair seats smoothed down, or corners blunted. You can add the dents by pounding the wood, wear down the edges by rasping and sanding, and provide every appearance of long use.

Advertisement

The real trick of distressing is knowing when to stop -- what you want is a subtle effect of wear, not an obviously battered look. Distressing can be particularly effective under an antiqued finish.

General wear and tear is easy to imitate. Use the rounded end of a ball-peen hammer to make random dents in the surface. For overall battering, drive flatheaded tacks into a piece of 1x3, leaving the heads protruding slightly. Use this to pound the wood lightly and evenly. Large, shallow dents can be made with a large, smooth rock.

With any distressing tool, exercise a little restraint. If you hit the wood too hard, you'll end up with splits and splinters. Work in random strokes; don't mark the wood in any set pattern, such as rows. What you're aiming at is a general dulling or blunting of the brand-new look.

Over years of use, sharp edges gradually become rounded, and high-use spots -- chair arms or rungs, for instance -- show obvious wear. To produce this effect, round the edges of tops, drawer and cabinet fronts, and arms and legs with a medium-grit sandpaper on a block, and then sand the rounded surface smooth. On chairs, flatten the front rung slightly where you'd rest your feet against it. This rounding and flattening should be random and very gradual, with no obvious pattern; add noticeable wear only to the natural high-use spots. Absolutely even wear doesn't happen naturally, and it shouldn't be forced with distressing. Envision normal wear, and aim at this effect.

For a more elaborate or "antique" look, add decorative hardwood carvings, attached with glue or brads and stained and finished to match.
© Publications International, Ltd.

Very old furniture sometimes has worm holes, usually near a leg. Poorly faked worm holes are very obvious, but it isn't hard to make not-so-obvious fakes. To get the wormholed effect, make a few holes in strategic spots with the point of an ice pick. Drive the pick in to varying depths, so the holes are not all the same diameter and depth, and don't overdo it. A few holes can be convincing, but holes on the entire piece won't fool anybody.

When you've achieved the look -- or the degree of wear -- you want, go over the distressed wood lightly with fine-grit sandpaper. Smooth out any obvious rough edges or splinters, but be careful not to remove the marks of distressing. Then finish the piece.

Adding Decoration

Before you finish the piece of furniture, you can add decorative moldings or carvings to dress it up. This obviously isn't necessary if you like the design of the piece as it is, but if you want a more ornate look, decorations can be very effective. Decorative hardwood moldings and ready-to-finish carvings are available in many designs. Look for them at paint and hobby stores or order from a woodworking supply company. Attach wood decorations with brads or glue them into place; stain and finish them to match.

After you finish the piece, you can dress it up with new hardware -- brass hinges, china and brass drawer pulls, any type of hardware you like. Good hardware can be expensive, but it can do a lot for an otherwise undistinguished piece of furniture.

Speaking of hardware, what to you do with furniture hardware that's in need of repair. Find out on the next page.

How to Repair Furniture Hardware

Enlarged screw holes can be made smaller with wood toothpicks, glued in and trimmed flush with the surface.
© Publications International, Ltd.

The hardware on old furniture -- drawer pulls, handles, hinges, locks, protective corners, and decorative bands and escutcheons -- often shows signs of long, hard use. Sometimes hardware is missing; sometimes it's loose, broken, or bent. Loose hardware can be repaired; missing or damaged pieces should be replaced.

Replacement is also the solution if you don't like the existing hardware. In this section, we'll discuss some techniques to quickly replace or repair worn hardware on your wooden furniture so they work once more.

Advertisement

Many pieces of furniture are made with very common types of hardware; matching these basic designs is fairly simple. If the hardware is more distinctive or unusual, it may be easier to replace all the hardware than to find a matching piece; make sure the new hardware's bases are at least as large as the old.

But if the piece of furniture is very valuable or an antique, or if the hardware is very attractive, the old hardware should not be removed. In this case, missing parts should be replaced with matching or similar hardware; a slight difference in design usually doesn't look bad.

Hardware stores, home centers, and similar stores offer a fair selection of furniture hardware; specialty hardware outlets and craft suppliers are usually better sources. Search the Internet for hardware vendors. Let's get started by reviewing how to handle a common hardware problem -- loose drawer pulls and handles.

Drawer Pulls and Handles

To tighten a loosely attached drawer pull, remove the pull and replace the screw with a longer one. If the screw is part of the pull, you'll have to make the hole in the wood smaller. When the hole is only slightly enlarged, you can tighten the pull by using a hollow fiber plug with the screw. For metal pulls, fit a piece of solid-core solder into the hole and then replace the screw.

When the hole is much too big, insert wood toothpicks or thin shavings of wood, with glue applied on the outside, into the hole. Let the glue dry and carefully trim them flush with the wood surface. Then dip the pull's screw into glue, replace the pull, and tighten the screw firmly. For a more substantial repair, enlarge the hole, glue a piece of dowel into it, and drill a new screw hole.

Hinges

Hinges that don't work properly usually have bent hinge pins; in this case, replace the hinges. If the hinges are loose, try using slightly longer screws to attach them. When the screw holes are very much enlarged, adjust them by one of the methods detailed above. If the hinge leaves are damaged and the hinges cannot be replaced, glue the hinges into position with epoxy or a rubber- or silicone-base adhesive.

Locks

Locks on old pieces are often damaged, and keys are often missing. If the piece of furniture is an antique, or the lock is very unusual, have it repaired by a professional. Otherwise, remove the damaged furniture lock and take it to a locksmith; order a matching or similar lock to replace it.

Loose Metal Bands and Escutcheons

Old bands and escutcheons often have an attractive design and patina; don't replace them unless they're badly damaged. To secure a loose band or escutcheon, squeeze adhesive caulking compound under the metal, and press it down to bond it to the wood. If this doesn't work, fasten the band or escutcheon with tiny metal screws, of the same metal as the hardware. You must match the metals -- brass to brass, copper to copper, steel to steel, or whatever. If you don't match the screws to the metal plate, the metal will corrode. Use several screws, placing them to form a pattern; drill pilot holes before inserting them.

Coverup Hardware

If old hardware holes are impossible to repair, or if you want to change the look of a piece entirely, the surface can be covered with new wood or metal escutcheon plates. Escutcheons are used particularly under drawer pulls or handles; many handles are made with escutcheon-type backers.

Attach the escutcheons with adhesive or screws, matched metal to metal. If you're using escutcheon-type handles, no other treatment is necessary. If you're using an escutcheon under other hardware, drill new mounting holes as required. Keep your design simple, and try to match the style of the piece.

Armed with the tips in this article, you are now ready to tackle any refinishing project. You'll likely end up with a piece you never dreamed could look so good!