How to Varnish Furniture
Varnish, one of the toughest of the finishes, is superior to the other traditional finishes. It enhances and gives warmth to the grain of the wood and is resistant to impact, heat, abrasion, water, and alcohol. It can be used as a topcoat over worn finishes. Varnish provides a clear finish, but it darkens the wood slightly. It is available in high-gloss, semigloss or satin, and matte or flat surface finishes. There are many types to choose from, but it's important to decide on one that will work well with your furniture wood.
Types of Varnish
The traditional varnish is based on natural resins and oils and is thinned with mineral spirits or turpentine. Spar varnish is a natural varnish formulated to stay tacky; it should never be used for furniture. Synthetic varnishes are based on synthetic resins and require special thinners.
Advertisement
The best of the synthetic varnishes is the polyurethane type; polyurethanes are clear, non-yellowing, and very tough. Other synthetic varnishes are the phenolics, used for exterior and some marine work, and the alkyds, often used in colored preparations. Phenolic and alkyd varnishes yellow with age and are not recommended for refinishing.
With any type of varnish, look for quick drying to minimize dust problems. Use spray varnish only where brushing is impractical, such as on wicker or rattan.
Water-base varnishes offer similar results without the cleanup hassle and toxicity. Most dry clear to the touch in 15 to 30 minutes. They don't crack, chip, or bubble, and they are water- and alcohol-resistant. Best of all, these varnishes do not yellow. However, when applied in several coats, the finish might begin to cloud, depending on the wood.
Special Requirements
Natural varnish can be used with any stain or filler. The sealer for natural varnish is thinned shellac or a mixture of 1 part varnish and 1 part turpentine or mineral spirits. Do not mix brands or types of varnish. Polyurethane varnish is not compatible with all stains and fillers. Before buying, read the labels to make sure you're using compatible materials. Some polyurethanes can be thinned for use as a sealer; some do not require sealers. Some sanding sealers are compatible with polyurethanes.
Water-base varnish can be used over stain and filler, provided you allow the undercoats to fully cure. This process can take up to a month. You can also apply a sealer coat of shellac between the two if you don't want to wait.
Be aware that varnish generally dries very slowly and can be difficult to apply, so it's important to know how to use this finish.
Varnish Application Techniques
Apply varnish with a new, clean, natural-bristle brush. Use only new varnish. Varnish that's been used several times may contain lumps of hardened varnish from around the sides and rim of the container. These lumps can really cause trouble. If you plan the job properly, you probably won't have enough varnish left to be wasteful. Leftover varnish can be used on parts that won't show or projects where the finish isn't critical.
Bare wood to be finished with varnish must be properly prepared, and sanded. (For guidelines on sanding, click here.) Finished wood to be top-coated must be cleaned and lightly sanded. Immediately before applying the varnish, clean each surface thoroughly with a tack cloth.
It's much easier to apply varnish to horizontal surfaces than vertical surfaces. Before you start to work, turn the piece of furniture so that its major surfaces are horizontal. If the piece has drawers, doors, shelving, and other removable parts, take them out or off and finish them horizontally. Work on only one surface at a time, and work on large surfaces last.
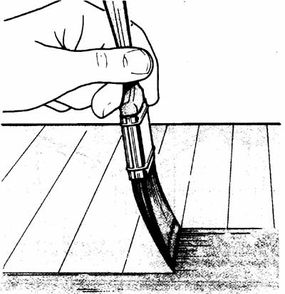
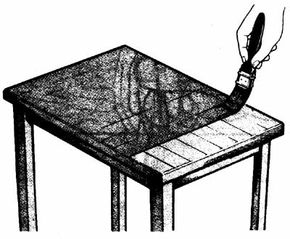
Apply varnish to the prepared wood with long, smooth, even strokes, laying the varnish along the grain in strips the width of the brush. Do not touch the brush to the rim of the varnish container; shake or tap off excess varnish inside the container or on a strike can. The varnish should flow onto the surface of the wood, with no drag. If the brush starts to pull or if you see small missed or thin spots, add about 1 ounce of thinner to the varnish.
For natural varnish, use turpentine or mineral spirits. For polyurethane varnish, use the thinner recommended by the manufacturer. Stir the thinner gently into the varnish, being careful not to raise any bubbles.
After laying on an even coat of varnish in strips along the grain of the wood, apply more varnish in even strokes across the grain of the wood to level and even the surface. The varnish should be as even and level as possible, with no thick or thin spots, but a thin coat is better than a thick one.
Thick coats of varnish take longer to dry, and they tend to crack as the varnish ages. As you work, remove dust and lint from the wet finish with a rosin lint picker.

To finish each surface, tip off the wet varnish in the direction of the grain. Use an almost dry brush for this step. Holding the brush at a slight angle to the surface, very lightly stroke the surface of the varnish to remove brush marks and even the surface. Smooth the entire varnished surface, working in strips along the grain of the wood. As you work, pick off dust and lint with a lint picker. Any remaining brush marks will disappear as the varnish dries.
Varnish must be applied carefully to prevent thick spots. At outside corners, work from the flat surface toward the corner; lift the brush as it nears the corner and before it flips down over the edge. This prevents a buildup of varnish along the edge. At inside corners, work an inch or two away from the corner; then brush the varnish into the corner, tip it off, and leave it alone. This method prevents buildup on many flat-surface brushings.
Spots that tend to hold varnish, such as tiny potholes, should be coated just once with varnish and tipped just once with the brush. Repeated tipping will leave a bulge.
Brush lengthwise along rungs, spindles, and other turnings. On carved moldings, apply the finish to the carvings first with a fairly dry brush; then finish the flat surfaces with the tip of the brush. Finally, use a very dry brush to go over the carvings and then the flats, leveling the finish and removing any fat edges, sags, or runs. On raised panel doors, finish the panels first and then move on to the flat framing. The finish will build up at the miters in the frame where they meet the panel; remove the excess with a very dry brush, working from the corner out.
Drying and Recoating
Drying times for natural varnish average about 24 hours, but water-base varnish and polyurethanes often dry more quickly. Dampness slows drying, so it's recommended that you extend all drying times if you're applying varnish in humid or wet weather. Also, drying times are not necessarily curing times, and new varnish is easily damaged. Always let the finish dry at least 24 hours or as long as the manufacturer recommends; if possible, let it dry a couple of days or more.
Pick off lint and dust only while the surface is wet or sticky; too much interference could damage it.
Many varnishes require two or even three coats for a smooth finish -- use your own judgment, and follow the manufacturer's recommendations. Between coats of varnish, let the first coat of varnish harden or dry, as recommended by the manufacturer.
Some two-coat varnishes should be applied 10 to 15 hours from the time the first coat was applied, but in general it's best to wait at least 24 hours -- longer, if possible. When the first coat is completely dry, lightly sand the varnished wood in the direction of the grain, using grade 7/0 sandpaper on a padded sanding block. Abrade the surface evenly, but don't cut it deeply.
Clean away all sanding residue with a tack cloth, and apply the second coat of varnish the same way as you did the first. Repeat this procedure, sanding the varnished wood carefully, if a third coat of varnish is required.
In addition to varnish, another option that stands up well to heavy use is a penetrating resin finish. Check out the next section for when and how to use this type of finish.
