How to Stain Wooden Furniture

©2006 Publications International, Ltd. After stripping, examine the piece of furniture for surface and structural problems –- burns, stains, cracks, loose veneer.

Staining wooden furniture isn't just a matter of stripping off one finish and applying another. Preparing the wood takes both time and elbow grease, but it's vital to the success of your refinishing job. The finish is only as good as the preparation for it. You may end up spending more time on this step than you did on of the other furniture refinishing stages, but your results will be worth the effort.

Staining wooden furniture can be a big job, filled with the apprehension that you might ruin the piece. Hopefully, this article can give you peace of mind. In the following sections, we wiil walk you through the entire staining process -- bleaching, sanding, staining, and sealing. Let's get started with some questions you'll have to ask yourself before you begin staining.

Advertisement

First, take a good look at the piece of furniture. How has the stripping process affected it? Are the joints loose? Do burns, stains, or other blemishes still show? Are veneers loose or bubbled? Before you prepare and stain the wood, repair the damage. Any problems you ignore now will show up all too clearly later; the finish will accentuate the damage.

Second, look at the wood itself. What kind of wood is it? Is the grain open or closed? The type of wood determines the preparation -- open-grained woods should usually be filled; some woods may need special treatment. Is the piece of furniture made with more than one kind of wood? If it is, you may have to bleach or stain the less conspicuous wood -- usually the less expensive one--so that it matches the main surfaces.

Finally, look at the color and texture of the stripped wood. Is there an old stain or filler left in the wood? It should usually be bleached out. Is the color blotchy or uneven? Is one part of the furniture darker than another? Is the wood darker or lighter than you want it to be? Can you see a distinct grain pattern?

With any piece of furniture, the stain you choose will determine how the wood should be prepared. Not all finishes can be used with all sealers and fillers. Not all stains require the same amount of preparation. Before you prepare a piece of furniture for staining, make sure you're familiar with the special characteristics and requirements of the stain you plan to use. Read the ingredient and application information on the container, and follow the manufacturer's instructions and recommendations. Make sure you use compatible sealers and fillers as specified by the manufacturer and as outlined in the accompanying chart.

Think you're ready to begin? Well, before you can start staining or even sanding, you might have to do something about discolorations in the wood's surface. In the next section, you will learn the various techniques for bleaching wood.

How to Bleach Wooden Furniture

© 2006 Publications International To even blotchy areas and to lighten the wood slightly overall, apply laundry bleach full-strength along the grain of the wood over the entire surface.

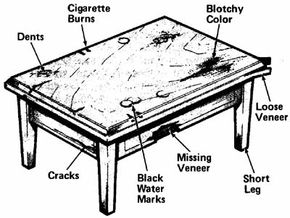
In most cases, bleaching is essentially a first-aid measure, not a routine part of refinishing. A piece of furniture should be bleached if the surface is marked by stains, black rings, or water spots; if the wood is discolored or blotchy; if the color is uneven; or if an old stain or filler is left after the finish is removed. Old filler is often a problem with oak, walnut, and mahogany. Bleaching can also be used to even the color of a piece of furniture made with two or more woods. It can lighten the darker wood to match the lighter one.

Before you use bleach on any piece of furniture, make sure the wood is suitable for bleaching. Some woods don't accept bleach well -- cherry and satinwood, for instance, should never be bleached. Some woods, such as bass, cedar, chestnut, elm, redwood, and rosewood, are very difficult to bleach, and some -- notably pine and poplar -- are so light that bleaching makes them look lifeless. Birch, maple, and walnut can be bleached, but bleaching destroys their distinctive color. And the rare woods -- mahogany, teak, and the other choice woods -- seldom benefit from bleaching. Common woods that are easy to bleach, and may benefit from it, include ash, beech, gum, and oak.

Advertisement

Choosing a Bleach

Not all bleaching jobs call for the same type of bleach. Depending on the problem you want to correct, you may need a very strong bleaching agent or a relatively mild one. Below are some common bleach options you might want to consider.

Laundry Bleach: This mild bleach can solve most refinishing color problems, from stain or filler not removed in stripping to ink stains and water spots. It works well for blotchy areas and for slight overall lightening, but it won't change the color of the wood drastically. Before you use a stronger bleach on any piece of furniture, try laundry bleach; it usually does the trick.

Oxalic Acid: Oxalic acid, sold in powder or crystal form, is used to remove black water marks from wood. It is also effective in restoring chemically darkened wood to its natural color. You're not likely to encounter this problem unless you have a piece of furniture commercially stripped because lye and ammonia, the chemicals that discolor wood, are not recommended for nonprofessional use. Oxalic acid must be used on the entire surface of the wood, because in most cases it also bleaches out old stain. You may have to bleach the entire piece of furniture to get an even color. Oxalic acid is more effective in lightening open-grained wood than close-grained.

Two-Part Bleaches: The two-part commercial wood bleaches are used to lighten or remove the natural color of wood. If you want a dark old piece to fit in with a roomful of blond furniture, this is the bleach to use. Two-part bleach is very strong and must be used carefully; wear rubber gloves and safety goggles. This type of bleach is also expensive. Several brands are available.

Bleaching Techniques

Whatever bleach you use, remember that the results are permanent -- you may be able to restain if you make the wood too light, but uneven bleaching is very hard to remedy. Make sure the wood is absolutely clean, and touch it as little as possible. The bleach must penetrate the wood evenly.

Before applying the bleach, test it on a scrap piece of the same wood or on a hidden part of the piece of furniture. Make sure you know exactly what the bleach will do and how fast. In general, bleaches act quickly on soft woods and slowly on hard woods.

Bleaching isn't difficult, but it does require some precautions -- bleaches are fairly strong chemicals. The stronger ones can damage skin, eyes, and lungs. Wear rubber gloves and safety goggles when working with bleach, and make sure your working area is well ventilated. Follow the bleach manufacturer's instructions exactly. If you get bleach on your skin, wash it off immediately.

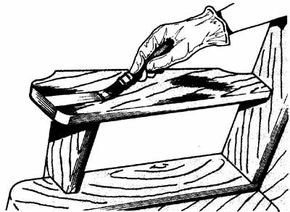
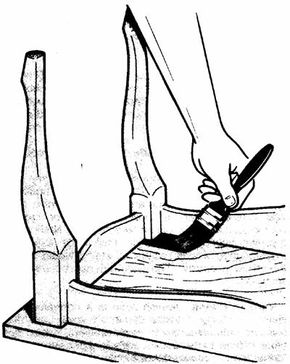
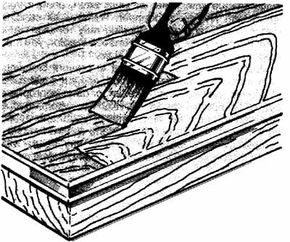
Bleaching also requires careful application and removal. With any bleach, use a synthetic-bristle brush -- the chemicals will damage natural bristles. Apply the bleach along the grain of the wood, wetting the surface evenly and thoroughly; there should be no dry spots and no puddles. Let the bleach work as detailed below.

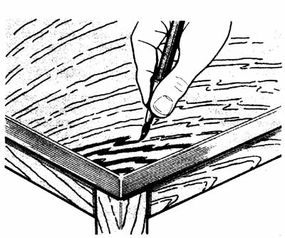
After bleaching, wipe the wood clean with a damp cloth. To remove any residue, neutralize the wood thoroughly; use an ammonia solution for oxalic acid, a borax solution for laundry bleach or two-part bleaches. Wash the bleached wood thoroughly with the appropriate neutralizer; be careful not to overwet it. Then, working quickly to prevent water damage, rinse the wood with clean water and dry it thoroughly with a soft cloth. Let the piece of furniture dry for at least two days before doing any further work on it.

Laundry Bleach

Apply laundry bleach full-strength, brushing it evenly over the entire surface. If you're removing spots or lightening discolored areas, apply bleach full-strength to those areas. Laundry bleach works quickly. After a minute or two, you should be able to see the stain fading. If you're bleaching out an old stain, wipe the bleach off with a damp cloth when the stain has lightened.

If you're spot-bleaching to remove spots or blend color areas, wait until the bleached spots are roughly the same color as the rest of the wood; then apply bleach again over the entire surface. Remove the bleach with a damp cloth when the color is even. Finally, neutralize the treated wood with a solution of 1 cup of borax dissolved in 1 quart of hot water. Neutralize, rinse with clean water, and dry it thoroughly.

Oxalic Acid

Oxalic acid is not caustic, but it is poisonous. Wear rubber gloves and safety goggles, and make sure ventilation is adequate. To prepare the acid, mix a saturated solution with warm water: 1 ounce of powder or crystals per 1 cup of warm water. Make sure you prepare enough bleach to treat the entire surface or piece of furniture.

Apply the acid solution evenly to the wood, brushing it on along the grain to cover the entire surface. On soft wood, you'll see results very quickly; on hard woods the bleaching takes longer. Let the acid work for about 20 minutes, then wipe it off with a damp cloth. If the surface isn't fully or evenly bleached, reapply the acid as necessary. On hard woods, complete bleaching may take up to an hour. Wipe the wood clean with a damp cloth, and wash it with clean water. Then neutralize it with a solution of 1 cup of household ammonia and 2 quarts of water. Rinse it again with clean water, and dry it thoroughly.

Two-Part Bleaches

Two-part bleach is easy to use, and usually works very quickly. The two components of the bleach -- labeled "1" and "2" or "A" and "B" -- are usually applied separately. Read the manufacturer's instructions and follow them exactly. The first solution is usually allowed to work for about 20 minutes before the second solution is applied.

Following the directions carefully, apply the first solution and let it work; then apply the second solution. One treatment usually bleaches the wood completely, but if the wood isn't light enough, treat it again. Wipe the bleached wood clean with a damp cloth, and then neutralize it with a solution of 1 cup of borax dissolved in 1 quart of hot water. Rinse the wood with clean water, and dry it thoroughly.

Post-Bleach Treatment

Treatment with any bleach raises the grain of the wood, even when the piece of furniture has already been thoroughly sanded. To prevent the raised grain from affecting the finish, it must be resanded to the level of the wood surface after the wood is dry.

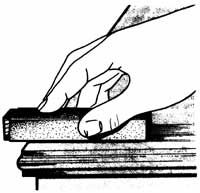
After bleaching, let the piece of furniture dry for at least two days. Then sand the grain down lightly with grade 5/0 or 6/0 sandpaper; be careful not to roughen the surface. Because there may still be some chemical residue in the wood, wear a breathing mask and use a vacuum to remove sanding dust. Wipe the wood clean with a tack cloth.

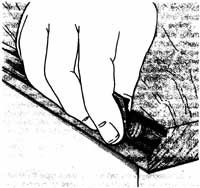
One other complication of bleaching, especially with laundry bleach, is that the wood may be left with a whitish or grayish color. This is not serious; it indicates that the bleach has dried out the fibers of the wood surface. On hard woods, it disappears when the finish is applied. On soft woods, the gray color may be pronounced and the loose fibers obvious. To remove them, rub the wood firmly along the grain with No. 000 steel wool; rub the entire bleached area, and make sure the color is even. The grayish cast will disappear completely when the finish is applied.

You're almost ready to start staining your furniture, but there's one more crucial step. Before you can apply any sort of finish to wood, you have to prepare the surface by sanding it down. In the next section, you will learn all about sanding, including how to get into those tricky, tight spaces.

How to Sand Wooden Furniture

© 2006 Publications International, Ltd. Always sand with the grain of the wood, making long, light, even strokes with a padded sanding block.

Sanding, more than any other part of refinishing, is a process that can't be rushed. It must be done by hand; power tools can damage the wood. It must be done carefully and thoroughly and always with the grain. But it's a demanding technique only in terms of time, because what it requires is chiefly patience. The care you put into sanding will determine the quality of the finish. Before you begin the work, make sure you know the basics.

Sanding Technique

The first rule of sanding is to work with the grain of the wood, because cross-grain sanding can leave permanent and very obvious scratches. The second rule is to use a sanding block, because you can't exert even sanding pressure without one.

Advertisement

For flat surfaces, the block should be padded; an unpadded block has no give, and grit caught under the sandpaper can scratch the wood as you work. For curved surfaces, your best bet is a thick piece of foam padding or sponge covered with sandpaper. The padding shapes itself to the curves, providing firm, even pressure.

Good sanding technique is easy to learn and apply. Using a sanding block, sand in long, light, even strokes along the grain of the wood. Don't press hard; too much pressure can cause gouging at the edge of the sanding block. Change the sandpaper as soon as it clogs or wears smooth.

To smooth the wood evenly and thoroughly, work with successively finer grades of sandpaper. The slight roughness left by the first sanding will be removed in the next sanding; the final sanding will remove the last traces of roughness. Start sanding with coarse-grit paper -- grade 3/0 for most woods or grade 4/0 for very soft woods, such as pine or poplar. Work up to grades 4/0, 5/0, and finally 6/0 sandpaper. Although finer-grit paper would theoretically produce a smoother surface, sanding with too fine a paper can clog the wood and interfere with finishing.

Sand the entire piece of furniture with each grade of sandpaper before moving on to the next grade. Between sandings, brush off or vacuum up all sanding debris, and then wipe the wood clean with a tack cloth. Dust or grit caught under the paper can scratch the wood. If there are tight corners you can't get at with sandpaper, use a very sharp scraper to very carefully smooth the wood in these. Scrapers can leave gouges or scratches, so use them only when sanding isn't possible.

Rungs, Rounds, and Spindles.

Narrow rungs, spindles, legs, and other round parts need special treatment. Hard sanding with coarse-grit paper, with or without a block, can flatten or deform round parts; only the minimum of wood should be removed. To sand round parts, cut narrow strips of fine-grit -- grades 5/0 and 6/0 -- sandpaper; don't use coarser grades at all.

Wrap a strip of sandpaper around the part, crosswise, and pull the ends back and forth to buff-sand the wood. Move up and down each round, changing your angle of sanding as you work to smooth the wood evenly. Be careful not to leave horizontal grooves in the wood at the edges of the sandpaper strips.

© 2006 Publications International, Ltd. On carvings, sand lightly along the grain, pressing the sandpaper into the carving. Be careful not to flatten the wood.

Carvings

Carvings, especially shallow ones, must be treated carefully. Because coarse sanding could blur the lines of the carving, use only fine-grit sandpaper, grades 5/0 and 6/0, to smooth the stripped wood; work without a sanding block. Sand lightly along the grain of the wood, pressing the paper into cutout areas with your fingertips. Sand as far down into the carving as you can, but be careful not to flatten rounded surfaces.

Crevices and Curved Edges

Sand along crevices with a strip of sandpaper creased to fit into the angle of the crevice. Sand only along the crevice, and use slow strokes; keep the pressure even.

Make sure the sandpaper doesn't slip. If you're not careful, you could damage the edges of the wood at the sides of the crevice. Sand convex curves carefully along the curve, pressing lightly with your fingers and being careful not to damage any adjoining surfaces or edges. To smooth concave curves, use a piece of dowel the same diameter as the curve. Wrap a piece of sandpaper around the dowel, and push it carefully back and forth along the curve. At the ends of the curve, be careful not to slam the dowel into any adjoining surfaces.

Veneers and Fine Patinas

If the piece of furniture you're working on is veneered, it must be treated very carefully. The usual sanding techniques could cause serious damage to the wood. The same thing is true for wood with a fine patina -- normal sanding will remove the patina. For the best results, veneers and pieces with a fine patina should be smoothed very gently.

© 2006 Publications International, Ltd. To sand a concave curve, use a piece of dowel, the same diameter as the curve, wrapped in sandpaper.

Smooth sturdy whole-surface veneers with fine-grit sandpaper, grades 5/0 and 6/0. Do not use coarser grades. On very thin veneers and wood with a patina, smoothing is best done with steel wool. The technique is essentially the same as for sanding; all you really need is patience.

Start working with No. 0 steel wool if the surface is rough, and work up to Nos. 00 and 000 for the final smoothing. If the surface is smooth, use only the finer grades of steel wool. Between grades, brush off or vacuum up all dust and steel wool debris, and then wipe the wood clean with a tack cloth.

Raising the Grain

When wood is moistened, the cells that make up the grain swell, raising the grain above the surface of the wood. Any liquid causes this reaction; even when the wood is smoothly sanded, the finish itself acts to raise the grain. To prevent the appearance of a raised grain in the finished piece of furniture, the grain should be purposely raised and then sanded down before the finish is applied after the final sanding.

The simplest grain-raiser is water. Sponge the sanded piece of furniture with cold water, soaking the wood evenly and thoroughly; then wipe off any excess. The wood must be evenly wet, with no dry spots and no puddles, or it may dry with water stains. Be especially careful not to overwet veneers; the glue that holds them may be water-soluble.

Let the wood dry completely. When it's thoroughly dry, the raised fibers of the grain will stick up stiffly above the surface. With grade 5/0 or 6/0 sandpaper, lightly smooth these raised fibers down to the surface of the wood; use No. 000 steel wool on very delicate surfaces. Be careful not to roughen the surface. Then brush off or vacuum up the sanding debris, and wipe the wood clean with a tack cloth.

Finally, you're ready to start staining, right? Not so fast. There's a great deal to know about stains before you start painting one on. In the next section, we'll help you choose the right stain for your wood.

How to Choose a Stain

© 2006 Publications International Before staining a piece of furniture, brush a little finish on an inconspicuous area to see how the finished wood looks without a stain.

Wood is a beautiful material, but not all wood is equally beautiful. The choice woods are prized chiefly for the beauty of their color and grain; the common furniture woods are less desirable not because they don't work as well but because they don't look as nice. Antiques, whether hardwood or softwood, are often beautiful simply because the wood has acquired a patina that new wood doesn't have. In furniture refinishing, one great equalizer is used to make the wood look better: stain.

Staining is done for a variety of reasons. Properly used, stain can emphasize the wood grain and give a light wood character. It can make a new wood look old or a common wood look like a rare one. It can pull together a two-wood piece, restore color to bleached areas and change or deepen the color of any wood. Staining is not always advisable, but it can solve a lot of problems.

Advertisement

Before you stain any piece of furniture, take a good look at it. If it's made of cherry, maple, mahogany, rosewood, aged pine, or any of the rare woods, the wood should probably not be stained; these woods look best in their natural color. If the wood is light, with a relatively undistinguished grain, it may benefit considerably from a stain. Beech, birch, poplar, ash, gum, and new pine are usually stained before finishing. Some woods, like oak, are attractive either stained or unstained. In general, it's better not to stain if you're not sure it would improve the wood.

The type of wood is not the only guideline for staining; your own preference should be the deciding factor. To get an idea how the piece of furniture would look unstained, test an inconspicuous spot -- on the bottom of a table, for example -- with whatever finish you plan to apply. The finish itself will darken the wood and bring out the grain. If you like the way it looks, there's no need to stain the wood. If you want a darker color or a more pronounced grain pattern, go ahead and stain it.

Once you know what type of wood you are working with, it will be easier to choose a stain that will enliven and restore the wood. There are many types to choose from.

Choosing a Stain

Several types of stains are available: wiping stains, water-base stains, varnish and sealer stains, NGR stains. Some stains are combined with a sealer, and these are usually labeled as stain/sealers. Not all are easy to use or guaranteed to give good results, so take a few minutes to plan and read the labels.

The first consideration is the finish you plan to use. Most finishes can be applied over most types of stain, but polyurethane varnish cannot be applied over some stains. If you want to use a polyurethane finish -- and this type of finish is both good-looking and very durable -- look for a stain that's compatible with polyurethane. If you can't find a compatible stain, you'll have to apply a clear penetrating resin sealer over a noncompatible stain. Varnish can be applied over this sealer if you want a shiny finish.

The second consideration in choosing a stain is the job you want it to do. The most commonly used furniture stains are based on pigments mixed in oil or turpentine, or on aniline dyes mixed in turpentine, water, alcohol, or a volatile spirit. Other types of stains include varnish stains, sealer stains, and organic stains.

Pigmented Oil Stains

The pigmented oil stains are nonpenetrating. They consist of pigments mixed in linseed oil, turpentine, mineral spirits, or a similar solvent. They are sometimes also available in gel form. They are inexpensive and easy to apply, but unless the grain of the wood is very open, they usually blur or mask the grain pattern.

These stains usually don't work well on hardwoods but can be used for slight darkening on close-grained hardwoods, such as maple. The lightening stains are pigmented oil stains. Pigmented oil stains are applied by wiping and are removed after the desired color is achieved. The intensity of the color is controlled by the length of time the stain is left on the wood. Drying time can be long, and the stain must be well sealed to prevent bleeding through the finish. The wood should also be sealed before application. The colors fade over time.

Penetrating Oil Stains

The penetrating oil stains are very popular; they consist of aniline dyes mixed with turpentine or a similar solvent. They are inexpensive and easy to apply, but they tend to penetrate unevenly. For this reason, they don't work well on hardwoods and are best used on pine and other softwoods. They can be used for slight darkening on close-grained hardwoods, such as maple.

Penetrating oil stains are applied by wiping and are removed after the desired color is achieved. The intensity of the color is controlled by the length of time the stain is left on the wood. Drying time is relatively long, and the stain must be well sealed to prevent bleeding through the finish. This stain is very hard to remove once it's dry. The colors are rich and clear, but they fade over time.

NGR (Non-Grain-Raising) Stains

The NGR stains consist of aniline dye mixed with denatured alcohol or a volatile spirit, such as methanol. They are expensive, and they can be difficult to use. Alcohol-base stains fade over time and must be sealed well to prevent bleeding; they cannot be used with shellac. Spirit-base NGR stains don't fade or bleed, and they produce a more uniform color.

Alcohol- and spirit-base NGR stains dry very quickly. Apply them with very quick, even brushing. Repeated thin applications are best to minimize overlaps. One color can be applied directly over another, but too dark a color must be bleached out. NGR stains are recommended for use on hardwoods, especially close-grained woods, where oil stains would not be absorbed properly. They should not be used on softwoods.

Varnish Stains

Varnish stain is a nonpenetrating stain, consisting of aniline dye in a varnish base. It is used by manufacturers to finish drawers, backs, and other hidden parts because it's inexpensive and no further finish is required, but it looks cheap and is generally not recommended for refinishing.

Sealer Stains

The sealer stains are nonpenetrating mixtures of dye in a varnish, shellac, or lacquer base. Two coats are usually required, and the surface must often be protected with paste wax. No further finishing is required.

Organic Stains

Several organic-base stains can be made for use on pine and other woods. The most common organic stain uses tobacco as the color, but stains can also be made from bark, roots, tea, berries, and other natural sources. These stains are interesting, but they're not recommended unless you're an accomplished refinisher.

Using the right staining techniques can save you time and help you avoid messes. We'll review the best ways to mix and apply stain in the next section.

Staining Techniques for Wooden Furniture

© 2006 Publications International Brush oil stain on with a clean brush, flowing it evenly along the grain of the wood to cover the entire surface.

Whatever type of stain you're using, the most important part of the process is getting the color you want. You may be able to buy stain in the color you want. If not, and if you have a sample of the stain color you want, take it to the paint store and have a color mixed to match. Experiment, mixing small amounts of stain and applying test batches to scrap wood, until you get the right color.

Although a wide range of stain colors is available, you can mix almost any color with two or more of the four basic shades: light oak (tan), walnut (brown), maple (yellow-orange), and mahogany (red). Most manufacturers provide mixing proportions for various effects.

Advertisement

To dull any color, add a drop or two of black. Mix small amounts of stain at first; then, starting full-strength and thinning the stain gradually with the proper solvent, test the stain on scrap wood until you have the right color. Keep track of the proportions so you'll be able to duplicate the mixture. When you like the color, test it again on a hidden part of the piece of furniture. If the piece is made of two or more woods, you may have to mix stain separately for each wood, but this is often not necessary.

When you're satisfied with the stain color, mix enough stain to treat the entire piece of furniture. Do not mix brands or types of stain, and do not change brands or types in the middle of the job. It's better to have stain left over than to run out of stain with one table leg or chair arm to go.

Whatever stain you're using, it's best to go carefully. If you're not sure the color is right, thin the stain to lighten it and apply several coats of stain until the color is as deep as you want it. Always test the stain in an inconspicuous spot, and stain the least conspicuous surfaces first. It may take longer this way to get the effect you want, but the only way to salvage a badly applied stain is to bleach it out and start over.

To prevent drip marks and uneven color, turn the piece of furniture so that the surface being stained is always horizontal. If you're working on a large piece and this isn't practical, start at the bottom and work up. Always work quickly, applying stain smoothly and evenly over the entire surface.

Pigmented or Penetrating Oil Stains

Apply pigmented or penetrating oil stain with a clean brush, flowing stain evenly along the grain of the wood. You can also use a clean cloth or sponge to apply penetrating stain. Let pigmented oil stain set for about 10 to 15 minutes, until the surface of the stain starts to turn dull, then firmly wipe off the excess stain with a clean cloth dampened with stain.

Penetrating oil stains work more quickly than pigmented ones. Wipe off the excess immediately for a light color, or let it set as long as 15 to 20 minutes for a darker color.

Oil stain can be modified to some extent if you don't like the effect. If the wood is too dark, soak a clean cloth in turpentine or mineral spirits and rub the wood firmly and evenly along the grain. This will lighten the stain but not remove it. If part of the grain is too dark, wrap a cloth around your index finger, dip it into turpentine or mineral spirits, and lightly rub the grain you want lightened. If part of the grain is too light, use an artists' brush to carefully apply more stain just to the grain.

Let the completed stain dry for about 24 hours. If the color isn't dark enough, repeat the staining procedure.

Water-base Stains

Water-base stains should be used on clean, bare wood or on new wood. Apply stain with a new brush, flowing it on quickly and evenly along the grain of the wood. Use long, smooth strokes. Try not to overlap your strokes; a double layer of stain will dry twice as dark as a single one. It's better to use several thinned coats of stain than one dark one to minimize brush overlap marks.

Water-base stain can be adjusted if you're working on relatively small surfaces. To apply water-base stain by this method, flow it onto the surface liberally; then wipe off the excess, stroking along the grain with a clean cloth. The intensity of the color is determined by the length of time the excess is left on the wood; wipe immediately for a light color or let the stain set for a darker shade. Let the completed stain dry for about 24 hours. If the color isn't dark enough, repeat the staining procedure.

© 2006 Publications International Oil stain allows some leeway for color adjustment. If part of the grain is too light, use an artists' brush to apply more stain to the lighter areas.

NGR Stains

NGR stain, either alcohol- or spirit-base, is applied like water-base stain, but this type of stain dries so quickly that it can be hard to apply. Use a medium-size new brush to apply NGR stain, flowing it on quickly and evenly along the grain of the wood. Make long, smooth, light strokes, and try not to overlap the strokes. Brush overlap marks will dry twice as dark as the rest of the stain.

To minimize overlap marks, it's better to use several thinned coats of stain than one dark one.

NGR stains cannot be adjusted and should not be applied in very humid weather. An unsatisfactory stain must be bleached out. Let the stain dry completely before finishing the wood -- about half an hour for alcohol-base stain and about one hour for methanol- or other spirit-base stain.

Lightening

Dark wood can be lightened with stain for an interesting light-dark effect. Lightening is not recommended for fine woods because it covers the natural color and grain of the wood; as a last resort, though, it can be effective. Lightening works best on open-grained wood; the effect of a lighter color is produced because the grain is filled with a light or white pigment. The lightening agent is sometimes thinned white oil-base paint, but more often it is pigmented oil stain.

Apply the oil stain as above, and let it set to achieve the desired effect. Wipe off excess stain, and let the stained wood dry completely.

Post-Stain Treatment

Any stain, even an oil-base stain, may raise the grain of the wood slightly. If necessary, remove this slight roughness when the stain is completely dry, but smooth the wood very carefully to avoid removing the stain. To smooth wood treated with oil-base stain, rub it gently with No. 000 or 0000 steel wool. To smooth wood treated with water-base or NGR stain, sand it very lightly with fine-grit sandpaper. Remove all sanding debris with a tack cloth. Sanding may remove water-base stain in spots; if the surface is uneven in color, you may have to apply another coat of stain.

To complete your post-stain treatment, you will have to apply a coat of sealer. For a full explanation of this process, move on to the next section.

How to Seal Wooden Furniture

Most stains should be sealed to prevent bleeding. After smoothing the stained wood, apply a sealer coat of thinned shellac, sanding sealer, or other appropriate sealer. Do not use shellac with NGR or water-base stains. If you plan to finish the piece with polyurethane, make sure the sealer is compatible. Let the sealed wood dry completely, then sand the surface very lightly with fine-grit sandpaper. Remove the sanding debris with a tack cloth. Like good sanding, careful sealing can make all the difference to your results in refinishing furniture.

Choosing a Sealer

The traditional sealer for shellac, lacquer, and natural varnish finishes is thinned white shellac. This basic sealer is simply a mixture of 1 part white shellac (4-pound cut) and 3 to 4 parts denatured alcohol. Shellac is suitable for most refinishing jobs, but it cannot be used with polyurethane varnish or with water or NGR (non-grain-raising) stains.

Advertisement

Where shellac cannot be used, the easiest sealer is a commercial sanding sealer. Sanding sealer dries quickly and provides a very good sanding base; it can be used with varnish, shellac, or lacquer. If you plan to finish the piece with polyurethane varnish, read the label carefully; sanding sealer may not be compatible with polyurethane. Sealing is not necessary before finishing with a penetrating resin sealer.

Under natural varnish or lacquer finishes, some professionals prefer to seal the wood with a thinned mixture of the same finish. To make a natural varnish sealer, thin the varnish with turpentine or mineral spirits to make a 50-50 mixture. To make lacquer sealer, mix lacquer and lacquer thinner in equal parts. These sealers cannot be used with shellac or with polyurethane varnish.

Polyurethane varnish demands special treatment. Read the labels carefully when you buy. Some polyurethanes can be thinned with a specific thinner; with these varnishes, the manufacturer may recommend thin varnish coats as sealers. Some polyurethanes do not require sealers. If you must seal stain or filler before polyurethane is applied, make sure the sealer is compatible with the varnish. Otherwise, use a penetrating resin sealer. This finishes the wood completely, but you can apply polyurethane over it if you want a smoother finish.

Sealing Technique

Apply the sealer with a clean brush, flowing it on evenly and quickly along the grain of the wood. Make sure all surfaces are evenly covered, and pay particular attention to any end grain. End grain that isn't properly sealed will absorb stains and finishes more deeply than the rest of the wood in a piece.

Let the sealer dry completely: about two hours for thinned white shellac, about one hour for commercial sanding sealer. Then sand the surface very lightly with fine-grit sandpaper, grade 7/0. The wood must be very smooth, but the sanding shouldn't penetrate the sealer. Remove all sanding debris with a tack cloth.

If you're applying a finish directly over sanded wood, more than one coat of sealer may be necessary to close the wood's pores completely. In this case, let the first coat of sealer dry completely before applying another coat. Very porous woods may require several coats of sealer.

Staining a piece of wooden furniture can greatly enhance its appearance and hide minor imperfections. Though preparing your piece for staining may take a little work, it will be worth it once you see that beautiful color.

© Publications International, Ltd.