How To Repair Vent Pipes
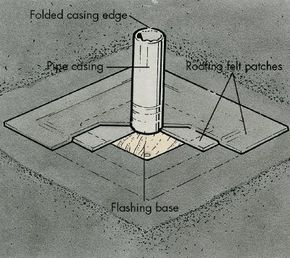
Vent pipes and appliance chimneys are sealed with metal flashing to prevent leaks, but the flashing may eventually need replacement. Pitched roof vents are usually flashed with a flat metal sheet cut to fit around the pipe and a protective collar that fits around its base. Flashing for flat roofs usually covers the entire vent, with a flat base and a pipe casing that slides on over the chimney. Replacing either type of flashing is fairly easy.
Make sure your replacement flashing is exactly the same type and diameter as the old one. Follow the roof safety procedures detailed below.
Advertisement
Caution: Wear work gloves when working with metal flashing because the edges of the flashing are sharp.
On a pitched roof, the base of the flashing is covered with shingles on the side above the chimney and left exposed on the side below it.
To reflash a vent pipe on a pitched roof:
Step 1: Remove shingles on part of roof above chimney. Lift shingles with pry bar, but be careful not to damage them, as you will have to put them back to cover new flashing. If you break a shingle, you'll need a new one to replace it.
Step 2: Remove flashing by inserting blade of pry bar under its edge, and lever bar on block of scrap wood to lift flashing.
Step 3: Lift flashing up over vent pipe, being careful not to knock pipe out of place. Then pull out any nails left around pipe, and fill holes with roof cement.
Step 4: Set new flashing over pipe, with its protective collar aligned same way as old one. Nail down flashing with 6d galvanized roofing nails, and cover nail heads with roof cement. Apply more roof cement to seal base of protective collar.
Step 5: Put shingles back over top of flashing. Starting with bottom row and working up, nail each shingle into place at top. Use two 6d galvanized roofing nails for small shingles, four nails for large ones. As you work, cover nail heads with roof cement. Slide top edges of top row of shingles under overlapping bottom edges of the row above.
To reflash a vent pipe on a flat roof:
Step 1: If there's gravel on roof, sweep it away from vent pipe to clear 4-foot-square area.
Step 2: Locate edge of flashing base, and use sharp utility knife to cut slit through roofing felt along one side of it.
Step 3: Insert blade of pry bar into slit and under edge of flashing. Lever bar over block of scrap wood, working along slit in roofing, to release flashing. Cut around remaining three sides to free flashing completely. Lift old flashing out and over pipe.
Step 4: Set new flashing on top of roof to determine how to fill hole. For each layer of roofing you can see in hole, cut patch of 15-pound roofing felt with utility knife. Use base of old flashing as pattern to cut out felt. On each piece of roofing felt, mark location of vent pipe and cut hole at that point so patch will fit snugly over pipe.
Step 5: Spread thick layer of roof cement on bottom of hole, set first patch over pipe, and press it firmly into hole. Then spread more roof cement on top. Fill entire hole this way, building up layers of roofing felt and roof cement, until top patch is level with roof surface. Spread thick layer of roof cement over top patch, and fill any gaps around vent pipe with more cement.
Step 6: Set new flashing carefully into place over vent pipe, and press it down firmly so vent pipe is encased in flashing pipe and base is aligned in exactly the same way old flashing was.
Step 7: Nail down flashing with 6d galvanized roofing nails, and cover nail heads with roof cement. Using pliers, fold top edge of casing pipe down over top edge of vent pipe to seal new flashing.
Step 8: Cover base of flashing with two more layers of roofing felt -- the first layer 3 inches larger and the second 6 inches larger all around than flashing. As you did with first patches, cut hole in center of each piece so it will fit over vent pipe. Spread another thick layer of roof cement over base of flashing, extending it 3 inches onto roof all around. Set smaller piece of roofing felt over pipe, and press it into place. Cover this piece of felt with another layer of roof cement, again extending it 3 inches onto roof all around; set larger patch into place. Press this final patch down, and nail it into place with 6d galvanized roofing nails, about 1 inch apart. Cover nail heads with roof cement.
Step 9: If you removed gravel from patch area, you can spread it back over bare spot, but this isn't necessary.
When you have a leak, you often think the roof itself is the culprit, right? Well, proper drainage via roof accessories -- gutters and downspouts -- is key to preventing water from backing up and into your home. See the next page for tips on how to keep gutters clear.
