How to Sand Wood Furniture
Sanding, more than any other part of refinishing, is a process that can't be rushed. It must be done by hand; power tools can damage the wood. It must be done carefully and thoroughly and always with the grain. But it's a demanding technique only in terms of time, because what it requires is chiefly patience. The care you put into sanding will determine the quality of the finish. Before you begin the work, make sure you know the basics.
Sanding Technique
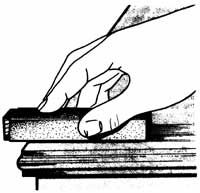
The first rule of sanding is to work with the grain of the wood, because cross-grain sanding can leave permanent and very obvious scratches. The second rule is to use a sanding block, because you can't exert even sanding pressure without one.
Advertisement
For flat surfaces, the block should be padded; an unpadded block has no give, and grit caught under the sandpaper can scratch the wood as you work. For curved surfaces, your best bet is a thick piece of foam padding or sponge covered with sandpaper. The padding shapes itself to the curves, providing firm, even pressure.
Good sanding technique is easy to learn and apply. Using a sanding block, sand in long, light, even strokes along the grain of the wood. Don't press hard; too much pressure can cause gouging at the edge of the sanding block. Change the sandpaper as soon as it clogs or wears smooth.
To smooth the wood evenly and thoroughly, work with successively finer grades of sandpaper. The slight roughness left by the first sanding will be removed in the next sanding; the final sanding will remove the last traces of roughness. Start sanding with coarse-grit paper -- grade 3/0 for most woods or grade 4/0 for very soft woods, such as pine or poplar. Work up to grades 4/0, 5/0, and finally 6/0 sandpaper. Although finer-grit paper would theoretically produce a smoother surface, sanding with too fine a paper can clog the wood and interfere with finishing.
Sand the entire piece of furniture with each grade of sandpaper before moving on to the next grade. Between sandings, brush off or vacuum up all sanding debris, and then wipe the wood clean with a tack cloth. Dust or grit caught under the paper can scratch the wood.
If there are tight corners you can't get at with sandpaper, use a very sharp scraper to very carefully smooth the wood in these. Scrapers can leave gouges or scratches, so use them only when sanding isn't possible.
Rungs, Rounds, and Spindles
Narrow rungs, spindles, legs, and other round parts need special treatment. Hard sanding with coarse-grit paper, with or without a block, can flatten or deform round parts; only the minimum of wood should be removed. To sand round parts, cut narrow strips of fine-grit -- grades 5/0 and 6/0 -- sandpaper; don't use coarser grades at all.
Wrap a strip of sandpaper around the part, crosswise, and pull the ends back and forth to buff-sand the wood. Move up and down each round, changing your angle of sanding as you work to smooth the wood evenly. Be careful not to leave horizontal grooves in the wood at the edges of the sandpaper strips.
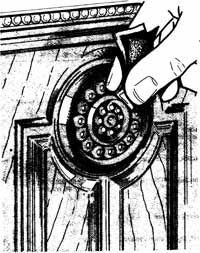
Carvings
Carvings, especially shallow ones, must be treated carefully. Because coarse sanding could blur the lines of the carving, use only fine-grit sandpaper, grades 5/0 and 6/0, to smooth the stripped wood; work without a sanding block. Sand lightly along the grain of the wood, pressing the paper into cutout areas with your fingertips. Sand as far down into the carving as you can, but be careful not to flatten rounded surfaces.
Crevices and Curved Edges
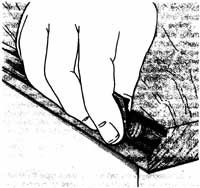
Sand along crevices with a strip of sandpaper creased to fit into the angle of the crevice. Sand only along the crevice, and use slow strokes; keep the pressure even.
Make sure the sandpaper doesn't slip. If you're not careful, you could damage the edges of the wood at the sides of the crevice. Sand convex curves carefully along the curve, pressing lightly with your fingers and being careful not to damage any adjoining surfaces or edges. To smooth concave curves, use a piece of dowel the same diameter as the curve. Wrap a piece of sandpaper around the dowel, and push it carefully back and forth along the curve. At the ends of the curve, be careful not to slam the dowel into any adjoining surfaces.
Veneers and Fine Patinas
If the piece of furniture you're working on is veneered, it must be treated very carefully. The usual sanding techniques could cause serious damage to the wood. The same thing is true for wood with a fine patina -- normal sanding will remove the patina. For the best results, veneers and pieces with a fine patina should be smoothed very gently.
Smooth sturdy whole-surface veneers with fine-grit sandpaper, grades 5/0 and 6/0. Do not use coarser grades. On very thin veneers and wood with a patina, smoothing is best done with steel wool. The technique is essentially the same as for sanding; all you really need is patience.
Start working with No. 0 steel wool if the surface is rough, and work up to Nos. 00 and 000 for the final smoothing. If the surface is smooth, use only the finer grades of steel wool. Between grades, brush off or vacuum up all dust and steel wool debris, then wipe the wood clean with a tack cloth.
Raising the Grain
When wood is moistened, the cells that make up the grain swell, raising the grain above the surface of the wood. Any liquid causes this reaction; even when the wood is smoothly sanded, the finish itself acts to raise the grain. To prevent the appearance of a raised grain in the finished piece of furniture, the grain should be purposely raised and then sanded down before the finish is applied after the final sanding.
The simplest grain-raiser is water. Sponge the sanded piece of furniture with cold water, soaking the wood evenly and thoroughly; then wipe off any excess. The wood must be evenly wet, with no dry spots and no puddles, or it may dry with water stains. Be especially careful not to overwet veneers; the glue that holds them may be water-soluble.
Let the wood dry completely. When it's thoroughly dry, the raised fibers of the grain will stick up stiffly above the surface. With grade 5/0 or 6/0 sandpaper, lightly smooth these raised fibers down to the surface of the wood; use No. 000 steel wool on very delicate surfaces. Be careful not to roughen the surface. Then brush off or vacuum up the sanding debris, and wipe the wood clean with a tack cloth.
Finally, you're ready to start staining, right? Not so fast. There's a great deal to know about stains before you start painting one on. In the next section, we'll help you choose the right stain for your wood.