How To Fix a Leaky Faucet
The first thing to do when fixing a faucet drip is to turn off the water supply. You should be able to turn off the supply at a nearby shutoff, but if your house is not equipped with shutoffs for individual fixtures, you'll have to go to the main shutoff and turn off the entire water supply to your home. What follows are ways to address a drip in a compression-type faucet.
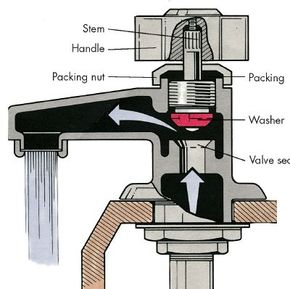
No matter what a compression-type faucet looks like, whether it has separate handles for hot and cold water or just one that operates both hot and cold, it operates according to certain basic principles. Here's how to disassemble a compression-type faucet and stop a drip:
Advertisement
Step 1: Shut off water supply, and remove faucet handle held to main body of faucet by unscrewing tiny screw on top or at back of handle. Some screws are hidden by metal or plastic button or disc that snaps out or is threaded. Once you get button out, you'll see top-mounted handle screw. If necessary, use penetrating oil, such as WD-40, to help loosen it.
Step 2: Remove handle, and look at faucet assembly. Remove packing nut with large pair of slip-joint pliers or adjustable wrench, being careful not to scar metal. Twist out stern or spindle by turning it in the same direction you would to turn on faucet.
Step 3: Remove screw that holds washer. Use penetrating oil, if necessary, to loosen screw. Examine screw and stem, replacing if damaged.
Step 4: Replace old washer with an exact replacement. Washers that almost fit will almost stop the drip. Also note whether old washer is beveled or flat, and replace it with one that is identical. Washers designed only for cold water expand greatly when they get hot, thereby closing the opening and slowing the flow of hot water. Some washers will work for either, but you should make sure the ones you buy are exact replacements.
Step 5: Fasten new washer to the stem, and reinstall assembly in faucet. Turn stem clockwise. With stem in place, put packing nut back on. Be careful not to scar metal with wrench.
Step 6: Reinstall handle and replace button or disc. Turn water supply back on, and check for leaks.
Learn what to do if the faucet valve seat is the cause of your drip on the next page.
Not what you're looking for? Try these:
- Plumbing: Tackling plumbing problems in the home can be quite daunting. Don't dismay -- the plumbing tips detailed in this article are sure to help, even if helping means advice on when to call a plumber.
- How to Fix Sinks, Tubs, and Drains: Plumbing issues related to sinks, tubs, and drains, can be fixed by the average homeowner...if you have some tips under your belt to help you identify and fix the problem. Find such tips in this article.
- Plumbing Troubleshooting: Sometimes figuring out what's wrong with your toilet, drain, or other plumbing-related area is half the battle. Find helpful troubleshooting tips here.
- Plumbing Tools: You may already have many of the tools necessary for most plumbing jobs because they are the same tools used for other do-it-yourself projects. Find out about special plumbing tools, such as pipe wrenches, in this article.
