How To Replace a Faucet
Replacing a faucet requires some work and patience. Fortunately, new faucet units are made for do-it-yourself installation with easy-to-follow instructions included. A new faucet can work wonders for the appearance of your fixtures and will also eliminate all the leaks, drips, and other problems you may have had with your old faucet.
Make sure whatever faucet unit you choose will completely cover the old faucet's mounting holes. If you have an unusual sink in your home, look for an adjustable faucet unit that is designed to fit many types of sinks. Once you select the faucet model you want, follow these steps to install it properly:Step 3: Remove old faucet assembly from sink, then clean sink around faucet mounting area.
Advertisement
Step 4: Before installing a faucet, apply plumbers' putty around its base. If gaskets are supplied with faucet for this purpose, putty is not necessary.
Step 5: If new faucet has spray hose, attach hose. Run spray hose down through its opening in faucet assembly, through its opening in sink, and up through sink's center opening. Then attach hose to supply stub on faucet.
Step 6: Install new faucet assembly into mounting holes in sink. With new faucet assembly in position, place washers and nuts on assembly's mounting studs under sink and hand-tighten them, making sure assembly is in proper position and any gaskets are correctly aligned. Then further tighten nuts with basin wrench.
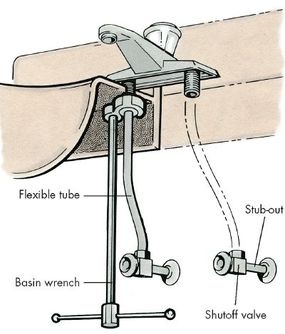
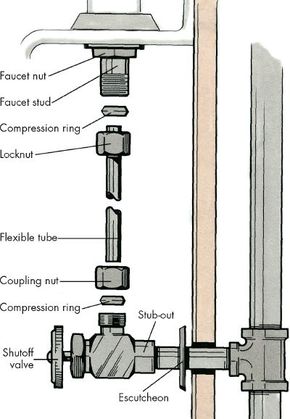
Step 7: Align and connect original water supply lines with flexible supply tubes coming from new faucet. Make sure hot water and cold water lines are connected to proper supply tubes on faucet assembly. When you attach lines, be sure to use two wrenches. One holds fitting while the other turns nut on water supply line.
Step 8: Turn on hot and cold water supplies to fixture. Run both hot and cold water full force to clear supply lines and to check fixture for leaks. If there's any evidence of leakage, go back over procedure to check for loose or improper connections.
Although bathroom faucets are similar to the ones we've just described, they can present their own distinct challenges. Read on to learn how to install various bathroom faucets.
Replacing Bathroom Faucets
Replacing a bathroom sink faucet can be done using the same procedures that were described in the previous section. One difference may be the presence of a pop-up drain plug that's connected by a linkage to a knob or plunger on the old faucet assembly. There should be one or two places in the linkage where it can be easily disconnected from the faucet before removing the original unit from the basin. Instructions provided with the new faucet will tell you exactly how to connect the new drain assembly. Be sure to reconnect the drain linkage when installing the new faucet.
Replacing a shower or tub faucet is not usually a quick fix because the connections are made behind a wall. However, there may be an access panel so you can get at the pipes without ripping the wall apart. If you have to cut into the wall and want to tackle this project, be sure to add an access panel for future pipe and faucet repairs.
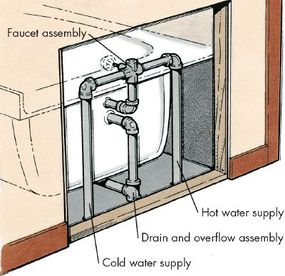
Once you get to the tub faucet connections behind the wall, the job is no harder than working on your kitchen sink. Shut off the water supply, remove the faucet handle on the tub side, then disconnect the old faucet unit from the back. If there's an old showerhead pipe, unscrew it from its pipe inside the wall; do the same thing with the tub spout. Now you're ready to install all the new parts. Follow the directions that are included with the new assembly.
Whether it's a worn O-ring or noisy pipe, your home's faucet system will need periodic repairs. But if you follow the steps we've outlined in this article, you'll be able to get these jobs done with minimal trouble.
Not what you're looking for? Try these:
- Plumbing: Tackling plumbing problems in the home can be quite daunting. Don't dismay -- the plumbing tips detailed in this article are sure to help, even if helping means advice on when to call a plumber.
- How to Fix Sinks, Tubs, and Drains: Plumbing issues related to sinks, tubs, and drains, can be fixed by the average homeowner...if you have some tips under your belt to help you identify and fix the problem. Find such tips in this article.
- Plumbing Troubleshooting: Sometimes figuring out what's wrong with your toilet, drain, or other plumbing-related area is half the battle. Find helpful troubleshooting tips here.
- Plumbing Tools: You may already have many of the tools necessary for most plumbing jobs because they are the same tools used for other do-it-yourself projects. Find out about special plumbing tools, such as pipe wrenches, in this article.