How to Arrange Flowers

Learn how to make a mixed arrangement. See more pictures of flowers.

Flowers have played a large part in our history since ancient times. Primitive man used the juices of flowers and plants to beautify his face, his body, and his cave.

The ancient inhabitants of northern Great Britain, called the Picts (picti-painted people) by the Romans, wore a blue dye made from the leaves of Isatis tinctoria (woad) with little else on formal occasions.

Advertisement

Flowers Image Gallery

Still, it was mostly for their ability to nourish and heal the spirit that man came to love flowers so dearly.

In ancient Egypt, flowers of many kinds were used for personal and household adornment on special occasions. Lotus blossoms were a favorite. Garlands of them were worn around the head and neck, carried in the hand, or draped about temples on festive occasions. Stylized lotus designs were incorporated in the capitals of columns, in jewelry, on furniture and walls.

Certain ceremonies required flowers as part of the offering to the gods, or part of the funerary equipment of any well set-up pharaoh. When the inner case of King Tut's sarcophagus was opened in 1924, a small nosegay of field flowers was found resting on his chest.

Today, even if one is not up on all of the subtle meanings of flowers, a gift of flowers provides beauty for the eye, peace for the spirit, and a warm feeling of friendship. In this article we'll teach you how to arrange flowers and use them in unusual ways.

Flower Arrangement Materials are the items you want to keep in the house to create beautiful floral displays. Learn what you should buy at the hobby store.

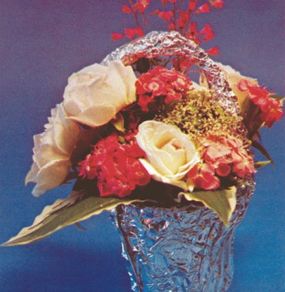
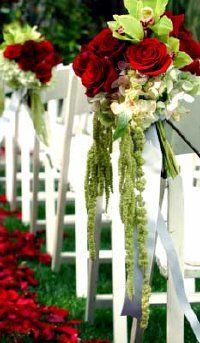
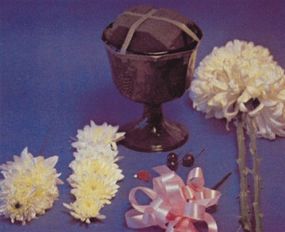
Using a Water Pick to Arrange Flowers will create a bouquet that can surprise you. Find out how to use a water pick in this section.

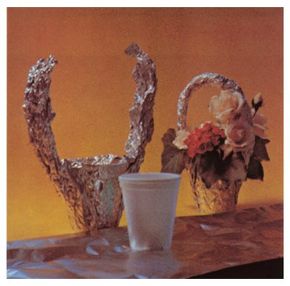
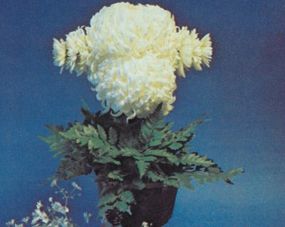
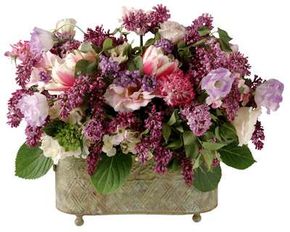
Making a Flower Foil Basket is a satisfying task that creates a beautiful arrangement. We'll teach you how on this page.

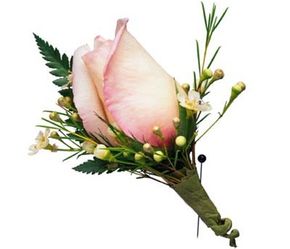
How to Make a Corsage is a skill that a budding floral designer cannot be without. We'll show you all of the steps in this section.

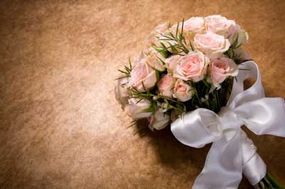
How to Make a Bouquet might seem challenging, but is a fun way to prepare for a wedding. Learn from these step-by-step instructions.

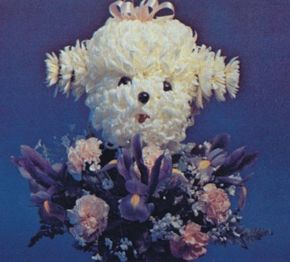
How to Make a Floral Pet Poodle is an amusing way to surprise the pet lover in your life. See how easy it is to create this adorable arrangement using these guidelines.

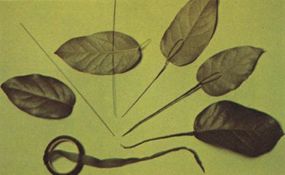
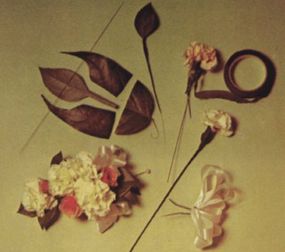
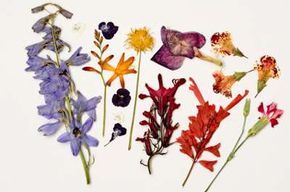
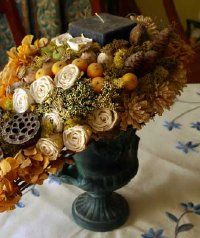
Using Dry Plants in Flower Arrangements can add interesting dimension and texture. We'll show you how to beautifully incorporate these materials into your arrangement in this section.

The Significance of Flowers can help you to send the right message with your flower arrangement. Learn about the meaning of various flowers and foliage plants in this section.

Ready to stop and smell the roses? Learn which materials you need for floral arrangement in the next section.

Inspired by cut flowers? To learn more about gardening, see:

Making a Flower Arrangement

Place one type of flower into a favorite container for an informal arrangement.

There are all kinds of flowers: certified bought-from-a-florist flowers, gathered-from-the-garden flowers, borrowed-from-a-neighbor flowers, and collected-at-the-roadside flowers.

But no matter what kind of flower you choose, or where you find it, each flower has its own individual characteristics, its own personality. Like people, some kinds of flowers get along better together than others. To know which ones get along best, you'll first need to get acquainted with flowers as individuals or families.

Advertisement

A good place to begin learning the art of flower arranging is to choose a single flower in season and let it direct you. Put it in a bottle or glass with a few sprigs of green. Enjoy its solitary shape, its color. Learn from it. A mass of flowers gives you a decoration; a single flower gives you an education.

A few flowers will arrange themselves informally in any narrow-necked container that holds water. Try to select fresh plant material at various stages of development, from bud to bloom, so that you can watch the buds unfold and blooms mature.

As long as the stems can reach the water and the flowers can keep their heads above it, these spontaneous arrangements will survive as beautifully as the most elaborate floral creations.

Once the flowers have taught you about themselves, you'll want to relate to them in your own personal way by creating arrangements. Putting flowers together attractively is a satisfying, creative experience. Beauty lasts only as long as the memory will hold it, but the opportunities to create again are never-ending.

Creating a beautiful arrangement of flowers is also one of the nicest things you can do for yourself or for a friend. With a little knowledge of the fundamentals, you can do it.

While you're learning, don't try too hard to be artistic. Ornate, self-conscious arrangements may detract from the natural beauty of the flowers, and struggling to make them may spoil your fun.

Before you begin, survey the world around you with open eyes and an

open mind to see what it offers you in the way of containers and plant material. As you make your selections it is wise to keep in mind where and how the arrangement will be used.

If the arrangement is for your own home, consider the color and mood of the room where it will be used as well as the space available. A small bowl of daisies will look lovely on the coffee table but lonely on a long buffet. A tall arrangement of irises will cheer a dark foyer but hinder conversation at the dinner table.

Remember, too, that flower arrangements for a special event are best prepared a day ahead of time so that the plant materials can develop that settled, comfortable look. Perhaps they will be your inspiration as you complete the preparations for your party.

When arranging flowers for a gift, consider the spirit of the occasion and to whom it will be sent. An arrangement of sweetheart roses and baby's breath might not be the thing to send for the opening of an engineering office; a new mother might be overwhelmed with an arrangement containing two dozen glads.

When in doubt, one kind and color of flowers is usually safe. A simple arrangement of white flowers is appropriate for most occasions -- but some people associate white with funerals.

What you will need:

Like any other creative project, arranging flowers is easier if all the necessary materials have been gathered together before you start. Since flowers are so perishable, the more quickly and efficiently each step is performed, and the less the materials are handled, the longer the flowers -- and your handiwork -- will last.

  • Plant material, cut and conditioned
  • Clean container
  • Floral foam
  • Floral tape
  • Preservative solution
  • Knife
  • A pointed tool such as a an ice pick, awl, or pencil
  • Clear working surface spread with newspapers to speed cleanup

How to arrange flowers:

Step One: Using the knife, cut floral foam to fit the container. Leave enough open space inside the container to allow you to add water without spilling.

Step Two: Soak foam in preservative solution.

Step Three: Set the wet foam in the container and tape it down if the arrangement will be a heavy one or if it is to be transported somewhere.

Tape floral foam into the container.

Step Four: Cover the foam and edges of the container with greens.

Cover with greens.

Step Five: Working with one type of flower at a time, arrange a circle of flowers around the edge of the container. Stems should glide easily into wet foam. If they don't, poke holes in the foam with a pointed tool. Holes should be just big enough to admit stems. Foam will not support stems if the holes are too big.

Arrange a circle of flowers around the edges.

Step Six: Insert a few more flowers in the center, trying to achieve a domed effect that looks like daisies growing on a hill.

Step Seven: Repeat steps five and six with additional colors or kinds of flowers, one at a time, to create an even distribution of color and flower shapes.

Step Eight: Add small-flowered filler or greens between principal flowers.This step is important to making the best use of every flower in the bouquet. It keeps the blooms separated so they don't crush one another, helps provide good air circulation to keep blooms fresh longer, and helps create the illusion of many flowers where there are only a few.

Step Nine: Fill the container with preservative solution.

Get one step closer to become a flower arranging pro. In the next section, learn about the other kinds of materials used in flower arranging.

Inspired by cut flowers? To learn more about gardening, see:

Flower Arrangement Materials

Floral foam makes a domed effect easy to produce.

To some people, making a flower arrangement without floral foam and waterproof, stretchable floral tape is like trying to cook a gourmet meal over a campfire rather than a modern range.

Still, for those emergencies when floral foam and floral tape are not on hand, other materials can do the job. There may even be times when some of these other materials are more desirable than floral foam and floral tape.

Advertisement

Chicken wire, pinholders, frogs, and Japanese fork sticks were used in flower arranging long before floral foam was invented. These still are handy to have around for use with or without floral foam. Chicken wire is especially helpful when used over floral foam to give extra support to heavy flowers like birds of paradise.

Twigs and clippings from evergreen shrubbery also were commonly used in the past. The problem, though, with such organic materials is that they decompose, spoiling the water, which then clogs up the conducting tubes of fresh plant material. Furthermore, certain evergreens -- arbor vitae is one of them -- give off ethylene, which hastens the aging and decay of fresh flowers.

Should you find yourself the happy, but surprised, recipient of a bouquet of flowers and have no floral foam with which to make an arrangement, look around the house for possible substitutions.

Plastic containers, cut-off milk cartons, Styrofoam cups, or plastic egg cartons can be poked with holes and turned upside down in a container. Plastic berry baskets turned upside down also might do the trick. A potato poked with holes will support plant stems and also ballast the container. Marbles, gravel, or sand might work, although dust from the latter two might clog the stems.

In a pinch almost any kind of tape you have around the house will hold floral foam or other anchoring material in place. Narrow strips of electrical tape, masking tape, adhesive tape, freezer tape, or any waterproof vinyl tape will do. Cellophane tape is not a good choice. It is brittle and is easily loosened by moisture. Try wire or string instead.

Foil and Floral Foam

With a little imagination, flowers can be used almost anywhere. An easy way to use flowers or foliage in unexpected, unconventional places is to use foil and floral foam. Foil-covered floral foam is ideal when you don't want water to spill or leak.

Almost anything can become a container with foil and foam.

Arrangements in odd-shaped containers, such as an old shoe or a straw hat, or even arrangements in a non-container, such a combination of flowers and foliage with a pile of fruit on a tray, are easy with foil-covered floral foam.

A wicker basket filled with cuttings and a few flowers travels easily and can be attractive anywhere. Floral foam can be cut to fit any container. Then, the floral foam can be covered with foil to keep the water where you want it -- with the flowers. If you pull the sides of the foil away from the floral foam in a couple of spots, it will be easier to add water.

If flowers are short-stemmed, you can add height to your arrangement by inserting the short flowers into hollow stems such as those of a gladiolus or day lily, which are then inserted into the floral foam. By arranging the other flowers and foliage carefully, the joint won't show.

Fun flower arrangements, without fretting, are possible when using foil and floral foam.

Cuttings That "Bloom"

Fresh flowers also are a delightful way to perk up cuttings from your plants, making them pleasing decorative accents while they are rooting.

Short-stemmed flowers from your garden or a retailer, or leftover flowers from a bouquet can simply be placed with cuttings in a glass of water or a bud vase.

Floral foam also is excellent for this purpose. It works especially well with ivy, pachysandra, and sedums, as well as common indoor plant material such as coleus, Swedish ivy, and Wandering Jew.

When using floral foam for bouquets of cuttings and flowers, the same preservative that helps keep the flowers fresh also provides some protection against bacteria for the cuttings.

Once they have rooted, cuttings can be gently pulled from the foam or the foam can be broken apart to free the roots. If the roots have grown deeply into the foam, break away as much as possible and then pot up the remaining foam with the cutting.

Ready to try a new flower arranging technique? In the next section, learn about using a water pick to arrange flowers.

Inspired by cut flowers? To learn more about gardening, see:

Using a Water Pick to Arrange Flowers

Foliage plants grow orchids? Yes, with a water pick.

A water pick is a plastic container with a pointed end that can be stuck into the soil in a planter or into the straw or moss in a wreath. Water picks are filled with water and the top is covered with a tight fitting, rubber cap that has a hole in the center through which the flower stem or stems can be inserted.

Water picks also can be used to keep flowers fresh when you want to put them on trees, hats, or packages. When you want to put flowers in an arrangement beyond the reach of their natural stems, water picks can be taped or wired to the ends of long sticks.

Advertisement

A very large water pick or cone, filled with water, set in the top of a huge arrangement, makes it possible to add flowers for height and for a full top. Water picks also allow you to add a little extra something to a plant or a planter being sent for a special occasion.

Since indoor plants usually are selected for their foliage rather than for their flowers, a water pick makes it possible for plants to make a spectacular first impression.

An orchid in a water pick.

Stick an orchid into a planter sent to celebrate a housewarming. Add some baby's breath and a sweetheart rose in a wicker basket planted with ivy for a new mother, or add a couple of daisies to the desk plant of someone returning to the office after vacation.

Now that you've learned about flower arranging, it's time to create your very own container. See the next section for instructions on making a flower foil basket.

Inspired by cut flowers? To learn more about gardening, see:

Making a Flower Foil Basket

A Styrofoam cup holds water for foil baskets.

A great pleasure in life is sharing flowers -- flowers from the garden or the florist, or a combination of the two. The container is not as important as the thought, although the container sometimes can overwhelm the flowers.

For May Day or any day, a small basket of flowers hung secretly on a door can give a friend something pleasant to think about for the rest of the day.

Advertisement

A simple container can be made from a sheet of aluminum foil and a recycled Styrofoam cup. Place a Styrofoam cup on a sheet of foil about two and one-half feet long. Then, turn the foil up on each side of the cup and tuck it in.

To form a handle, partially crush the long ends and slip one end into the other. Then, squeeze the ends tightly together. Pieces of evergreens or other greenery can be stuck in the basket to support the flowers.

Foil baskets of flowers make lovely gifts.

This is a charming way to use short-stemmed flowers or to send the ends of a large arrangement off on a last fling.

In the next section, learn the art of creating one of the most popular kinds of arrangements. Read our step-by-step instructions for making corsages.

Inspired by cut flowers? To learn more about gardening, see:

How to Make a Corsage

A single flower can be the center of a beautiful corsage.

Many different materials can be used for making corsages. Purchased material can be mixed with flowers and foliage from your garden or indoor plants.

The flowers should be bright and fresh and the greens should have a good color and substance. Make sure that the flowers and the greens have been conditioned by cutting the ends of the stems and putting them in a deep container of tepid water until they have taken up as much water as possible. This should be done at least three hours before working with the material.

Advertisement

What you will need:

  • Flowers
  • Greens
  • Wire (No. 24 wire is a good weight, but No. 28 is better for more delicate flowers)
  • Floral tape (1/2-inch wide for wrapping the stems and wires; it can be green, brown, or a harmonizing color)
  • Ribbon (1/2-inch wide in a harmonizing or contrasting color to finish off the corsage or fill holes in the design)
  • Large-headed corsage pins.

Steps in making a corsage:

Step One: Wire each blossom and each leaf separately, this makes the corsage easier to arrange. Wire blossoms either by sticking the wire through the calyx, the thick green part right underneath the flower, or by poking a wire through the center of the flower.

Leaves of corsages should be wired individually.

On stiff-stemmed flowers, leave one-half to three-quarters of an inch of the stem. With flowers like daisies, push a wire up through the center of the flower, bend the top into a hook, and pull it back into the blossom. If some flowers, such as carnations, are too large, they can be split and each part treated as an individual blossom.

Also, if a leaf is too large, a smaller leaf can be cut from the tip end. It is also possible to create flowers by combining several leaves.

In the '50s, "glamelias" were constructed from gladiolus and rosebuds; a rosebud or gladiolus bud was inserted into a gladiolus blossom and served up with a lot of ribbon. These corsages were even more popular than orchids.

Step Two: Individual leaves are wired by slipping the wire through the base of the leaf and wrapping it down the stem.

Step Three: After you have wired the flowers and the leaves, wrap them with tape. Start wrapping next to the blossom or leaf base.

Step Four: Combine the leaves and the flowers into a corsage. Tie the parts together with wire or tape. Cut the wrapped wire stems and either leave them straight or curl the ends. Add a bow, if desired, and a couple of large-headed corsage pins.

Assembled materials are combined to create a completed corsage.

Step Five: To protect the flowers and cut down on moisture loss until it is time to wear them, put the corsages in closed plastic bags in the refrigerator.

Ready to take the next big step? In the following section, learn how to make a bouquet.

Inspired by cut flowers? To learn more about gardening, see:

How to Make a Bouquet

Learn how to make regal cascading bouquets.

Bouquets are large corsages or wired flower arrangements designed to be carried. The construction principles are the same as those used in corsages.

The flowers -- or sometimes groups of flowers such as rosebuds and gypsophila -- and foliage are wired individually and then combined into a nosegay or a cascading bouquet.

Advertisement

After wiring the individual parts, the bouquet is arranged in the hand and then a wire is twisted around all the individual wires to hold them together.

After the wires are trimmed off and all the loose ends are smoothed down, the wire handle is bent so the bouquet can be carried comfortably. Then, the whole stem or handle is wrapped with ribbon.

Making a Bow

For a simple bow (two loops and two ends), cut the material a bit longer than three times the desired length of the bow. Fold the ribbon into thirds, loop the wire or string around the center of the ribbon, and wrap it tight. Pull the bow to shape and trim the ends.

For a fancy, 12-loop bow, you will need about three feet of half-inch ribbon. Fold the ribbon into three-inch lengths, loop the wire or string around the center, and pull tight.

A bow adds a lovely touch to bouquets and nosegays.

Shape the loops and trim the ends. Depending on the size, the bow can be used on a corsage or to decorate a large arrangement. If you are going to use a bow in an arrangement, wire it to a stake so you can put the bow anywhere you wish.

Ready for something different? In the next section, learn how to make a floral pet poodle.

Inspired by cut flowers? To learn more about gardening, see:

How to Make a Floral Pet Poodle

This poky pet poodle is adorable. And you don't have  to walk him, either.

The fanciful floral pet poodle shown here is not hard to make.

Materials needed:

Some materials needed to make a floral pet poodle.
  • For head: 2 large standard mums (1 for top of head and 1 for face)
  • For ears: 10 pompon mums (5 for each ear, decreasing in size to tapered tips)
  • For eyes and nose: 3 large, black, artificial grapes strung on wires or pieces of black felt on pins
  • For tongue: 1 piece of red felt cut to size attached to a wire or pin
  • For bow for top of head: 2 to 3 feet of half-inch ribbon made into a bow and wired on a wooden pick
  • For container: tape, wire, floral foam, greens, and flowers to finish off the arrangement

To construct: Tape the floral foam to the container. Be sure you have room to add water. Add water.

Advertisement

Wire the two large mums together so one mum is the top of the head and the other is the face of the poodle. Make the ears by bending a piece of wire into a U and running it through the smallest of the small mums.

Then slip it through the four increasingly larger mums. Repeat the process to make the second ear. Wire the ears to the head. Insert the head into the floral foam.

Two large mums create the poodle's head. Ears are small mums wired together.

Add greens to cover the floral foam and to hide the back of the poodle's neck. Add the eyes, nose, tongue, and bow. Arrange flowers on the base.

Looking for more professional flower arranging tips? In the next section, learn how to use dry plants in flower arrangements.

Inspired by cut flowers? To learn more about gardening, see:

Using Dry Plants in Flower Arrangements

Learn how dry plants and flowers can spruce up any type of arrangement.

Look around at weeds, seeds, cones, and twigs. Collect dried plant material with interesting colors, shapes, and textures. Driftwood from the beach, or seedpods from the flower garden or roadside can make semi-permanent, natural arrangements for dark or drafty places where live plants and flowers have a hard time.

Small flowered plant materials such as baby's breath, statice, and yarrow can often be dried by collecting them in small bunches and hanging them in a dry place for several days to several weeks.

Advertisement

Large flowered material can often be preserved by providing support while the moisture evaporates. In the old days, this was done by using clean, dry sand or borax. Now, specially formulated preserving compounds, such as silica gel, are available in craft shops, chain stores, or flower shops.

When preserving or drying flowers, the idea is to remove moisture while supporting the flower to keep as much of the original texture and shape as possible. Flowers should be preserved when they are at their peak or before, not after they have started their decline.

Drying time depends on the flower, its size, and the amount of humidity in the air. Three days is about average. Some small, light flowers can dry in a couple of days, and some heavy, moisture-filled blossoms can take a week.

Do not waste your time trying to preserve a dead or wilted flower. If you are cutting outdoor material, make sure it is dry. For maximum success, everything you use should be as dry as possible.

Dried arrangements can make lovely decorations.

Dried materials can also be purchased. Some are natural plant materials collected in other parts of the world, and some are "make-believe" flowers constructed out of several natural materials.

Dried natural materials combine beautifully. Dyed materials have to be used much more skillfully. The easiest dried flower arrangements are made by inserting the "flowers" into a cloud of baby's breath or some other light, fill material. For more formal arrangements, wires can be inserted in to Styrofoam and bent to the desired shapes.

Dry material can also be very effective inserted into straw wreaths from chain stores or florist shops. These wreaths can be finished all at once, or they can be developed gradually as you add material collected from vacation trips, friends' gardens, or other pleasant places.

Dried flower arrangements are long lasting and are not only an attractive addition to your decor but also can bring back memories of happy times and places.

Success in drying flowers depends on many variables and is a matter of practice and experimentation. When flowers dry, their colors often change. Reds can turn almost black or fade to rose. Some oranges turn rose or red while others keep their color. Many whites turn ivory-cream while some keep their original color. Many blues turn lavender or just fade to a lighter shade of blue.

Want to send flowers but not the wrong message? Learn about the significance of flowers in the next section.

Inspired by cut flowers? To learn more about gardening, see:

The Significance of Flowers

Roses can have different meanings.

Flowers can say love, console in sorrow, congratulate in achievement, and celebrate friendship. Flower messages have varied tremendously through the ages. The same flower has meant different things at different times and in different places.

The Chinese and Japanese have a long established language of flowers. Flowers helped the people of ancient Egypt, Greece, and Rome express their feelings. In the West, Charles XII introduced the language of flowers when he returned from exile in Turkey in 1714.

Advertisement

The use of flower talk was promoted by Lady Mary Worley Montague whose husband was appointed Ambassador to Constantinople in 1710. (This is the same Lady Mary who was responsible for introducing the smallpox vaccination.)

By 1884, when Kate Greenaway illustrated a language of flowers for children, so many different dictionaries were in print that it was almost necessary to send one along with the nosegay or tussy-mussy to make sure the message was clear.

Even today, it is safer to send along your own written translation when sending a floral message to avoid misunderstandings. The following dictionary is compiled from a selection of ancient and modern sources.

Flower Dictionary

AGAPANTHUS: Love

ALLIUM: Strength and courage (garlic is even stronger)

ANTHURIUM: Let's be sweethearts

ASTER: Elegance and daintiness; jealousy; I will consider your offer

BABY'S BREATH: Innocence; a delicate touch

BACHELOR BUTTON: Hope in love; celibacy

BANKSIA: Down under; absence makes the heart grow fonder

BELLS OF IRELAND: Improve with age; send money (shell out the green)

BIRD OF PARADISE: Magnificence; regal splendor; good fortune

CALLA LILY: Magnificent beauty

CARNATION: Red -- admiration; alas for my poor heart. White -- good luck; pure and ardent love. Yellow -- rejection and disdain. Striped --refusal. Pink -- mother's love

DAISY: Innocence; gentleness; purity in thought; loyal love; I partake your sentiments

DELPHINIUM: Fun; I had a good time; big-hearted

EREMURUS: Fortitude in adversity; endurance; constancy

EUPHORBIA: Strength of character; persistence

FEVERFEW: Innocence; speedy recovery

FREESIA: Elegance; I appreciate your thoughtfulness

GARDENIA: I love you in secret; good luck

GINGER: Strength and vigor

GLADIOLUS: You pierce my heart; admiration; consolation in sorrow

IRIS: Message and promise; faith and hope; wisdom and power; my compliments; good luck

IXIA: Bright and cheerful; you have beautiful eyes

LILY OF THE VALLEY: Return of happiness; purity and humility; let's make up

MUMS: Cheerfulness and optimism; long life and happiness; scholarship; rest and ease. Red -- I love you. White -- it's the truth

ORCHIDS: Magnificent; you are beautiful; I await your favors; fecundity; long life; good luck

PEONY: Good health; gay life and prosperity; love and friendship; happy marriage; bashfulness; power

ROSE: Love; silence (in ancient times, anything said under a rose -- sub rosa -- was to be kept secret); dinner time. Red -- love and desire; good luck; may you be pleased. Pink -- unconscious beauty. Yellow -- jealousy. White -- happy love; secrecy and silence; good luck

SNAPDRAGON: Desperation

STATICE: Constancy; always yours; social prominence; success

STEPHANOTIS: Fit for a crown; something special

STOCK: Bonds of affection

SWEET PEA: Departure; goodbye

SWEET WILLIAM: Gallantry; fineness and perfection; a smile

YARROW: Time will ease your sorrow

Foliage Dictionary

ASPARAGUS FERN: Fascination

BROOM: Ardor; humility

CAMELLIA: I shall love you always; good luck; unpretending excellence

CROTON: Congratulations

HUCKLEBERRY: Simple pleasures; come to dinner

LEATHERLEAF FERN: Fascination

LYCOPODIUM: Long life; eternal youth; good luck

MYRTLE: Love; mirth; joy; happy marriage

PITTOSPORUM: Generosity; happiness and prosperity

PODOCARPUS: Constancy; sorrow

SALAL: Zest; discretion; married love

TI: Bundle; gift

Inspired by cut flowers? To learn more about gardening, see: