Making a Flower Arrangement
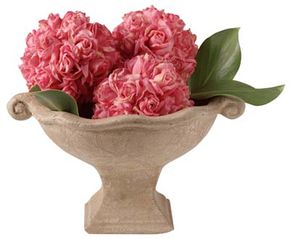
There are all kinds of flowers: certified bought-from-a-florist flowers, gathered-from-the-garden flowers, borrowed-from-a-neighbor flowers, and collected-at-the-roadside flowers.
But no matter what kind of flower you choose, or where you find it, each flower has its own individual characteristics, its own personality. Like people, some kinds of flowers get along better together than others. To know which ones get along best, you'll first need to get acquainted with flowers as individuals or families.
Advertisement
A good place to begin learning the art of flower arranging is to choose a single flower in season and let it direct you. Put it in a bottle or glass with a few sprigs of green. Enjoy its solitary shape, its color. Learn from it. A mass of flowers gives you a decoration; a single flower gives you an education.
A few flowers will arrange themselves informally in any narrow-necked container that holds water. Try to select fresh plant material at various stages of development, from bud to bloom, so that you can watch the buds unfold and blooms mature.
As long as the stems can reach the water and the flowers can keep their heads above it, these spontaneous arrangements will survive as beautifully as the most elaborate floral creations.
Once the flowers have taught you about themselves, you'll want to relate to them in your own personal way by creating arrangements. Putting flowers together attractively is a satisfying, creative experience. Beauty lasts only as long as the memory will hold it, but the opportunities to create again are never-ending.
Creating a beautiful arrangement of flowers is also one of the nicest things you can do for yourself or for a friend. With a little knowledge of the fundamentals, you can do it.
While you're learning, don't try too hard to be artistic. Ornate, self-conscious arrangements may detract from the natural beauty of the flowers, and struggling to make them may spoil your fun.
Before you begin, survey the world around you with open eyes and an
open mind to see what it offers you in the way of containers and plant material. As you make your selections it is wise to keep in mind where and how the arrangement will be used.
If the arrangement is for your own home, consider the color and mood of the room where it will be used as well as the space available. A small bowl of daisies will look lovely on the coffee table but lonely on a long buffet. A tall arrangement of irises will cheer a dark foyer but hinder conversation at the dinner table.
Remember, too, that flower arrangements for a special event are best prepared a day ahead of time so that the plant materials can develop that settled, comfortable look. Perhaps they will be your inspiration as you complete the preparations for your party.
When arranging flowers for a gift, consider the spirit of the occasion and to whom it will be sent. An arrangement of sweetheart roses and baby's breath might not be the thing to send for the opening of an engineering office; a new mother might be overwhelmed with an arrangement containing two dozen glads.
When in doubt, one kind and color of flowers is usually safe. A simple arrangement of white flowers is appropriate for most occasions -- but some people associate white with funerals.
What you will need:
Like any other creative project, arranging flowers is easier if all the necessary materials have been gathered together before you start. Since flowers are so perishable, the more quickly and efficiently each step is performed, and the less the materials are handled, the longer the flowers -- and your handiwork -- will last.
- Plant material, cut and conditioned
- Clean container
- Floral foam
- Floral tape
- Preservative solution
- Knife
- A pointed tool such as a an ice pick, awl, or pencil
- Clear working surface spread with newspapers to speed cleanup
How to arrange flowers:
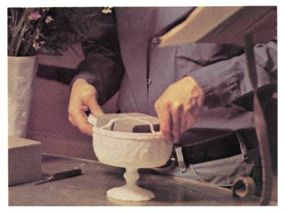
Step One: Using the knife, cut floral foam to fit the container. Leave enough open space inside the container to allow you to add water without spilling.
Step Two: Soak foam in preservative solution.
Step Three: Set the wet foam in the container and tape it down if the arrangement will be a heavy one or if it is to be transported somewhere.
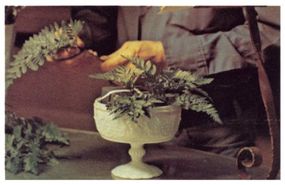
Step Four: Cover the foam and edges of the container with greens.
Step Five: Working with one type of flower at a time, arrange a circle of flowers around the edge of the container. Stems should glide easily into wet foam. If they don't, poke holes in the foam with a pointed tool. Holes should be just big enough to admit stems. Foam will not support stems if the holes are too big.
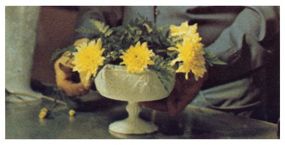
Step Six: Insert a few more flowers in the center, trying to achieve a domed effect that looks like daisies growing on a hill.
Step Seven: Repeat steps five and six with additional colors or kinds of flowers, one at a time, to create an even distribution of color and flower shapes.
Step Eight: Add small-flowered filler or greens between principal flowers.This step is important to making the best use of every flower in the bouquet. It keeps the blooms separated so they don't crush one another, helps provide good air circulation to keep blooms fresh longer, and helps create the illusion of many flowers where there are only a few.
Step Nine: Fill the container with preservative solution.
Get one step closer to become a flower arranging pro. In the next section, learn about the other kinds of materials used in flower arranging.